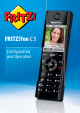
FRITZ!Fon ITZ!Fon C5 Configuration onfiguration andd Operation
Table of Contents Important Instructions . . . . . . . . . . . . . . . . . . . . . 7 Safety Instructions . . . . . . . . . . . . . . . . . . . . . . . . . . . . . . . . 7 Note for Hearing Aid Users . . . . . . . . . . . . . . . . . . . . . . . . . . 8 Prerequisites for Operating FRITZ!Fon . . . . . . . . . . . . . . . . . 8 1 FRITZ!Fon C5 at a Glance. . . . . . . . . . . . . . . . . . . . 9 1.1 1.2 1.3 Package Contents . . . . . . . . . . . . . . . . . . . . . . . . . . . . . . . . .
4 Registering with Multiple Base Stations . . . . . . 23 4.1 4.2 4.3 Registering with the 2nd, 3rd or 4th Base Station. . . . . . . 23 Switching Base Stations . . . . . . . . . . . . . . . . . . . . . . . . . . . 24 Deregistering from a Base Station . . . . . . . . . . . . . . . . . . . 24 5 Making Telephone Calls . . . . . . . . . . . . . . . . . . . 25 5.1 5.2 5.3 5.4 5.5 5.6 5.7 5.8 5.9 5.10 5.11 Function Keys for Making Telephone Calls . . . . . . . . . . . . . 25 Dialing Numbers . . . . . . . .
7 Telephone Book and Call Lists . . . . . . . . . . . . . . 35 7.1 7.2 7.3 7.4 7.5 7.6 7.7 7.8 Requirements . . . . . . . . . . . . . . . . . . . . . . . . . . . . . . . . . . . 35 Setting Up a Telephone Book in FRITZ!Box. . . . . . . . . . . . . 35 Calling a Telephone Number from the Telephone Book. . . 36 Calling a Telephone Number from the Call List . . . . . . . . . 37 Changing or Adding a Telephone Number . . . . . . . . . . . . . 37 Searching in the Telephone Book . . . . . . . . . . . . . . . . .
10 Switching the Alarm On and Off . . . . . . . . . . . . . 48 10.1 10.2 Configuring the Alarm . . . . . . . . . . . . . . . . . . . . . . . . . . . . . 48 Switching the Alarm On and Off . . . . . . . . . . . . . . . . . . . . . 49 11 Configuring the Baby Monitor . . . . . . . . . . . . . . . 50 12 Web Services . . . . . . . . . . . . . . . . . . . . . . . . . . . . 51 12.1 12.2 12.3 12.4 Receiving and Sending E-mail. . . . . . . . . . . . . . . . . . . . . . . 51 Receiving RSS Feeds . . . . . . .
16 Operating Devices in the Home Network . . . . . . 69 16.1 16.2 16.3 Switching the FRITZ!Box Wireless Network On and Off . . . 69 Switching Smart Home Devices On and Off . . . . . . . . . . . . 69 Using FRITZ!Fon as a Media Player . . . . . . . . . . . . . . . . . . . 70 17 Technical Specifications . . . . . . . . . . . . . . . . . . . 71 18 Customer Service. . . . . . . . . . . . . . . . . . . . . . . . . 72 18.1 Support from the Support Team . . . . . . . . . . . . . . . . . . . . .
Important Instructions Safety Instructions Be sure to observe the following security instructions for handling the FRITZ!Fon to protect yourself and the FRITZ!Fon from harm: • Moisture and liquids that find their way into the FRITZ!Fon can cause electric shocks or short circuits. – Only use the FRITZ!Fon indoors. – Never let liquids get inside the FRITZ!Fon. • Heat accumulation can lead to overheating of the FRITZ!Fon and subsequently damage the FRITZ!Fon. – Protect the FRITZ!Fon from direct sunlight.
Note for Hearing Aid Users If you wear a hearing aid, FRITZ!Fon can cause unpleasant noises. These are caused by radio signals coupled into the hearing aid. Prerequisites for Operating FRITZ!Fon • You need a DECT base station that is connected with a telephone landline or the Internet. • If you would like to use all of the functions offered by the FRITZ!Fon, you need a FRITZ!Box that supports DECT as your base station. The latest firmware must be installed on both devices.
FRITZ!Fon C5 at a Glance 1 FRITZ!Fon C5 at a Glance FRITZ!Fon C5 is a cordless telephone with which you can make telephone calls on the Internet and the landline network. FRITZ!Fon was developed especially for the FRITZ!Box, but can be used with other DECT base stations. Telephone calls over the Internet can be conducted with FRITZ!Fon in HD to enjoy natural sound quality. FRITZ!Fon supports DECT Eco “No Emission”.
Getting to Know the FRITZ!Fon 1.
Icons on the Display 1.
Starting Operation of the FRITZ!Fon C5 2 Starting Operation of the FRITZ!Fon C5 2.1 Starting and Registering 1. Pull the protective film downward out of the FRITZ!Fon C5. FRITZ!Fon C5 starts automatically. 2. Press the registration button on your DECT base station. Depending on the device, it is usually called the DECT or Paging button. FRITZ!Fon C5 is connected with the DECT base station and can be used immediately.
Charging the Battery 2.2 Charging the Battery 1. Connect the power supply unit to the charging station. 2. Plug the other end into a power outlet. 3. Place the FRITZ!Fon in the charging station. The battery will be charged.
Changing the Battery 2.3 Changing the Battery FRITZ!Fon C5 is supplied with electrical power by a lithium-ion battery. Once the battery has died, you can replace it yourself. Here is how to replace the FRITZ!Fon C5 battery: 1. Place a coin in the slot at the bottom of FRITZ!Fon. Rotate the coin until the battery cover pops open and take off the battery cap. 2. Insert the battery. The conductors of the battery must be in contact with the conductors in the housing.
Changing the Battery 3. Close the battery compartment.
Operating FRITZ!Fon 3 Operating FRITZ!Fon 3.1 Switching FRITZ!Fon On and Off 3.2 To switch the FRITZ!Fon on or off, press and hold the clear call key . Selecting Functions—Navigating The functions of FRITZ!Fon are operated using a menu on the display.
Opening New Messages Opening the Menu Press the Menu key . The main menu appears on the display. Selecting a Menu Item A menu item performs an action or opens a sub-menu. 1. Press the up and down navigation keys to navigate up and down in the menu. 2. Press the OK key to select a menu item. You can return to the previous menu by pressing the left Select key . 3.
Opening New Messages 3. Select a message. Press the OK key . New messages are black; messages that have already been read are gray.
Entering Numbers and Text 3.4 Entering Numbers and Text You can enter numbers and text using the FRITZ!Fon keys. Entering Numbers and Letters Press the corresponding keys to enter numbers and letters. For information about which numbers, letters and special characters are assigned to the individual keys, refer to the table. “1 x” means “press once”, “2 x” “press twice”, and so on.
Entering Numbers and Text Setting Capitalization, Lower Case Letters and Numerals Press the Menu key until the desired entry mode appears at the lower right of the display: Text Entry Mode Function Shift Capitalize next letter ABC Capitals abc Lower case 123 Numerals Abc Standard mode Moving the Cursor in the Text How to move the cursor in the text: The cursor jumps ... Press ...
Locking Keys 3.5 Locking Keys You can lock the key of your FRITZ!Fon. To lock the keys, press the and hold it down until “Keypad locked” appears on the display. To unlock the keys, press the and hold it down until “Keypad unlocked” appears on the display. When the keys are locked, you can dial and call only emergency numbers (110 and 112). You can continue to accept incoming calls when the keys are locked. To hang up a call when the keys are locked, press and hold down the end call key .
Switching Off Ringer for a Call 3.7 Switching Off Ringer for a Call To switch off the ringing of an incoming call, press the key . You can pick up the call now or wait until the caller hangs up. The next time a call arrives FRITZ!Fon will ring again. 3.8 Paging a Mislaid FRITZ!Fon If you have mislaid your FRITZ!Fon, you can have it ring: 1. Press the “DECT” or the “Find” button on your base station. FRITZ!Fon rings. 2.
Registering with Multiple Base Stations 4 Registering with Multiple Base Stations During operation FRITZ!Fon can be actively connected with only one base station. But you can register FRITZ!Fon with up to four base stations, and change the active base station quickly as needed. 4.1 Registering with the 2nd, 3rd or 4th Base Station A FRITZ!Fon that is already registered with a base station can be registered with another base station as described below: 1. Press the Menu key . 2.
Switching Base Stations 4.2 Switching Base Stations If FRITZ!Fon is registered at multiple base stations, you can switch base stations as follows: 1. Press the Menu key . 2. Select “Settings / OK / Registration / OK / Select base / OK”. 3. Select a base station and press “OK”. FRITZ!Fon connects to the selected base station. 4.3 Deregistering from a Base Station If you no longer use one of the base stations, deregister FRITZ!Fon from that base station. 1. Press the Menu key . 2.
Making Telephone Calls 5 Making Telephone Calls 5.1 Function Keys for Making Telephone Calls Hands-free calling Call list Hang up Internal connection Establishing connection / redial 5.2 Telephone book Dialing Numbers 1. Enter a telephone number. 2. Press the Connect key . You can also press and hold the connect key dial tone and then enter the desired number.
Accepting a Call 5.3 Accepting a Call To pick up a call, press one of the following keys: 5.4 • Connect key + • Press the Select key • Hands-free calling key with the “Accept” display Enabling Direct Pickup If the “Direct pickup” function is enabled, FRITZ!Fon accepts a call immediately as soon as you take FRITZ!Fon out of the charging station. 1. Press the Menu key . 2. Select “Settings / OK / Telephony / OK / Pick up directly”. 3. Press the Select key “On”. Direct pickup is enabled.
Adjusting the Volume 5.5 Adjusting the Volume The volume of a call can be adjusted during calls with the handset and hands-free calls. Using the navigation keys: Volume Press ... Louder the top navigation key Quieter the bottom navigation key Using the side buttons: Volume 5.6 Press ... Louder the top side button Quieter the bottom side button Switching on Hands-Free Calling For hands-free calling you use the microphone and speaker.
Muting the Microphone 5.7 Muting the Microphone You can switch off the microphone of the FRITZ!Fon and a connected headset. Then the other parties will no longer be able to hear you. 5.8 Press the Select key microphone. with the display “Mute”, to mute the Press the Select key microphone back on. with the display “Loud” to switch the Making Internal Calls Other telephones connected with the same base station as FRITZ!Fon can be called internally. Internal calls are free of charge.
Alternating Between Calls 5.9 Alternating Between Calls While you are on the phone you can establish a second connection and switch (alternate) between the two calls as often as desired. Requirements The following requirement must be met in order to alternate between calls: • You use a FRITZ!Box as the base station for FRITZ!Fon, or another base station that supports alternating between calls. Alternating between Calls 1. Make a call or pick up a call. 2.
Three-Party Conference Call 4. Once the second call is connected, you can alternate: Press the Select key lect “Alternate / OK”. with the display “Options” and se- You are connected to the first party again. Using “Options / Alternate / OK” you can alternate between the two calls as often as you like. 5.10 Three-Party Conference Call Three parties can confer with each other in real time in a three-party conference call.
CLIR: Calling Line Identification Restriction 3. Make the second call: Press the telephone book key “OK”. , select an entry, and press or Enter an external telephone number. or Press the left navigation key press “OK”. , select a telephone and 4. Once the second call has been connected, press Select key with the “Options” display. 5. Select “Conference / OK”. The three-party conference is set up. 5.
CLIR: Calling Line Identification Restriction Requirements The following requirement must be met in order to use the CLIR feature: • You use a FRITZ!Box as the base station for FRITZ!Fon, or another base station that supports CLIR. Enabling CLIR (Case by Case) 1. Press the Select key call / OK”. “Favorites” and select “Anonymous or Press the Menu key and select “Settings / OK / Telephony / OK / Anonymous call / OK”. 2. Press the Select key with the “On” display. The “Next call” setting is enabled.
Entering Telephone Numbers 6 Entering Telephone Numbers If you have more than one telephone number, you can assign your FRITZ!Fon telephone numbers for outgoing and incoming calls. The telephone number for outgoing calls is the one your FRITZ!Fon uses when you call someone. The telephone numbers for incoming calls are the ones at which your FRITZ!Fon can be reached. Telephone numbers are assigned to your FRITZ!Fon in the DECT base station. 6.
Selecting a Telephone Number before a Call 6.2 Selecting a Telephone Number before a Call If FRITZ!Fon is registered with a FRITZ!Box, you can select a telephone number before you place a call. If you do not select a telephone number, the number you assigned to FRITZ!Fon in the FRITZ!Box will be used. Requirements This is how FRITZ!Fon must be set up in the FRITZ!Box user interface: • For incoming calls the option “React only to the following numbers” must be enabled.
Telephone Book and Call Lists 7 Telephone Book and Call Lists On the FRITZ!Fon you can use the telephone book and the call lists of the FRITZ!Box. 7.1 Requirements The telephone book and call lists are available if the following requirement is met: • 7.2 You use a FRITZ!Box as the base station for FRITZ!Fon. Setting Up a Telephone Book in FRITZ!Box In the default setting the FRITZ!Fon uses the first telephone book of the FRITZ!Box. You can also use a different telephone book on your FRITZ!Fon.
Calling a Telephone Number from the Telephone Book 4. Set up the new telephone book. For more information on setting up the telephone book, click “Help” in the user interface. Selecting a Telephone Book in FRITZ!Fon If you have set up multiple telephone books in your FRITZ!Box, you can select a telephone book on the FRITZ!Fon. 1. Press the bottom navigation key . The telephone book is opened. 7.3 2. Press the Select key with the “Options” display. 3. Select “Change Phone Book / OK”. 4.
Calling a Telephone Number from the Call List 7.4 Calling a Telephone Number from the Call List You can make calls from the call lists: 1. Press the right navigation key and select a call list. or Press the Connect key 2. Select an entry. 3. Press the Connect key to open the redial list. . The call will be connected. 7.5 Changing or Adding a Telephone Number Telephone numbers from the telephone book and the call list can be changed or extended before dialing.
Searching in the Telephone Book 4. Select “Use” and press “OK”. If the entry has more than one telephone number, select a telephone number. The telephone number appears on the display. The cursor blinks after the last numeral. 5. Change or add to the telephone number. 6. Press the Connect key . The call will be connected. 7.6 Searching in the Telephone Book Finding and Calling a Telephone Number 1. Press the bottom navigation key . The telephone book is opened. 2.
Saving a New Telephone Book Entry Enabling the Simplified (Vanity) Telephone Book Search When you enable the simplified telephone book search, it is no longer necessary to press keys multiple times. Example: You press the “5” key, and receive all of the entries that begin with “J”, “K”, or “L”. Without the simplified telephone book search you have to press twice for “K” and three times for “L”. 1. Open the user interface of the FRITZ!Box in a web browser (http://fritz.box). 2.
Saving Numbers from the Call List 7.8 Saving Numbers from the Call List A telephone number from a call list can be saved to the telephone book: 1. Press the right navigation key and select a call list. 2. Select a telephone number. 3. Press the Select key lect “Apply”. 4. Select “New entry / OK”. 5. Enter a name. 6. Select “Home”, “Office” or “Mobile”. 7. Press the Select key with the “Options” display and se- with the “Paste” display. The telephone number from the call list is added. 8.
Answering Machine 8 Answering Machine In the FRITZ!Box you can configure an answering machine for FRITZ!Fon. If you have multiple FRITZ!Fon cordless telephones, you can set up a separate answering machine for each FRITZ!Fon. 8.1 Requirements The answering machine is available if the following prerequisite is fulfilled: • 8.2 You use a FRITZ!Box as the base station for FRITZ!Fon. Configuring an Answering Machine in FRITZ!Box 1.
Switching the Answering Machine On and Off 8.3 Switching the Answering Machine On and Off 1. Press the Menu key . 2. Select “Answering machine / OK”. 3. Press the Select key 4. Select “Settings / OK”. 5. Select an operating mode. with the “Options” display. In the “Greeting only” mode, callers cannot leave you any messages. 6. 8.4 Press the End Call key . Recording a Greeting You can use the start and end announcements on the answering machine or record your own announcements: 1.
Playing Back Messages 8.5 6. Speak the entire greeting and confirm that you have finished by clicking “OK”. 7. Select “Play / OK” to check your recording. 8. Select “Ring delay / OK”. 9. Specify how many seconds should lapse before the call is picked up and press “OK”. 10. Select “Activate / OK / Private greeting / OK”. 11. To configure an end greeting in the “With recording” operating mode, press the Select key with the “Back” display key. 12.
Picking Up a Call from the Answering Machine 3. Select “Delete / OK”. The message will be deleted. With the option “Delete all old” you can delete all messages that have been listened to already. 8.7 Picking Up a Call from the Answering Machine You can pick up calls that the answering machine has answered and accept them on your FRITZ!Fon: 8.8 1. Press the Select key 2. Select “Answer / OK”. with the “Options” display. Recording a Call You can record calls and save them on an answering machine.
Listening In as New Messages Are Recorded 8.9 Listening In as New Messages Are Recorded You can use FRITZ!Fon’s loudspeaker to listen when the answering machine records a new message. Enable the “Listen in” function: 1. Open the user interface of the FRITZ!Box in a web browser (http://fritz.box). 2. Select “DECT / Cordless Telephones”. 3. Click the “Edit” button 4. On the “Telephony Device Features” tab, enable the “Listen in on the answering machine” setting. 5. Click “OK”. for FRITZ!Fon. 8.
Configuring Call Diversion 9 Configuring Call Diversion Call diversion forwards incoming calls, for instance, to your mobile telephone. You can set up call diversion for the following calls: • For all calls to FRITZ!Fon • For all calls that come from a certain telephone number • For all anonymous calls in which the caller does not transmit a telephone number The following destinations can be defined for call diversion: 9.
Switching Call Diversion On and Off 9.2 Switching Call Diversion On and Off A call diversion setting configured for FRITZ!Fon can be switched on and off on the FRITZ!Fon. 1. Press the Menu key 2. Select “Supplementary services / OK / Call diversion / OK”. 3. Select a call diversion setting. 4. Press the Select key 5. Press the End Call key FRITZ!Fon C5 FRITZ!Fon MT-D . with the “On” or “Off” display. .
Switching the Alarm On and Off 10 Switching the Alarm On and Off If your FRITZ!Fon is registered with a FRITZ!Box, you can configure up to three different alarms. 10.1 Configuring the Alarm 1. Press the Menu key . 2. Select “Supplementary services / OK / Alarm / OK”. 3. Select an alarm. 4. Press the Select key 5. In the “New alarm time” menu, set the time for the alarm to ring and press “OK”. 6. Select your FRITZ!Fon in the “telephone” menu and press “OK”. 7.
Switching the Alarm On and Off 10.2 Switching the Alarm On and Off 1. Press the Menu key . 2. Select “Supplementary services / OK / Alarm / OK”. 3. Select an alarm. 4. Press the Select key 5. Select “Alarm on / OK” or “Alarm off / OK”. with the “Options” display. The alarm is turned on or off.
Configuring the Baby Monitor 11 Configuring the Baby Monitor If your FRITZ!Fon is registered with a FRITZ!Box, you can configure the FRITZ!Fon as a baby monitor. FRITZ!Fon will then call a specified telephone number whenever the ambient noise reaches a defined level. 1. Press the Menu key . 2. Select “Supplementary services / OK / Baby monitor / OK / Destination no. / OK”. 3. Enter a telephone number and press “OK”. or Delete all of the numerals already entered.
Web Services 12 Web Services If your FRITZ!Fon is registered with a FRITZ!Box, with FRITZ!Fon you can read and write e-mail, read RSS feeds, and listen to podcasts or web radio. 12.1 Receiving and Sending E-mail With FRITZ!Fon you can receive and send e-mail when your computer is switched off. In the FRITZ!Box you can set up up to ten e-mail accounts for this purpose. If you have more than one FRITZ!Fon cordless telephones you can use different e-mail accounts on the different cordless telephones.
Receiving and Sending E-mail Reading E-mail Opening E-mail 1. Press and hold the key. The “Internet services” menu is opened. 2. Select “E-mail / OK”. 3. If more than one e-mail account is set up, select an e-mail account and press “OK”. 4. Select an e-mail and press “OK”. The e-mail appears on the display. Navigating in E-mail With the navigation keys you can navigate up and down in an e-mail message and skip to the next or the previous e-mail. With the OK key e-mail.
Receiving and Sending E-mail Sending E-mail 1. Press and hold down the key. The “Internet services” menu is opened. 2. Select “E-mail / OK”. 3. If more than one e-mail account is set up, select an e-mail account and press “OK”. 4. Press the Select key play. 5. Select “New e-mail / OK”. 6. Write the subject line and the text. with the “Options” or “New” dis- For more on writing text, read page 19. 7. Press the Select key with the “Options” display. 8.
Receiving RSS Feeds 12.2 Receiving RSS Feeds You can read RSS feeds with FRITZ!Fon. RSS is a format for rendering headlines and what are usually short items on certain subjects. These could be, for instance, the latest headlines or information about changes on the provider’s website. Configuring RSS Feeds RSS feeds provide RSS messages. Configure the RSS feeds you would like to receive with FRITZ!Fon in the FRITZ!Box: 1. Open the user interface of the FRITZ!Box in a web browser (http://fritz.box). 2.
Listening to Podcasts 4. Select an RSS message and then press “Show”. The RSS feed appears on the display. Navigating in RSS Feeds Use the navigation keys to navigate upward and downward in the message and to skip to the next or the previous message. With the OK key sage. you can page forward and skip to the next mes- Rotating the Display With the key you can rotate the display: Press the key ... Display Rotation once The display rotates by 90°. twice The display rotates by 270°.
Listening to Podcasts Configuring a Podcast Configure the podcasts you would like to listen to with FRITZ!Fon in the FRITZ!Box: 1. Open the user interface of the FRITZ!Box in a web browser (http://fritz.box). 2. Select “Home Network / Media Server / Podcast”. 3. Select a preset podcast from the drop-down list, or select “Other podcast” and configure a new podcast. The Help of the FRITZ!Box user interface presents comprehensive information on all of the settings for podcasts. Playing a Podcast 1.
Listening to Web Radio 12.4 Listening to Web Radio With FRITZ!Fon you can listen to web radio (also called “Internet radio”). Many web radio station addresses are available, for instance, at onlineradiostations.com and shoutcast.com. Configuring a Web Radio Station Configure the radio stations you would like to listen to with FRITZ!Fon in the FRITZ!Box: 1. Open the user interface of the FRITZ!Box in a web browser (http://fritz.box). 2. Select “Home Network / Media Server / Web Radio”. 3.
Listening to Web Radio Playing a Web Radio Station 1. Press and hold the key. The “Internet services” menu is opened. 2. Select “Web radio / OK”. 3. If more than one radio station is configured, select a radio station and press “OK”. The radio station will be played back. Press the top navigation key to increase the volume, and the bottom navigation key to turn it down.
Connecting a Headset 13 Connecting a Headset 13.1 Suitable Headsets The headset must meet the following specifications: • Headphone impedance: 32 ohms • Microphone impedance: 800 ohms to2.2 kOhm • 3.5 mm jack, assignment (stereo / mono): Right Left Microphone Ground audio signal audio signal Microphone Ground 13.2 Connecting a Headset Connect the headset to the headset socket. The headset is now ready for operation.
Configuring FRITZ!Fon 14 Configuring FRITZ!Fon 14.1 Configuring the Start Screen With FRITZ!Fon you can set up different start screens. For instance, you can set up your own background image and a clock, or display the answering machine or most important data about your FRITZ!Box as a start screen. Selecting a Start Screen 1. Press the Menu key . 2. Select “Settings / OK / Display / OK / Start screens / OK”. 3. Select a start screen and press “OK”.
Configuring Favorites Opening the Event Log The preset start screen “Events” shows events like missed calls, new messages on the answering machine, new e-mail and the last web radio station played. You can open the events directly from the start screen: 1. Press the OK key . The “Event” menu appears. 2. Select an event by pressing the navigation keys . 3. Press the OK key and . 14.
Configuring Favorites Moving Around Favorites You can change the order of the favorites. 1. Press the Select key with the “Favorites” display. 2. Select a favorite. 3. Press the Select key 4. Select “Move / OK”. 5. Move your favorites to the top using the top navigation key . Use the bottom navigation key to move favorites downward. with the “Options” display. Deleting Favorites 1. Press the Select key 2. Select a favorite. 3. Press the Select key 4. Select “Delete / OK”.
Settings in the FRITZ!Fon Menu 14.3 Settings in the FRITZ!Fon Menu Audio Settings The “Settings / Audio” menu contains the following settings: • Volume: volume of the ring tone, the handset and the speaker during hands-free calling The volume of the handset and the speaker can be set during a call; see Adjusting the Volume on page 27.
Settings in the FRITZ!Fon Menu Telephony Settings The “Settings / Telephony” menu contains the following settings: • Own telephone no.: See Selecting a Telephone Number before a Call on page 34. • Anonymous call: See CLIR: Calling Line Identification Restriction on page 31. • Pick up directly: See Enabling Direct Pickup on page 26. • Active keylock: See Enabling Active Keylock on page 21. • Secure: When “Secure” is enabled, FRITZ!Fon establishes only encrypted DECT connections.
Settings in the FRITZ!Box User Interface 14.4 Settings in the FRITZ!Box User Interface If you use a FRITZ!Box that supports DECT as a base station, you can configure your FRITZ!Fon in the user interface of the FRITZ!Box. All current functions and settings are at your disposal if both devices are using the current firmware. For more information, see the Updating the Firmware from page 68 section. 1. Open the user interface of the FRITZ!Box in a web browser (http://fritz.box). 2.
Settings in the FRITZ!Box User Interface • Ring tones: You can assign various ring tones to your FRITZ!Fon and add an MP3 file as a ring tone of your own. • Do Not Disturb: You can define periods of time when FRITZ!Fon does not ring. • Properties of the telephony device: You can enable various additional convenience features (for instance “busy on busy” and CLIR), select a background image for the start screen, and change the sound settings for your FRITZ!Fon.
DECT Eco: Switching Off Radio When Idle 14.5 DECT Eco: Switching Off Radio When Idle Your FRITZ!Fon supports DECT Eco “No Emission”. Thanks to DECT Eco, the FRITZ!Box can switch off the DECT network whenever all cordless telephones are on standby. The connection between the FRITZ!Box and the telephones remains active, however. You can place and accept calls at any time.
Updating the Firmware 15 Updating the Firmware AVM provides free firmware updates for FRITZ!Fon via the Internet. A firmware update brings the functions of your FRITZ!Fon up to date. 15.1 Preparation: Checking the FRITZ!Box Firmware FRITZ!Fon must be registered with a FRITZ!Box with the latest firmware. Check the FRITZ!Box firmware: 1. Press the Menu key . 2. Select “Home Network / OK / FRITZ!Box Version / OK”. 3. Press the Select key 4.
Operating Devices in the Home Network 16 Operating Devices in the Home Network If you use a FRITZ!Box that supports DECT as a base station, you can use FRITZ!Fon to operate other devices in the home network. 16.1 Switching the FRITZ!Box Wireless Network On and Off The wireless LAN function of your FRITZ!Box can be switched on and off using the FRITZ!Fon. 1. Press the Menu key . 2. Select “Home Network / OK / WLAN / OK”. 3. Press the Select key with the “On” or “Off” display.
Using FRITZ!Fon as a Media Player 16.3 Using FRITZ!Fon as a Media Player With FRITZ!Fon you can play music stored on the FRITZ!Box or another media server in the home network. You can use your FRITZ!Fon as a playback device or use FRITZ!Fon to remote control music playback on other UPnP-compatible devices in the home network. 1. Press the Menu key . 2. Select “Home Network / OK / Media player / OK”. 3. Select a media server. 4. Press the Select key 5.
Technical Specifications 17 Technical Specifications • DECT wireless standard • Range: up to 300 m indoors and up to 40 m outdoors • Standby time up to up to 288 h • Talking time up to up to 10 h • Display: 320 x 240 pixels; 262,000 colors • Keypad with function keys, control keys and number keys • 2 charging contacts on the bottom • On/Off switch via the Clear Connection key • Loudspeaker / microphone • Dimensions (W x D x H): approx.
Customer Service 18 Customer Service 18.1 Support from the Support Team Our Service area can be reached in the Internet at: en.avm.de/service Click “Support request” and open a support query. First you receive a selection of FAQs. If you require additional help on a technical problem, click “Submit support request”. Fill out the support form and send it to us. Our Support team will respond by e-mail as quickly as possible.
Manufacturer’s Warranty We offer a manufacturer’s warranty of 2 years on the hardware of this original product. Batteries constitute expendable material, which is not covered by the warranty. The warranty period begins with the purchase date from the first end user. Compliance with the warranty period can be proven by submission of the original invoice or comparable documents. This warranty does not restrict your warranty rights based on the contract of sale or other statutory rights.
Legal Notice This documentation and the software it describes are protected by copyright. AVM grants the nonexclusive right to use the software, which is supplied exclusively in object code format. The licensee may create only one copy of the software, which may be used exclusively for backup use. AVM reserves all rights that are not expressly granted to the licensee.
Declaration of CE Conformity Declaration of CE Conformity AVM declares herewith that the device is compliant with the basic requirements and the relevant rules in directives 2014/53/EU, 2009/125/EC and 2011/65/EU. The declaration of CE conformity is available at en.avm.de/ce.
Disposal Information In accordance with European regulations, FRITZ!Fon C5, as well as all devices and electronic components contained in the package, may not be disposed with household waste. After use, please dispose of FRITZ!Fon C5 and all electronic components and devices included with delivery at a collection point in your local community for the disposal of electric and electronic appliances. The FRITZ!Fon C5 contains a rechargeable battery. This battery, too, may not be disposed with household waste.
Index A active keylock . . . . . . . . . . . . . 21 alarm . . . . . . . . . . . . . . . . . . . . 48 alternating between calls . . . . 29 answering machine. . . . . . . . . 41 audio settings . . . . . . . . . . . . . 63 CLIR. . . . . . . . . . . . . . . . . . . . . . 31 condition upon delivery . . . . . . 64 consultation . . . . . . . . . . . . . . . 29 copyright. . . . . . . . . . . . . . . . . . 74 customer service . . . . . . . . . . . 72 D declaration of CE conformity . . 75 DECT base station . . . . .
F factory settings . . . . . . . . . . . . 64 favorites. . . . . . . . . . . . . . . . . . 61 firmware update . . . . . . . . . . . 68 function keys . . . . . . . . . . . . . . 10 for telephone calls . . . . . . 25 M making calls . . . . . . . . . . . . . . . 25 manufacturer’s warranty . . . . . 73 media player . . . . . . . . . . . . . . 70 menu . . . . . . . . . . . . . . . . . . . . 16 microphone off. . . . . . . . . . . . . 28 muting . . . . . . . . . . . . . . . . . . . 28 H hands-free calling . . .
R radio station configuration . . . . . . . . . . 57 listening to . . . . . . . . . . . . 58 recycling. . . . . . . . . . . . . . . . . . 76 redialing . . . . . . . . . . . . . . . . . 37 registering with DECT base station . . . . . . . . 23 removing protective film . . . . . 12 reset. . . . . . . . . . . . . . . . . . . . . 64 ring tones. . . . . . . . . . . . . . . . . 63 RSS feeds. . . . . . . . . . . . . . . . . 54 switching outlet on and off . . .