FRITZ!Box 3370 Installation and Operation www.avm.de © AVM GmbH · Alt-Moabit 95 · 10559 Berlin · Telefon 030 39976-0 · info@avm.
Table of Contents Symbols and Highlighting . . . . . . . . . . . . . . . . . . . . . . . . . 6 1 The FRITZ!Box 3370. . . . . . . . . . . . . . . . . . . . . . . . . . . . . . . 7 2 Ports, Interfaces, Buttons and LEDs. . . . . . . . . . . . . . . . . . 8 2.1 2.2 2.3 Ports and Interfaces . . . . . . . . . . . . . . . . . . . . . . . . . . . . . . . . . . . . . . . . 8 Buttons . . . . . . . . . . . . . . . . . . . . . . . . . . . . . . . . . . . . . . . . . . . . . . . . . . 9 LEDs. . . . . . . . . . . .
7 Configuring an Internet Connection in the FRITZ!Box . . . 31 7.1 7.2 7.3 Configuring an Internet Connection for DSL . . . . . . . . . . . . . . . . . . . . 31 Changing the Annex Setting of the FRITZ!Box . . . . . . . . . . . . . . . . . . . 32 Configuring the Internet Connection for the Mobile Communications Network . . . . . . . . . . . . . . . . . . . . . . . . . . . . . . . . . . . . . . . . . . . . . . . . . 33 Surfing the Net . . . . . . . . . . . . . . . . . . . . . . . . . . . . . . . . . . . .
12 The FRITZ!Box Home Network . . . . . . . . . . . . . . . . . . . . . . 68 13 Network Devices in the FRITZ!Box Home Network. . . . . . 70 13.1 Network Settings in the FRITZ!Box. . . . . . . . . . . . . . . . . . . . . . . . . . . . 70 13.2 Obtaining an IP Address Automatically. . . . . . . . . . . . . . . . . . . . . . . . 78 14 USB Devices in the FRITZ!Box Home Network . . . . . . . . . 81 14.1 14.2 14.3 14.4 14.5 14.6 Power Supply for USB Devices . . . . . . . . . . . . . . . . . . . . . . . . .
18 Technical Specifications . . . . . . . . . . . . . . . . . . . . . . . . . 106 18.1 18.2 18.3 18.4 18.5 Ports and Interfaces . . . . . . . . . . . . . . . . . . . . . . . . . . . . . . . . . . . . . . 106 Router Functions. . . . . . . . . . . . . . . . . . . . . . . . . . . . . . . . . . . . . . . . . 106 User Interface and Display . . . . . . . . . . . . . . . . . . . . . . . . . . . . . . . . . 106 Physical Specifications . . . . . . . . . . . . . . . . . . . . . . . . . . . . . . . . . . .
Symbols and Highlighting Symbols and emphasized text are used to mark certain information in this manual. Symbols This symbol marks useful hints and tips. This symbol indicates important instructions that must be observed to avoid malfunctions.
The FRITZ!Box 3370 1 The FRITZ!Box 3370 Welcome! We are glad you decided on a FRITZ!Box. The FRITZ!Box 3370 is the hub of your home network, connecting your computers and network devices with the Internet. You can operate the FRITZ!Box on a DSL or VDSL line as an Internet router. The FRITZ!Box has ports for computers and USB devices and supports wireless LAN technology. This means you can use the FRITZ!Box as a wireless LAN base station for wireless devices like notebooks, tablets or smartphones.
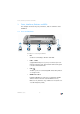
Ports, Interfaces, Buttons and LEDs 2 Ports, Interfaces, Buttons and LEDs This chapter describes the ports, interfaces, buttons and LEDs of the FRITZ!Box. 2.1 Ports and Interfaces WLAN 2.4 GHz/5 GHz Notebook, smartphone, video/TV streaming DSL/VDSL USB 2.0 4 x Gigabit LAN USB 2.
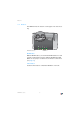
Buttons 2.2 Buttons The FRITZ!Box has two buttons on the upper side of the housing. Info DSL LAN WLAN WLAN Power Powe Power FRITZ!Box buttons WLAN Button With the WLAN button you can turn the WLAN function on and off and connect wireless devices with the FRITZ!Box by WPS. WPS is an easy way to establish secure wireless connections (see page 20). Power Button Use the Power button to switch the FRITZ!Box on and off.
LEDs 2.3 LEDs Five LEDs are built into the top of the FRITZ!Box 3370, which flash or light up to display various connection statuses and events.
Before You Connect the FRITZ!Box 3 3.1 3.2 Before You Connect the FRITZ!Box • Check the contents of your FRITZ!Box package. See the section Contents of the FRITZ!Box Package on page 11 for more information. • Make sure that the requirements for connecting and operating the FRITZ!Box have been met. See the section Requirements for Operation on page 11 for more information. • Please see the security and handling instructions in the section Security and Handling on page 12.
Security and Handling • for connecting computers via WLAN: computer with WLAN support (compliant with IEEE 802.11n, IEEE 802.11g, IEEE 802.11a or IEEE 802.11b). Computers that do not have integrated WLAN can be equipped with WLAN support by installing a WLAN device like a FRITZ!WLAN USB Stick N, for instance. • for connecting computers using network cable: computer with a network port (network adapter standard Ethernet 10/100/1000 Base-T) 3.
Security and Handling • Make sure that the ventilation slits on the FRITZ!Box housing are always unobstructed. The ventilation slits provide for air cooling. – The FRITZ!Box should not be placed on a carpet or on upholstered furniture. – Do not cover the FRITZ!Box. • Do not place the FRITZ!Box on excessively heat-sensitive surfaces, as the base of the device can heat up during normal operation. • • Do not install the FRITZ!Box during an electrical storm. • Never let liquids get inside the FRITZ!Box.
Security and Handling • FRITZ!Box 3370 Make sure to keep sufficient distance from potential sources of interference like microwave devices or electric devices with large metal housings.
Connecting the FRITZ!Box 4 Connecting the FRITZ!Box • • Connect the FRITZ!Box to the power supply. Connect the FRITZ!Box to your Internet connection. This chapter tells you how. Before you connect the FRITZ!Box, note the additional instructions in the section Security and Handling on page 12. 4.1 Connecting to Electrical Power er w Po N LA N LA W SL D fo In Connecting to the power supply 1. Pick up the power supply unit included in the FRITZ!Box package.
Connecting to the Internet Connecting to the DSL Line er w Po N LA W N LA D SL fo In Connecting to a telephone socket 1. Pick up the DSL cable (gray) included in the package. The cable has an RJ45 connector on both ends. 2. Insert one end of the cable into the socket on the FRITZ!Box labeled “DSL”. 3. Connect the other end to the socket on the DSL splitter labeled “DSL” or similar.
Connecting the Computer to the FRITZ!Box 5 Connecting the Computer to the FRITZ!Box You can connect a computer with the FRITZ!Box either using a network cable or wirelessly over WLAN. A computer can be connected with the FRITZ!Box using only one of these methods. It is not possible to connect using the network cable and WLAN. 5.1 Connecting Computers to the LAN Port w Po er N LA N LA W SL D fo In Connecting a computer to the FRITZ!Box using a network cable 1.
Connecting Computers to the LAN Port Connecting More Computers to the LAN Ports Additional cables are required to connect further computers. In purchasing a LAN cable, note the instructions in the section Network Cable on page 107. One computer can be connected to each network port of the FRITZ!Box. Connecting a Network Hub or Switch You can also connect a network hub or switch to the LAN ports on the FRITZ!Box. er w Po N LA N LA W SL D fo In Connecting the FRITZ!Box to a network hub 1.
Connecting Computers Wirelessly over WLAN 5.2 Connecting Computers Wirelessly over WLAN Using WLAN radio technology you can connect multiple computers with the FRITZ!Box wirelessly. Please note the following before establishing a wireless connection between the computer and the FRITZ!Box: • WLAN device A computer to be connected to the FRITZ!Box via WLAN must be equipped with a WLAN device for it to support WLAN.
Connecting Computers Wirelessly over WLAN Establishing a WLAN Connection with AVM Stick & Surf If you use a FRITZ!WLAN USB Stick from AVM as the WLAN device, you can use AVM Stick & Surf to establish a secure WLAN connection quickly and conveniently. 1. Switch on your computer. 2. Insert your FRITZ!WLAN USB Stick into one of the USB ports on the FRITZ!Box. The WLAN security settings are transmitted to the FRITZ!WLAN USB Stick. The “Info” LED on the FRITZ!Box begins flashing quickly.
Connecting Computers Wirelessly over WLAN WPS with the Push-button Method The push-button method (WPS PBC) can be used if your WLAN device is equipped with a WPS button, or if WPS can be enabled via the control software of the WLAN device. Info DSL WLAN LAN Press the “WLAN” button on the FRITZ!Box until the “WLAN” LED begins flashing. Power 1. Push for approx. 6 seconds 2. When the “WLAN” flashes, start WPS on the WLAN device. You have 2 minutes for this task.
Connecting Computers Wirelessly over WLAN The FRITZ!Box Specifies the PIN 1. Open the FRITZ!Box user interface. 2. Select the “WLAN / Security” menu. 3. Go to the “WPS Quick Connection” page. 4. Enable the setting “WPS enabled”. 5. Select the option “PIN method (WPS-PIN), the FRITZ!Box specifies the PIN”. 6. The PIN will be displayed. Enter this PIN in the control software of the WLAN device. 7. Click “Start WPS”.
Connecting Computers Wirelessly over WLAN Transferring the WLAN Security Settings Manually The WLAN security settings for WLAN devices can also be transferred manually. Manual transfer is unavoidable if a WLAN device does not support any methods for transferring the security settings automatically. For manual transfer the WLAN security settings have to be entered in the WLAN software.
Connecting Computers Wirelessly over WLAN SSID (name of the FRITZ!Box WLAN 3370 WLAN radio network) 3. Encryption method WPA2 (AES-CCMP) Encryption WPA2-PSK (AES) WLAN key The key is printed on the sticker attached to the bottom of the housing. Network mode Infrastructure Confirm your entries using the relevant button in the user interface (for instance, “OK” or “Connect”). Now your WLAN device and the FRITZ!Box are connected with each other wirelessly.
Connecting Computers Wirelessly over WLAN The WLAN connection between your WLAN device and the FRITZ!Box will be established. We strongly recommend using a WLAN device that supports WPA or WPA2 (for instance, a FRITZ!WLAN USB Stick from AVM). WEP is out of date and data encrypted with WEP can be deciphered within minutes.
The FRITZ!Box User Interface 6 The FRITZ!Box User Interface The FRITZ!Box has a user interface you can open in a web browser on your computer. In the user interface you can set up the FRITZ!Box, enable or disable functions and receive information on the FRITZ!Box and on your connections. 6.1 Opening the User Interface The FRITZ!Box user interface can be opened on every computer connected with the FRITZ!Box. 1. Start a web browser on your computer. 2. Enter fritz.
Overview: Everything at a Glance 6.2 Overview: Everything at a Glance All important information about the FRITZ!Box is displayed directly on the “Overview” page of the FRITZ!Box user interface. By clicking the linked entries you can jump from this page to the corresponding menus and configure settings there.
Standard View and Advanced View In the lower area of the window, the information is rounded out by the last telephone calls conducted, the list of connected devices like computers, network storage and telephones, and the last telephone book entries to be edited. 6.3 Standard View and Advanced View The FRITZ!Box user interface has two views: the standard view and the advanced view. In the standard view all of the settings required for everyday operation of the FRITZ!Box are at your disposal.
Protecting the User Interface with a Password Setting Up Password Protection As long as no password protection has been set up, every time you open the user interface you will be prompted to enter a password. If you disabled this message, here is how to set password protection: 1. Open the FRITZ!Box user interface (see page 26). 2. Go to the “System / FRITZ!Box Password” menu. 3. Enter a password and save the password by clicking “Apply”. Password protection is now enabled.
Saving the FRITZ!Box Settings Logging Off the User Interface When password protection is enabled, you can log off the user interface at any time. To do so, click in the list of links. If you do not click on the user interface for a period of longer than ten minutes, you will be logged off automatically. The only pages excepted from this are those which are constantly updated, like the “Overview” page. No automatic logout will take place on these pages. 6.
Configuring an Internet Connection in the FRITZ!Box 7 Configuring an Internet Connection in the FRITZ!Box Once you have connected the FRITZ!Box to your Internet connection, you must configure the Internet connection in the FRITZ!Box user interface so that the FRITZ!Box can establish the connection to your Internet service provider and connect to the Internet.
Changing the Annex Setting of the FRITZ!Box Configuring the Internet Connection Without the Wizard You can also set up the Internet connection without the Wizard. 1. Open the FRITZ!Box user interface (see page 26). 2. Select the “Internet / Account Information” menu and enter your account information. Also take advantage of the Help available in the FRITZ!Box user interface. 7.2 Changing the Annex Setting of the FRITZ!Box The FRITZ!Box cannot establish a connection to the DSL network.
Configuring the Internet Connection for the Mobile Communications Network 7.3 Configuring the Internet Connection for the Mobile Communications Network With a USB modem you can also establish the Internet connection with your FRITZ!Box 3370 via the mobile communications network. A USB modem for mobile Internet access (UMTS/HSPA) and a SIM card from a mobile communications provider are required for this. The FRITZ!Box supports UMTS/HSPA modems from various manufacturers. 1.
Surfing the Net 7.4 Surfing the Net 1. Start a web browser on your computer. 2. Enter in the address field the URL of the web page you would like to visit, for instance www.avm.de/en. The requested Internet page is opened and displayed.
Firmware Update: Updating the FRITZ!OS 8 Firmware Update: Updating the FRITZ!OS AVM provides free updates of the firmware for your FRITZ!Box. The firmware—called FRITZ!OS—is the software stored in the FRITZ!Box that controls all of the FRITZ!Box functions. FRITZ!OS updates contain further developments of existing FRITZ!Box functions and often also introduce new functions for your FRITZ!Box. A FRITZ!OS update is necessary if you would like to take advantage of further developments and new functions. 8.
Automatic Search for Updates and Updating FRITZ!OS 8.2 Automatic Search for Updates and Updating FRITZ!OS With the AVM service “Search for updates automatically” you will always be informed about the latest FRITZ!OS updates for your FRITZ!Box. When a new firmware for your FRITZ!Box is found on the AVM website, you will be notified on the “Overview” page. New updates are not installed automatically. Updating FRITZ!OS 1. Open the “Overview” page.
Automatic Search for Updates and Updating FRITZ!OS 3. Scroll down to the end of this page and click the “AVM Services” link. The “AVM Services” page is opened. 4. Disable the setting “FRITZ!Box searches for updates periodically” and save your setting with “Apply”. The AVM service “Search for updates automatically” is now disabled.
MyFRITZ!: Global Access to the FRITZ!Box 9 MyFRITZ!: Global Access to the FRITZ!Box MyFRITZ! is an web service by AVM with which you can access your FRITZ!Box from anywhere in the world over the Internet. • FRITZ!NAS: When you use MyFRITZ!, FRITZ!NAS is available everywhere. You can access photographs, music and documents located on the storage media connected to the FRITZ!Box.
MyFRITZ!: Global Access to the FRITZ!Box – For access to the FRITZ!Box over the Internet, enter a FRITZ!Box Internet password. This password is requested by the FRITZ!Box whenever you want to access the FRITZ!Box via MyFRITZ!. • You receive an e-mail from MyFRITZ! containing a registration link. If possible, open the e-mail on the computer on which you began to set up the account. Click the registration link.
MyFRITZ!: Global Access to the FRITZ!Box MyFRITZ! in the Home Network You can also use MyFRITZ! in the FRITZ!Box home network. 1. Enter “myfritz.box” in the address field of your browser. 2. Enter the Internet password for your FRITZ!Box. You will be directed to the MyFRITZ! page of your FRITZ!Box. In this case you do not have to log in to MyFRITZ!. Multiple FRITZ!Boxes You can register multiple FRITZ!Boxes at one MyFRITZ! account.
FRITZ!Box as an Internet Router 10 FRITZ!Box as an Internet Router The FRITZ!Box connects computers in your home network with the Internet. This chapter explains the possibilities offered by using the FRITZ!Box as an Internet router and how to take advantage of them. 10.1 Child Protection: Restricting Internet Access The child protection feature allows you to define access rules to the Internet for individual computers or Windows users.
Port Forwarding: Making Computers Accessible from the Internet The child protection feature is available only if you have set up the Internet connection in the FRITZ!Box and established an Internet connection. Child protection is not available if you have configured the FRITZ!Box as an IP client. In this case, use the corresponding functions of the router whose Internet connection is being shared. Setting Up Child Protection in the FRITZ!Box 1. Open the FRITZ!Box user interface (see page 26). 2.
Port Forwarding: Making Computers Accessible from the Internet PING IPv4: The FRITZ!Box responds to ping inquiries from the Internet addressed to the IPv4 address of the FRITZ!Box. IPv6: The FRITZ!Box responds to ping inquiries from the Internet addressed to the IPv6 address of the FRITZ!Box. Additionally, you can set up PING6 port forwarding rules for each computer in the home network since each computer has its own globally valid IPv6 address.
Port Forwarding: Making Computers Accessible from the Internet Setting Up Port Forwarding in the FRITZ!Box • IPv4: Port forwarding for IPv4 is set up in the “Internet / Permit Access” menu, on the “Port Forwarding” page. • IPv6: Enable the advanced view. Port forwarding for IPv6 is also set up in the “Internet / Permit Access” menu, on the “IPv6” page.
Dynamic DNS: Name Instead of IP Address 10.3 Dynamic DNS: Name Instead of IP Address Dynamic DNS is an Internet service that makes it possible for the FRITZ!Box to remain accessible from the Internet at all times under a fixed name, even though the public IP address changes. Dynamic DNS can be used as an alternative to MyFRITZ!. Both services can be used in parallel. You must register with a dynamic DNS provider to use this service.
Prioritization: Right of Way for Internet Access 4. Select the “Remote Access” page and set up dynamic DNS. For more information, see the Online Help. 10.5 Prioritization: Right of Way for Internet Access Prioritization is a function you can use to specify that network applications and network devices be treated with higher or lower priority when they access the Internet connection.
Prioritization: Right of Way for Internet Access Prioritized Applications This category is suitable for applications that require a fast reaction time (for example, company access, terminal applications, games). • For network applications prioritized in this category, 90% of the FRITZ!Box’s upload bandwidth is available, as long as no application from the “Real-time applications” category requires bandwidth.
VPN: Remote Access to the Home Network • Discard low-priority packets in order to ensure the transmission of higher-priority packets. This algorithm is used whenever more packets are supposed to be sent to the Internet than the upstream transmission rate of the Internet connection allows. • As long as no packets are being sent from higher-priority applications, the full transmission rate of the Internet connection is available for low-priority packets. Setting Up Prioritization in the FRITZ!Box 1.
VPN: Remote Access to the Home Network Setting Up VPN in the FRITZ!Box 1. Open the FRITZ!Box user interface. 2. Enable the advanced view. 3. Select the “Internet / Permit Access” menu. 4. Select the “VPN” page. See the Online Help of the FRITZ!Box to set up VPN. Supplementary Software for VPN All of the information required for a VPN is saved in a configuration file. The terminals involved in any VPN must receive this file. Individual computers that are networked over a VPN require a VPN client.
DNS Server: Freely Selectable 10.7 DNS Server: Freely Selectable DNS servers are preset in the FRITZ!Box for IPv4 and IPv6. These are the DNS servers assigned by the Internet service provider. For both IPv4 and IPv6, the preset DNS server can be replaced by a free DNS server. Free DNS servers include, for instance, OpenDNS and Google DNS. Here is how to change the DNS server entry: 1. Open the FRITZ!Box user interface. 2. Enable the advanced view. 3.
IPv6: The New Internet Protocol The home user relies on the authenticity of the IP address returned by the DNS server. Authentic means that the response is the IP address of the desired web site, and not a faked IP address that leads to a fake web site. DNSSEC can ensure that the returned addresses are authentic. Support with the FRITZ!Box The FRITZ!Box supports DNSSEC queries over UDP. The FRITZ!Box has a DNS proxy. The computers in the home network use the FRITZ!Box as a DNS server.
IPv6: The New Internet Protocol IPv6-capable Services in the Home Network • • • FRITZ!NAS access via SMB or FTP/FTPS • The globally valid prefix is distributed via router advertisement. • For guest access to the WLAN, the home network and WLAN guests are separated by IPv6 subnetworks.
Mobile Network: Replace Faulty DSL Setting Up IPv6 on the Computer You can establish connections in the IPv6 range of the Internet only if IPv6 is installed and enabled on the computers in your home network. • IPv6 is already installed and enabled in the Windows 7 and Windows Vista operating systems. • IPv6 is not installed and enabled in standard Windows XP. You must install and enable IPv6 in order to use it. The IPv6 installation requires Service Pack 2 for Windows XP.
Mobile Network: Replace Faulty DSL 4. Configure the settings for your Internet connection over the mobile communications network. For more information, see the Online Help of the FRITZ!Box. Access to the Internet is now guaranteed, even when the DSL connection fails. As soon as the DSL connection is stable and available for at least 30 minutes, the connection will be switched back to the DSL connection.
FRITZ!Box as a WLAN Base Station 11 FRITZ!Box as a WLAN Base Station The FRITZ!Box is a WLAN base station for WLAN devices like notebooks, tablets or smartphones. The FRITZ!Box can establish WLAN connections compliant with the fast WLAN N standard in two different frequency bands at the same time. The FRITZ!Box is preconfigured with an encryption method from today’s safest method WPA2. This encryption method is supported by most of the latest WLAN devices.
Connecting WLAN Devices Securely with the FRITZ!Box 2. Press the WLAN button on the FRITZ!Box until the “WLAN” LED begins flashing. You have 2 minutes for this task. 3. Your WLAN device and the FRITZ!Box now establish a secure WLAN connection automatically. The FRITZ!Box “WLAN” LED stops flashing and remains on. With this, the WLAN connection is established. Your WLAN device is integrated into your home network and can use the Internet connection of the FRITZ!Box.
Connecting WLAN Devices with the FRITZ!Box Guest Access 11.2 Connecting WLAN Devices with the FRITZ!Box Guest Access With the FRITZ!Box you can provide your guests with an Internet connection of their own. At this guest access they can surf the web with their own smartphones or tablets, but cannot access the contents of your home network. You can set up a guest access if you have connected the FRITZ!Box directly to your DSL line.
Switching the WLAN Radio Network On and Off by Schedule 11.3 Switching the WLAN Radio Network On and Off by Schedule You can switch the WLAN radio network of the FRITZ!Box automatically according to a schedule. This function is called “night service” and reduces the power consumption of the FRITZ!Box by completely turning off the WLAN module.
Enlarging the WLAN Radio Network You can extend the range of your WLAN radio network with a WLAN repeater. Or you can set up a second WLAN router, for instance a second FRITZ!Box as a WDS repeater. Expanding a WLAN Radio Network with a WLAN Repeater You can expanding your WLAN radio network with a WLAN Repeater. In combination with the FRITZ!Box the AVM FRITZ!WLAN Repeater are especially suitable.
WLAN—Getting Technical The wireless LAN connection between your FRITZ!Box and a FRITZ!Box in WDS operation can be encrypted by WPA2. The wireless LAN connection between your FRITZ!Box and another wireless LAN router is only possible with less secure WEP encryption. 11.5 WLAN—Getting Technical A wireless LAN radio network is based on standards defined by the Institute of Electrical and Electronic Engineers (IEEE).
WLAN—Getting Technical IEEE 802.11a Because this standard works exclusively in the seldom used 5-GHz range, it offers the opportunity to transmit data relatively free of interference from external influences. WLAN devices that support 802.11a are much less common than devices that work in accordance with the 802.11b/g standard. IEEE 802.11b With a maximum throughput rate of 11 Mbit/s, this is the oldest WLAN standard. Older WLAN devices of the first generation can communicate with the FRITZ!Box using 802.
WLAN—Getting Technical Setting the Right Standard in the FRITZ!Box The throughput rate that can be achieved in your WLAN radio network depends on the WLAN standards used by the integrated WLAN devices. These WLAN standards must also be set in the FRITZ!Box. Proceed as follows to check which WLAN standards are set and change them if needed: 1. Open the FRITZ!Box user interface. 2. Enable the advanced view. 3.
WLAN—Getting Technical • Your radio network integrates only WLAN devices that are compatible with one or both of the following standards: 802.11b 802.11g Set the following mode in the FRITZ!Box: Mode: 802.11b+g The 2.4-GHz frequency band will be used. • Your radio network integrates only WLAN devices that are compatible with one or several of the following standards: 802.11n 802.11g 802.11b Set the following mode in the FRITZ!Box: Mode: 802.11n+g+b The 2.4-GHz frequency band will be used.
WLAN—Getting Technical The Standard for Security IEEE 802.11i The WPA2 security mechanism is defined in the IEEE 802.11i standard. WPA2 is an extension of the familiar security mechanism WPA (Wi-Fi Protected Access). The main feature of the extension of WPA to WPA2 is the AESCCMP encryption process. Mechanism Encryption WPA TKIP (Temporary Key Integrity Protocol) WPA2 TKIP AES-CCMP based on the extremely secure AES (Advanced Encryption Standard) procedure.
WLAN—Getting Technical In the 2.4-GHz frequency range the European regulation authorities have designated 13 channels for WLAN. A channel can have a bandwidth of 20 MHz (throughput of up to 216 Mbit/s) or 40 MHz (throughput of up to 450 Mbit/s). Channels located directly next to each other in the 2.4-GHz band may overlap and result in mutual interference. For instance, if several WLANs are operated close to each other in the 2.
WLAN—Getting Technical monitors the selected channel periodically for higher-priority users, and, if necessary, switches to a different channel. Note that the FRITZ!Box waits up to ten minutes, as legally required, before occupying a free channel. During this period you cannot register any WLAN devices. The WLAN connection is then established automatically. For more information, see the section Avoiding WLAN Channels with DFS on page 101.
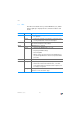
WLAN—Getting Technical Allocation of the WLAN Channels in the 2.4-GHz Range Channel Frequency (GHz) Channel Frequency (GHz) 1 2.412 8 2.447 2 2.417 9 2.452 3 2.422 10 2.457 4 2.427 11 2.462 5 2.432 12 2.467 6 2.437 13 2.472 7 2.442 Allocation of the WLAN Channels in the 5-GHz Range FRITZ!Box 3370 Channel Frequency (GHz) Channel Frequency (GHz) 36 5.18 108 5.54 40 5.20 112 5.56 44 5.22 116 5.58 48 5.24 120 5.60 52 5.26 124 5.62 56 5.28 128 5.
The FRITZ!Box Home Network 12 The FRITZ!Box Home Network The FRITZ!Box connects your network devices, USB devices and storage devices in what we call a FRITZ!Box home network. In the home network the FRITZ!Box makes data like images, music and videos available to all connected users and allows them to share a printer. Network Devices • Network devices include, for instance, computers, game consoles and smartphones that are connected with the FRITZ!Box via a network cable connection or via WLAN.
The FRITZ!Box Home Network For more information about how to access the memory in your FRITZ!Box home network safely and conveniently, see the chapter Accessing USB Memory from page 83. FRITZ!Box Name You can assign an individual name for your FRITZ!Box in the FRITZ!Box user interface.
Network Devices in the FRITZ!Box Home Network 13 Network Devices in the FRITZ!Box Home Network All network devices connected with the FRITZ!Box comprise a network. Network devices include, for instance, computers, game consoles and smartphones. The devices can be connected with the FRITZ!Box by cable or wirelessly. This chapter describes the network settings in the FRITZ!Box and how you can change them.
Network Settings in the FRITZ!Box For each user and each network device, you find an entry in the network overview. The columns have the following meanings: Icon A green LED before the device name indicates that a device is actively connected with the FRITZ!Box, but not using the Internet connection at this time. A green-blue globe indicates that the device is currently using the Internet connection. Name This column displays the name under which the user or the network device is known to the FRITZ!Box.
Network Settings in the FRITZ!Box Always Assigning the Same IP Address The editing mode for network devices includes the setting “Always assign this network device the same IP address”. When this setting is enabled for a network device, the DHCP server of the FRITZ!Box will always assign the same IP address to this device each time the connection is established. Starting the Computer—Wake on LAN The Wake on LAN function of computers can be enabled in the editing mode for network devices.
Network Settings in the FRITZ!Box IPv4 Settings in the FRITZ!Box The IPv4 settings of the FRITZ!Box are preset upon delivery with the following values: Factory Settings IPv4 address 192.168.178.1 Subnet mask 255.255.255.0 DHCP server enabled The IP address and the corresponding subnet mask yield the following values: Network address of the subnet 192.168.178.0 Entire IPv4 address range for the computers 192.168.178.
Network Settings in the FRITZ!Box IPv4 Address in the FRITZ!Box Upon delivery the FRITZ!Box is assigned the following IPv4 address: 192.168.178.1 If you would like to change the IPv4 address, please read through the following sections. When Does It Make Sense to Change the IPv4 Address? You should change the IPv4 address of the FRITZ!Box if the following apply to your network: • You have an existing local IPv4 network, one subnet with several computers.
Network Settings in the FRITZ!Box Only one DHCP server may be active within any network. Assigning the IP addresses via the DHCP server ensures that all of the computers connected with the FRITZ!Box are located in the same IP network. The computers can receive their IPv4 addresses from the DHCP server only if the setting “Obtain an IPv4 address automatically” is enabled in the their IP settings. For more information, see the section Obtaining an IP Address Automatically from page 78.
Network Settings in the FRITZ!Box Here too: each IPv4 address can be assigned only once. Changing Network Settings 1. Enable the advanced view in the user interface. 2. Select the “Home Network / Network” menu. 3. Select the “Network Settings” page. 4. Click the “IPv4 Addresses” or “IPv6 Addresses” button, depending on the address range you would like to change.
Network Settings in the FRITZ!Box Unique Local Adresses The communication within the local network takes place via the Unique Local Addresses (ULA). If no IPv6 Internet connection is established, the network devices do not have a ULA and communication between them is restricted. For this case you can set the FRITZ!Box such that the network devices receive the ULA from the FRITZ!Box. DHCPv6 Servers in the Home Network The FRITZ!Box is equipped with its own DHCPv6 server.
Obtaining an IP Address Automatically Set up the guest access as follows: 1. Open the FRITZ!Box user interface. 2. In the “Home Network / Network” menu, select the “Network Settings” page. 3. Enable the guest access. 13.2 Obtaining an IP Address Automatically The FRITZ!Box has its own DHCP server, which assigns IP addresses to the connected computers. The connected computers must be configured such that they can receive their IP addresses automatically.
Obtaining an IP Address Automatically 3. Windows XP: Under “This connection uses the following items”, select “Internet Protocol (TCP/IP)”. Windows 7 and Windows Vista: Under “This connection uses the following items”, select “Internet Protocol Version 4 (TCP/IPv4)”. 4. Click the “Properties” button. 5. On the “General” tab, enable the options “Obtain an IP address automatically” and “Obtain DNS server address automatically”. 6. Click “OK” to save the settings. 7.
Obtaining an IP Address Automatically Obtaining an IP Address Automatically in Mac OS X 1. Select the “System Preferences...” in the Apple menu. 2. In the “System Preferences” window, click the “Network” icon. 3. In the “Network” window, select the “Built-in Ethernet” entry from the list. Click the “Advanced...” button. 4. Click the “Advanced...” button. The “TCP/IP” settings page opens. Select the “Using DHCP” option from the “Configure IPv4:” drop-down list. 5. Click “OK”.
USB Devices in the FRITZ!Box Home Network 14 USB Devices in the FRITZ!Box Home Network The FRITZ!Box has two USB ports to which you can connect various USB devices. All network devices in the FRITZ!Box home network can use these USB devices jointly and simultaneously. This chapter describes how to share a printer in the network, which USB devices can be used in your FRITZ!Box home network, and how to use these devices safely. 14.
Using USB Devices Safely device is guaranteed only with the USB remote connection of the FRITZ!Box (see also: Sharing a USB Printer on page 84). • You can connect a USB hub to the FRITZ!Box and use up to four USB devices at this hub. You can use USB hubs with or without a separate power supply. We recommend deploying a USB hub with its own power supply if the USB devices to be connected exceed a total current consumption of 500 mA (see also: Power Supply for USB Devices on page 81).
Accessing USB Memory 1. Start a web browser. 2. Enter “fritz.box” in the address line. 3. Go to the “Home Network / Storage (NAS)” and select the “Security” tab. 4. Configure the access rights and password protection. Note that you cannot set up password protection and access rights if the USB remote connection is active. 14.5 Accessing USB Memory The participants in the home network have various possibilities for accessing the various storage media of the FRITZ!Box.
Sharing a USB Printer Suitable playback devices like TV sets, web radios, smartphones and the Windows Media Player can then call up the data for streaming from the media server. Playback devices to be used in connection with the media server must support the UPnP AV standard. The term “DLNA” is often used to designate this support. Enable the “media server” function in the FRITZ!Box user interface under “Home Network / Storage (NAS) / Options Enabled”. 14.
Sharing a USB Printer • the USB printer uses bidirectional data exchange. In other words: Not only does the computer send data to the printer, the printer also sends status messages to the computer. This communication in both directions is typical of the “Windows printers” or “GDI printers” that work only with special Windows device drivers.
Sharing a USB Printer If the printer is not displayed, you must first install the printer drivers for this device. Consult the documentation of your printer for instructions. 3. Switch to the “Ports” tab. 4. Click “Add”. 5. Double-click the “Standard TCP/IP Port” entry and click “New Port”, then “Next”. 6. Enter “fritz.box” in the “Printer Name or IP Address” field.
Sharing a USB Printer 5. In the “Protocol:” drop-down list, select the entry “HP Jetdirect – Socket”. 6. Enter “fritz.box” in the “Address:” input field. If the FRITZ!Box is configured as a WDS repeater or as an IP client, enter here the IP address at which the FRITZ!Box can be reached within the network. 1. In the “Print Using:” drop-down list, select the printer that is connected to the USB port of your FRITZ!Box.
Sharing a USB Printer Configuring a USB Printer with FRITZ!Box USB Remote Connection If you are using an all-in-one device or would like to use the convenience features of a USB printer connected to the FRITZ!Box, we recommend installing the FRITZ!Box USB remote connection software. The FRITZ!Box USB remote connection program can be installed on computers with Windows 7, Vista or XP (32- and 64-bit).
Sharing a USB Printer 4. Enable the USB remote connection for printers and select the option “printers (including all-in-one printers)”. For an all-in-one printer with a memory function, also enable the “USB storage media” option. For an all-in-one printer with a scanner function, also enable the “others (e.g. scanner)” option. 5. Click “Apply”. The FRITZ!Box USB remote connection is enabled. Using a USB Printer with FRITZ!Box USB Remote Connection 1.
Saving Energy with FRITZ!Box 15 Saving Energy with FRITZ!Box The FRITZ!Box combines a variety of devices in one device: VDSL and ADSL modem, WLAN router and media server. This means that you generally use much less power with the FRITZ!Box than you would with several separate devices. What is more, the FRITZ!Box saves energy by reducing processing power on standby and lowering the power consumption of idle functions. The FRITZ!Box also offers various settings for energy-saving operation.
Saving Energy at the LAN Ports Enable the energy-saving function in the “Home Network / USB Devices” menu in the FRITZ!Box user interface. You can also test here, wether your USB hard disk supports the energy-saving function. 15.3 Saving Energy at the LAN Ports For the individual LAN ports of your FRITZ!Box you can configure various operation modes. The power consumption of some modes is higher than others.
Help in Case of Errors 16 Help in Case of Errors This chapter provides assistance if you are not able to open the user interface of your FRITZ!Box or are having problems with the DSL or WLAN connection. 16.1 Cannot Establish a DSL Connection The FRITZ!Box automatically establishes a connection to the DSL network as soon as it is connected with the DSL line. If the DSL connection is not established, check which kind (annex) of DSL is set in your FRITZ!Box and attempt to resolve the error.
The User Interface Does Not Open After the annex setting has been changed, the FRITZ!Box restarts automatically. The connection to the DSL network has been established as soon as the “Power” LED stops flashing and remains lit up. 16.2 The User Interface Does Not Open If an error message is returned when you open the FRITZ!Box user interface, this can have various causes. Check the causes listed below and attempt to resolve the error.
The User Interface Does Not Open Checking the Cable Connections The FRITZ!Box user interface is not displayed in your web browser. Cause The cable connections are not secure. Help Make sure that all cables are plugged in securely. Checking the Name Resolution The user interface of the FRITZ!Box cannot be opened by entering fritz.box. Cause The name resolution of the FRITZ!Box does not work. Help 1. In the web browser, enter the following IP address in place of fritz.box: 192.168.178.1 2.
The User Interface Does Not Open If you still cannot open the user interface by entering fritz.box or by 192.168.178.1, use the fixed IP address of the FRITZ!Box as described on page 97. Disabling Dial-up Connections The user interface is not opened; a window for a dial-up connection appears instead. Cause The browser must use the network connection between the computer and FRITZ!Box when the user interface is opened.
The User Interface Does Not Open 2. If a checkmark is displayed in front of “Work Offline”, click this line. The checkmark will be removed and Internet Explorer will switch to online operation. Checking the Proxy Settings The user interface does not appear in the window of your web browser. Cause The proxy settings of the web browser prevent the user interface from being opened.
The User Interface Does Not Open Checking the Security Software The user interface cannot be displayed in the web browser. Cause Security software is blocking access to the user interface. Help Security software like firewalls can prevent access to the user interface of the FRITZ!Box. Configure exceptions for the FRITZ!Box in all of the enabled security software. If you would like to exit security software to test access to the FRITZ!Box, remove the DSL cable first.
Cannot Establish a WLAN Connection 16.3 Cannot Establish a WLAN Connection If you are not able to establish a WLAN connection between your computer and the FRITZ!Box, then please undertake the following measures to seek the source of the error and resolve it. Enabling the WLAN Device The WLAN device cannot find a wireless network. Cause The WLAN device is not ready for operation. Help Make sure that the WLAN device is ready for operation.
Cannot Establish a WLAN Connection Announcing the Name of the Radio Network The WLAN device cannot find the wireless network of the FRITZ!Box. Cause The name of the wireless network of the FRITZ!Box is concealed. Help 1. Connect a computer to the FRITZ!Box with a network cable (see page 17). 2. Open the FRITZ!Box user interface (see page 26). 3. Select “WLAN / Radio Network”. 4. Enable the option “Name of the radio network visible”. 5. Click the “Apply” button. 6.
Cannot Establish a WLAN Connection Testing a Non-Encrypted WLAN Connection Test whether a non-encrypted WLAN connection between the FRITZ!Box and the WLAN adapter is possible. 1. Connect a computer to the FRITZ!Box with a network cable (see page 17). 2. Open the FRITZ!Box user interface (see page 26). 3. Select “WLAN / Security”. 4. Enable the “non-encrypted” option. 5. Click the “Apply” button. 6. Remove the network cable and try again to establish a connection.
Cannot Establish a WLAN Connection Avoiding WLAN Channels with DFS The FRITZ!Box loses the WLAN connection in the 5-GHz frequency band for no apparent reason. Cause A forced channel change is taking place. In the 5-GHz frequency band the WLAN base station is programmed to change the channel whenever a radar source transmits on the same channel (Dynamic Frequency Selection, DFS).
Cannot Establish a WLAN Connection FRITZ!Box 3370 4. Set a different radio channel or automatic radio channel selection. 5. Click the “Apply” button. 6. Remove the network cable and check whether interference continues to occur.
Taking FRITZ!Box out of Operation 17 Taking FRITZ!Box out of Operation In this chapter you receive tips and recommendations for taking the FRITZ!Box out of operation. Please also follow our instructions for the correct disposal of waste equipment on page 119. 17.1 Restoring Factory Settings When the factory settings are restored to the FRITZ!Box, all of the settings in the FRITZ!Box are restored to their condition upon delivery.
Uninstalling Software Instructions for saving the data from the internal memory of the FRITZ!Box are presented in the Online Help of the user interface. Loading Factory Settings 1. In the FRITZ!Box user interface, select the “System / Reset” menu. 2. Select the “Factory Settings” tab. 3. Click the “Load Factory Settings” button. The FRITZ!Box is reset to its factory settings. 17.2 Uninstalling Software Additional software for the FRITZ!Box is available on the web pages of AVM at www.avm.
Uninstalling Software Uninstalling Software in Windows XP 1. Open “start / Control Panel / Add or Remove Programs”. Make sure that the “Change or Remove Programs” button is selected in the column at left. 2. Select the AVM software to be uninstalled from the list of “Currently installed programs”. 3. Click the “Change/Remove” button. The software will be removed.
Technical Specifications 18 Technical Specifications Facts worth knowing: Here you will find comprehensive technical data on your FRITZ!Box 3370. 18.1 Ports and Interfaces • VDSL modem in accordance with ITU standard G.993.2 Annex B • Four LAN ports via RJ45 sockets (standard Ethernet, 10/100/1000 Base-T) • • Two USB host controllers (USB version 2.0) WLAN base station with support for wireless networks – IEEE 802.11a – 54 Mbit/s – IEEE 802.11b – 11 Mbit/s – IEEE 802.11g – 54 Mbit/s – IEEE 802.
Physical Specifications 18.4 Physical Specifications • • • • • • Dimensions (W x D x H): ca. 226 x 160 x 47 mm Supply voltage: 230 V / 50 Hz Maximum power consumption: 19 W FRITZ!OS can be updated Conforms to CE standards Ambient conditions – operating temperature: 0 °C – +40 °C – storage temperature: -20 °C – +70 °C – relative humidity (operation): 10% – 90% – relative humidity (idle): 5% – 95% 18.
Customer Service 19 Customer Service Be it product documentation, frequently asked questions, tips or support: this chapter presents information on all important service topics. 19.1 Documentation on the FRITZ!Box To take advantage of all commands and features of your FRITZ!Box, consult the following documentation: Help In the FRITZ!Box user interface you can open the comprehensive Online Help by clicking the “Help” icon and the “Help” buttons.
Feedback on FRITZ!Box 19.3 Feedback on FRITZ!Box In various places in the user interface, the FRITZ!Box offers you the opportunity to send your concrete feedback to AVM. Your feedback helps us to continually improve the FRITZ!Box. When you submit your feedback, only the technical data and no personal data are transmitted to AVM. These data are used for the exclusive purpose of product improvement. A corresponding message appears in the Event Log, stating that the error report was sent to AVM.
Support from the Support Team 19.4 Support from the Support Team Should problems with your FRITZ!Box arise, we recommend taking the following steps: 1. If you have questions about starting operation of your FRITZ!Box, please consult the following chapters again: – Before You Connect the FRITZ!Box from page 11 – Connecting the FRITZ!Box from page 15 – Connecting the Computer to the FRITZ!Box from page 17 2.
Manufacturer’s Warranty 3. Fill out the form and send it to AVM by clicking the “Submit support request”. Our Support team will respond by e-mail as quickly as possible. 19.5 Manufacturer’s Warranty We offer a manufacturer’s warranty of 5 years on the hardware of this original product. The warranty period begins with the purchase date from the first end user. Compliance with the warranty period can be proven by submission of the original invoice or comparable documents.
AVM Products for the FRITZ!Box 20 AVM Products for the FRITZ!Box Here we introduce additional devices by AVM that are designed to be used in combination with your FRITZ!Box 3370. FRITZ!Powerline 500E LAN Powerline With FRITZ!Powerline 500E your electrical outlet is transformed into a secure network line.
AVM Products for the FRITZ!Box FRITZ!WLAN USB Stick N Up to 300 Mbit/s Dual band WPA2 (802.11i) Stick & Surf FRITZ!WLAN USB Stick N connects your computer easily and safely with your FRITZ!Box WLAN and other compatible WLAN routers: • USB stick for WLAN N with up to 300 Mbit/s • WLAN support for either 2.4-GHz or 5-GHz connections (dual band) • Supports the conventional standards 802.11n/g/b/a • WPA2 encryption for maximum WLAN security (802.
AVM Products for the FRITZ!Box FRITZ!WLAN USB Stick Up to 150 Mbit/s WPA2 (802.11i) Stick & Surf FRITZ!WLAN USB Stick connects your computer easily and safely with any WLAN router: • USB stick for WLAN N with up to 150 Mbit/s • Supports the WLAN standards 802.11n/b/g • WLAN support for 2.4-GHz connections • WPA2 encryption for maximum WLAN security (802.
AVM Products for the FRITZ!Box FRITZ!WLAN Repeater 300E Up to 300 Mbit/s WPS Gigabit LAN With the FRITZ!WLAN Repeater 300E the range of the wireless network can be conveniently extended: • Compatible with all conventional WLAN routers (802.11n/g/b/a radio standards) • WLAN support for either 2.
AVM Products for the FRITZ!Box FRITZ!WLAN Repeater N/G Up to 300 Mbit/s WPS Media function With the FRITZ!WLAN Repeater N/G the range of the wireless network can be extended quickly and easily: • Compatible with all conventional WLAN routers (802.11n/g/b/a radio standards) • WLAN support for either 2.
Legal Notice Legal Notice This documentation and the software it describes are protected by copyright. AVM grants the nonexclusive right to use the software, which is supplied exclusively in object code format. The licensee may create only one copy of the software, which may be used exclusively for backup use. AVM reserves all rights that are not expressly granted to the licensee.
Declaration of CE Conformity The manufacturer AVM GmbH Alt-Moabit 95 D 10559 Berlin Germany herewith declares that the product FRITZ!Box 3370 ADSL/VDSL WLAN router complies with the following directives: 1999/5/EC R&TTE Directive: Radio Equipment and Telecommunications Terminal Equipment 2009/125/EC EU directive: ecodesign requirements for energy-related products The following norms were consulted to assess conformity: - EN 60950-1:2006 + A11:2009 + A1:2010 - EN 300 328 V1.7.
Disposal Information In accordance with European regulations and the Waste Electrical and Electronic Equipment Directive (WEEE), the FRITZ!Box 3370, as well as all devices and electronic components contained in the package, may not be disposed with household waste. In accordance with European regulations and the Waste Electrical and Electronic Equipment Directive (WEEE), the FRITZ!Box 3370, as well as all devices and electronic components contained in the package, may not be disposed with household waste.
Drilling Template See the next page for a drilling template. Use the drilling template as a guide to mark the holes needed to mount the FRITZ!Box on a wall. Be sure to print out the page with the drilling template in its original size, or 100%. Do not enlarge it, adjust its size, reformat or rescale it in your printer settings.
Glossary Glossary ADSL short for Asymmetric Digital Subscriber Line ADSL (G.992.1/G.992.2) was developed on the basis of DSL technology in order to satisfy the increasing demand for higher throughput rates during uploading and downloading. Designates a fast kind of data transmission that works with standard copper cables and transports signals in both directions at different speeds (upstream at 640 Kbit/s and downstream at up to 9 Mbit/s). ADSL2 short for Asymmetric Digital Subscriber Line 2 ADSL2 (G.992.
Glossary ADSL2+ (G.992.5) is a further development of the ADSL standard. ADSL2+ offers a doubled frequency range used for downstream transmission, and thus double the maximum bandwidth achievable for downstream to 24 Mbit/s. ADSL2+ is completely downward compatible, meaning that terminal devices compliant with ADSL and ADSL2 can also be operated on ADSL2+ lines, although they cannot exploit the advantages of ADSL2+.
Glossary The central administration of the TCP/IP operation parameters makes it possible to avoid address conflicts caused by IP addresses (see glossary) accidentally assigned more than once. DHCP is used in IPv4 networks (see glossary). DHCP server The DHCP server assigns each client an IP address that it has not yet been assigned at the present time. The DHCP server also informs the client of the IP addresses of the DNS server to be used and of the default gateway.
Glossary download Download designates the transfer of files from the Internet to a computer. DSL modem A DSL modem connects a computer to the Internet via the DSL line. In contrast to the analog modem, a connection via the DSL modem does not mean that the telephone line is busy. DSL router A DSL router generally combines three different devices: a DSL modem (see glossary), a router, and a LAN switch.
Glossary Every computer participating in the Internet must have a uniquely assigned public IP address. Since only a limited number of such IP addresses is available, they must be used sparingly. That is why most of the Internet participants who dial in to the Internet receive a dynamic IP address. They are called dynamic because every participant receives a new public address that has not been assigned yet each time she or he connects to the Internet.
Glossary If you have a fixed line and a DSL line, the signals for both lines use the same cable to access your house or apartment. For this reason your telephony and Internet service provider supplies you with a DSL splitter (see glossary) that separates the telephone signals and DSL signals from each other. firewall A firewall protects a computer or local network against attacks from the Internet.
Glossary gateway Gateway is a general term designating an interface between two networks. Such a network interface can be realized using a router or a bridge, for instance. If a computer wants to transfer data packets to a computer in another network, it must first transmit the packet to the gateway. To do this, the computer must know the address of the gateway.
Glossary Internet telephony VoIP (see glossary) IP short for Internet Protocol The IP Internet Protocol is the most important basic protocol for the control of data exchange in local networks and in the Internet. The Internet protocol works without a connection; in other words, data packets are transmitted from the sender to the recipient without previous consultation. The addresses of the recipient and the sender in the data packets are given as IP addresses.
Glossary IP address In IP-based networks, for instance in the Internet and local networks, all connected devices are addressed via their IP addresses. So that data packets are sure to be delivered to the right address, each IP address may be assigned only once within the local IP network. IPv6 addresses are structured differently from IPv4 addresses. IP addresses can be written in decimal, octal or hexadecimal format. IP masquerading IP masquerading is a technique used within IPv4 networks.
Glossary NAT short for Network Address Translation NAT is a technique used within IPv4 networks. NAT is used in routers to replace the address information in data packets with new address information. A typical application for NAT is routers that connect local networks with the Internet. In local networks, every network device has a private IP address, while generally there is only one public IP address available for the Internet.
Glossary delivered via the IP Internet protocol. While the IP address determines the destination computer quite generally, the port addresses the communication interface provided by an application for a certain communication procedure. The Internet protocol allots 16 bits for the specification of the port number. Thus a total of 65,535 different port numbers can be specified. Ports up to port number 1,024 are reserved for special system applications and typical Internet applications.
Glossary Typical server applications that require port forwarding are FTP and web servers. To allow access to a computer via remote management software like Symantec pcAnywhere or Microsoft’s Remote Desktop, or even use of a file-sharing program like eDonkey, the required ports must be released for port forwarding.
Glossary key, are transferred almost fully automatically from the WLAN base station to the computer with the WLAN client that is to be connected. subnetwork A local IP network can consist of one subnetwork or be divided into multiple subnetworks. The division into subnetworks is performed when the local IP network is configured. The subnetworks of a local IP network are also IP networks (see glossary).
Glossary TR-069 TR-069 is a technical directive that simplifies the automatic configuration of Internet access devices like the FRITZ!Box. TR-069 describes the remote configuration of Internet access devices. In remote configuration the access and account data are automatically transmitted to the FRITZ!Box by the Internet service provider. These may include the account data for the Internet connection, Internet telephone numbers and login data for Internet telephony, or both.
Glossary update A more recent version of software or firmware is called an update. Updates are often free of charge, resolve minor programming errors, and sometimes also offer new functions. uplink port The uplink port on a hub or switch is designed for connecting another hub or switch, or a router. In contrast to the uplink port, there is also a user port for connecting terminal devices. The send and receive directions are transposed on the uplink port.
Glossary UPnP AV is a UPnP specification for the interaction between the media server, playback devices and devices controlling the streaming (transmitting a data stream) of audio, image and video data within networks. Media servers are devices that make audio, image and video data available upon request. Playback devices render the audio, image and video data (television, stereo system, streaming clients). Control devices are remote controls (smartphone, remote control).
Glossary downward compatible. The standard provides for throughput rates of up to 100 Mbit/s for uploading and downloading, but requires a distribution network with a more closely meshed infrastructure—a demand that is hardly economical outside of major urban areas. VPN short for Virtual Private Network VPN serves to integrate devices from a neighboring network into your own network, without the networks having to be compatible with each other.
Glossary In principle, VoIP calls can be made over any Internet connection. However, for convenient use with existing terminal devices, and for conversations with the fixed-line and mobile communications networks, it is important that the Internet service provider support what is known as the SIP standard. SIP is the current standard defined for VoIP by the IETF (Internet Engineering Task Force).
Glossary power than wireless LAN. What is more, Bluetooth technology is more flexible and thus can offer a greater bandwidth of potential applications.
Index A D access rights user interface . . . . . . . . . . . . . . . . . 28 access rules. . . . . . . . . . . . . . . . . . . . . . 41 accessories . . . . . . . . . . . . . . . . . . . . . 112 advanced view . . . . . . . . . . . . . . . . . . . 28 ambient conditions. . . . . . . . . . . . . . . 107 analog extension . . . . . . . . . . . . . . . . . . 8 autochannel . . . . . . . . . . . . . . . . . . . . . 65 see WLAN autochannel automatic error report . . . . . . . . . . . . 109 AVM Stick & Surf . . . . .
G IP address changing . . . . . . . . . . . . . . . . . . . . . emergency . . . . . . . . . . . . . . . . . . . in Linux . . . . . . . . . . . . . . . . . . . . . . in Mac OS X. . . . . . . . . . . . . . . . . . . in Windows . . . . . . . . . . . . . . . . . . . obtaining automatically . . . . . . . . . IPv4 address factory settings. . . . . . . . . . . . . . . . IPv4 settings . . . . . . . . . . . . . . . . . . . . . IPv6 . . . . . . . . . . . . . . . . . . . . . . . . . . . . guest access WLAN . . . . .
O software firmware . . . . . . . . . . . . . . . . . . . . . 35 standard view . . . . . . . . . . . . . . . . . . . . 28 starting operation requirements for operation . . . . . . 11 streaming . . . . . . . . . . . . . . . . . . . . . . . 83 support . . . . . . . . . . . . . . . . . . . . . . . . 108 by e-mail . . . . . . . . . . . . . . . . . . . . 110 information in the Internet. . . . . . 108 switch . . . . . . . . . . . . . . . . . . . . . . . . . . 18 see network symbols in the manual . . . . . . . .
W wake on LAN . . . . . . . . . . . . . . . . . . . . . 72 warranty. . . . . . . . . . . . . . . . . . . . . . . . 111 Wi-Fi Protected Setup (WPS) . . . . . . . . 20 WLAN . . . . . . . . . . . . . . . . . . . . . . . . . . . 19 base station . . . . . . . . . . . . . . . . . . . 8 frequency ranges . . . . . . . . . . . . . . 64 guest access . . . . . . . . . . . . . . . . . . 57 manually . . . . . . . . . . . . . . . . . . . . . 56 range . . . . . . . . . . . . . . . . . . . . . . . . 58 security . . . . . .