∏ AVM ISDN-CONTROLLER M a n u a High-Performance ISDN by . . . l v3.
HB_B1V30.book Seite 2 Mittwoch, 7. Februar 2001 3:19 15 AVM ISDN-Controller B1 v3.0 This manual and the software it describes are protected by copyright. The manual and software as presented are the object of a license agreement and may be used only in accordance with the license conditions. The licensee bears all risk in regard to hazards and impairments of quality which may arise in connection with the use of this product.
HB_B1V30.book Seite 3 Mittwoch, 7. Februar 2001 3:19 15 Contents 1 1.1 1.2 1.3 1.4 2 2.1 2.2 2.3 3 3.1 3.2 3.3 3.4 4 4.1 4.2 4.3 4.4 4.5 5 5.1 5.2 5.3 5.4 5.5 5.6 5.7 5.8 Introduction 8 The AVM ISDN-Controller B1 v3.0 . . . . . . . . . . . . . . . . . . . . . . 9 The Driver Software of the Controller B1 v3.0 . . . . . . . . . . . 10 System Requirements . . . . . . . . . . . . . . . . . . . . . . . . . . . . . . 12 Package Contents . . . . . . . . . . . . . . . . . . . . . . . . . . . . . . . . .
HB_B1V30.book Seite 4 Mittwoch, 7. Februar 2001 3:19 15 6 6.1 6.2 6.3 6.4 6.5 6.6 6.7 6.8 7 7.1 7.2 7.3 7.4 7.5 7.6 7.7 7.8 8 8.1 8.2 8.3 8.4 8.5 8.6 9 9.1 9.2 9.3 9.4 9.5 9.6 4 Installation in Windows 98 35 Installing the New Hardware Device . . . . . . . . . . . . . . . . . . . 35 Configuring the ISDN-Controller B1 v3.0. . . . . . . . . . . . . . . . 37 Physically Installing the ISDN-Controller B1 v3.0 . . . . . . . . . 37 Installing the Driver Software . . . . . . . . . . . . . . . . . . . . . .
HB_B1V30.book Seite 5 Mittwoch, 7. Februar 2001 3:19 15 10 10.1 10.2 10.3 10.4 10.5 10.6 10.7 11 Installation in Novell NetWare 63 Installing the Driver Software . . . . . . . . . . . . . . . . . . . . . . . . 63 ISDN-Controller B1 v3.0 Configuration with Stand-Alone CAPI . . . . . . . . . . . . . . . . . . . . . . . . . . . . . . . . . 65 Starting ISDN-Controller B1 v3.0 Operation with Stand-Alone CAPI . . . . . . . . . . . . . . . . . . . . . . . . . . . . . . . . .
HB_B1V30.book Seite 6 Mittwoch, 7. Februar 2001 3:19 15 16 16.1 16.2 17 17.1 17.2 6 Troubleshooting 92 General Malfunctions . . . . . . . . . . . . . . . . . . . . . . . . . . . . . . 92 Error Messages . . . . . . . . . . . . . . . . . . . . . . . . . . . . . . . . . . . 95 Support for Multiple Subscriber Numbers (MSNs) 105 Introduction . . . . . . . . . . . . . . . . . . . . . . . . . . . . . . . . . . . . . 105 Using MSN.EXE . . . . . . . . . . . . . . . . . . . . . . . . . . . . . . . . . .
HB_B1V30.book Seite 7 Mittwoch, 7. Februar 2001 3:19 15 Typographical Conventions The following typographical conventions and symbols are used in this manual to make it more readable and to emphasize important information: Highlighting The following table presents a short overview of the highlighting conventions used in this manual.
HB_B1V30.book Seite 8 Mittwoch, 7. Februar 2001 3:19 15 Introduction 1 Introduction Modern telecommunications have long since become much more than just making phone calls. Using the computer to surf the Internet, utilizing the resources of the company network through remote access, sending faxes, communicating with sales representatives by e-mail: electronic communications are opening up ever more interesting possibilities all over the world.
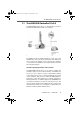
HB_B1V30.book Seite 9 Mittwoch, 7. Februar 2001 3:19 15 The AVM ISDN-Controller B1 v3.0 1.1 The AVM ISDN-Controller B1 v3.0 The AVM ISDN-Controller B1 v3.0 constitutes the connection between the ISDN network and your computer. Computer with AVM ISDN-Controller B1 v3.0 The ISDN-Controller is simply plugged into a free slot on the ISA/EISA bus. The controller is connected to the ISDN basic access over the S0 interface on the controller.
HB_B1V30.book Seite 10 Mittwoch, 7. Februar 2001 3:19 15 The Driver Software of the Controller B1 v3.0 1.2 The Driver Software of the Controller B1 v3.0 The driver software takes control of the communications processes and data transmission. The driver software is loaded to the ISDN-Controller from the hard disk. This process ensures that updates to the driver software can be carried out easily at any time. The driver software can compress data according to the V.42bis standard.
HB_B1V30.book Seite 11 Mittwoch, 7. Februar 2001 3:19 15 The Driver Software of the Controller B1 v3.0 Operating systems supported The CAPI driver software for the AVM ISDN-Controller B1 v3.0 is available for all operating systems for which a CAPI 2.0 standard is defined at the time of this printing: Windows 2000, Windows NT, Windows Millennium (Me), Windows 98, Windows 95, Windows 3.x, DOS, NetWare 5.x, 4.x and 3.x, OS/2 and Linux.
HB_B1V30.book Seite 12 Mittwoch, 7. Februar 2001 3:19 15 System Requirements 1.3 System Requirements The following hardware and software requirements must be met in order to use the Controller B1 v3.0: l computer with a free ISA slot l operating system: Windows 2000, Windows NT, Windows Millennium, Windows 98, Windows 95, Windows 3.x, DOS, Novell NetWare 5.x, 4.x or 3.x, OS/2 or Linux l CD-ROM drive for installation of the driver software 1.
HB_B1V30.book Seite 13 Mittwoch, 7. Februar 2001 3:19 15 Package Contents l AVM ISDN Tools The AVM ISDN-Tools are a collection of CAPI-based ISDN applications. They include such programs as “Connect32” for convenient data transfer in ISDN. For instructions on installing and operating this software, see the “AVM ISDN Tools” manual on the CD.
HB_B1V30.book Seite 14 Mittwoch, 7. Februar 2001 3:19 15 Installing the Hardware 2 Installing the Hardware The AVM ISDN-Controller B1 v3.0 can be operated on a number of platforms. The exact procedure for installing the ISDNController differs for the various operating systems. 2.1 Instructions for the Different Operating Systems Windows 2000/NT/3.x/MS-DOS/OS/2/Novell NetWare If you work in Windows 2000, Windows NT, Windows 3.
HB_B1V30.book Seite 15 Mittwoch, 7. Februar 2001 3:19 15 Installing the ISDN-Controller B1 v3.0 in the Computer The figure below illustrates how the jumpers are arranged on the ISDN-Controller B1 v3.0, showing the various jumper positions and their corresponding I/O addresses. These data are also listed as a label on the circuit board of the AVM ISDN-Controller B1 v3.0. Slot back plate Controller B1 v3.
HB_B1V30.book Seite 16 Mittwoch, 7. Februar 2001 3:19 15 Installing the ISDN-Controller B1 v3.0 in the Computer 2. Open the cover of the PC. Touch the metal of the PC housing to discharge any static electricity. 3. Select a suitable slot, remove the housing and insert the ISDN-Controller in the slot. 4. Screw the back plate of the ISDN-Controller to the back panel of the computer. 5. Close the computer and plug in the power cords. 6. Now you need to connect the ISDN-Controller to your ISDN line.
HB_B1V30.book Seite 17 Mittwoch, 7. Februar 2001 3:19 15 Installation in Windows 2000 3 Installation in Windows 2000 In Microsoft Windows 2000, the AVM ISDN-Controller B1 v3.0 can be installed with the drivers included in the operating system software. In this case, the drivers must be updated using the latest drivers available either on the CD included in the controller package or from the AVM Data Call Center (ADC).
HB_B1V30.book Seite 18 Mittwoch, 7. Februar 2001 3:19 15 Installing the Driver Software :\cardware\b1_v30\ windows.2k\english\setup.exe 4. Confirm by clicking “OK”. 5. The welcome screen of the installation program appears. To view additional information about the ISDNController and the installation routine, click the “Read AVM Readme” button. Click the “F1” key at any time to view help about the current step of installation. 6. Click “Next”. 7.
HB_B1V30.book Seite 19 Mittwoch, 7. Februar 2001 3:19 15 Changing the Settings he MSNs entered here are valid for both incoming and outgoing calls. The first MSN entry is valid for the first B channel; the second for the second B channel. A maximum of two B channels are supported by the NDIS WAN CAPI Driver. When a B channel is busy, the first MSN (default MSN) will be signalled as the outgoing MSN. Tip: simply enter the same MSN for both B channels to follow all costs accrued on this number. 13.
HB_B1V30.book Seite 20 Mittwoch, 7. Februar 2001 3:19 15 Installing Additional Controllers 4. Click with the right mouse button on the entry “AVM ISDN-Controller B1”. 5. Select “Properties” and activate the “ISDN” settings page. On this page, select the D-channel protocol. Click the “Configure” button to specify the multiple subscriber numbers for the NDIS WAN CAPI Driver. 6. Go to the “Resources” settings page. Click the “Change settings...” button.
HB_B1V30.book Seite 21 Mittwoch, 7. Februar 2001 3:19 15 Removing the ISDN-Controller B1 v3.0 2. The Add/Remove New Hardware Wizard is started. Click “Next”. 3. In the subsequent dialog, select the option “Uninstall/Unplug a device” and click “Next”. 4. Then select the first option, “Uninstall a device”. Confirm by clicking “Next”. 5. In the next dialog, the device to be installed must be selected. Activate the option “Show hidden devices” and click “Next”. Select the entry “AVM ISDN-Controller B1”.
HB_B1V30.book Seite 22 Mittwoch, 7. Februar 2001 3:19 15 Installation in Windows NT 4 Installation in Windows NT For use in Microsoft Windows NT, specially developed drivers are included with delivery. The CAPI 2.0 supplied with the controller supports both 16-bit and 32-bit applications. Applications in DOS windows are not supported. For more information about CAPI, see the section “The Applications Interface CAPI 2.0” on page 78.
HB_B1V30.book Seite 23 Mittwoch, 7. Februar 2001 3:19 15 Installing the Driver Software 5. Click “Next”. 6. The next window contains a list of the installed controllers. If no AVM ISDN-Controller is installed, the “New” entry (add an ISDN-Controller) is already active. Select the type of Controller to be installed and click “Next”. 7. In the next window, enter the folder in which the driver software is to be installed. 8. Enter the interrupt for the ISDN-Controller.
HB_B1V30.book Seite 24 Mittwoch, 7. Februar 2001 3:19 15 Starting Operation of the ISDN-Controller B1 v3.0 4.2 Starting Operation of the ISDNController B1 v3.0 By default the ISDN-Controller is loaded automatically every time Windows NT is started. Because the Controller is loaded before the items in the “Startup” program group, it is no problem to include communications programs based on CAPI in the “Startup” group. If the ISDN-Controller B1 v3.
HB_B1V30.book Seite 25 Mittwoch, 7. Februar 2001 3:19 15 Changing the Settings 4.3 Changing the Settings After installation has been concluded, you have the option of changing the following settings of the ISDN-Controller B1 v3.0: l Interrupt and I/O address l D-channel protocol l activate automatic data compression (CAPI SoftCompression X75/V42bis) Open the “B1 Setup” program from the “AVM” program group and follow the instructions there.
HB_B1V30.book Seite 26 Mittwoch, 7. Februar 2001 3:19 15 Removing the ISDN-Controller B1 v3.0 2. Double-click the “Add/Remove Software” icon. 3. The list of software installed includes an entry for the “AVM ISDN-Controller B1 Family” (or the last AVM ISDNController installed). 4. Select this entry and click the “Add/Remove” button. The uninstallation program is started. 5. The next window displays the folder which contains the corresponding driver software to be deleted. Confirm by clicking “Next”.
HB_B1V30.book Seite 27 Mittwoch, 7. Februar 2001 3:19 15 Installation in Windows Millennium 5 Installation in Windows Millennium For use in Microsoft Windows Millennium (Me), specially developed drivers are included with delivery. The driver architecture corresponds to the architecture of the Microsoft Win 32 Driver Model (WDM). This true 32-bit device driver offers full support for all features of Microsoft Windows Me. The CAPI 2.
HB_B1V30.book Seite 28 Mittwoch, 7. Februar 2001 3:19 15 Installing the New Hardware Device 2. The Add New Hardware Wizard announces that it recognizes new Plug and Play devices. Click “Next”. 3. Answer the question about whether the device is included in the list with “No” and click “Next”. 4. In the next window, answer “No” to the questions, “Do you want Windows to search for your new hardware?” and click “Next” again. 5. In the next window, select the hardware type to be installed.
HB_B1V30.book Seite 29 Mittwoch, 7. Februar 2001 3:19 15 Configuring the ISDN-Controller B1 v3.0 It is advisable to accept the I/O address value displayed here and, if necessary, to change the jumper position on the ISDN-Controller accordingly. If you would prefer to use another I/O address, open the Device Manager (“Settings / Control Panel / System”) before restarting Windows and enter the desired values there. Now the driver software is copied to your computer.
HB_B1V30.book Seite 30 Mittwoch, 7. Februar 2001 3:19 15 Installing the Driver Software 5.4 Installing the Driver Software After physically installing the Controller B1 v3.0, the next step is to install the driver software. Proceed as follows: 1. Turn your computer back on. The welcome screen of the installation program appears. To obtain more information about the ISDN-Controller and the installation process, click the “Read AVM Readme” button.
HB_B1V30.book Seite 31 Mittwoch, 7. Februar 2001 3:19 15 Starting Operation of the ISDN-Controller B1 v3.0 If the I/O address of the ISDN-Controller must be changed after installation, because of a new hardware device, for instance, open the Windows Me Device Manager by clicking through “Settings / Control Panel / System”. Enter the new value there. After changing this setting, remove the ISDN-Controller hardware from the computer and switch the jumper accordingly.
HB_B1V30.book Seite 32 Mittwoch, 7. Februar 2001 3:19 15 Changing the Settings Loading the ISDN-Controller The ISDN-Controller can be loaded manually by clicking the “B1 Load” icon in the “AVM” program group. After loading the following message appears: Message after loading in Windows Me 5.6 Changing the Settings After installation has been concluded, you have the option of changing the following settings of the ISDN-Controller B1 v3.
HB_B1V30.book Seite 33 Mittwoch, 7. Februar 2001 3:19 15 Installing Additional Controllers 5.7 Installing Additional Controllers Up to four active AVM ISDN-Controllers may be installed in your computer at the same time. It is also possible to combine active AVM ISDN-Controllers for ISA, PCI and USB buses in one computer. To install an additional AVM ISDN-Controller B1 v3.0, simply repeat the entire installation procedure as described. Start by installing a new hardware device.
HB_B1V30.book Seite 34 Mittwoch, 7. Februar 2001 3:19 15 Removing the ISDN-Controller B1 v3.0 Only one ISDN-Controller may be removed at a time. If multiple ISDN-Controllers are installed and all are to be removed, perform the above procedure several times (without restarting Windows between the individual uninstallation procedures). 34 ISDN-Controller B1 v3.
HB_B1V30.book Seite 35 Mittwoch, 7. Februar 2001 3:19 15 Installation in Windows 98 6 Installation in Windows 98 For use in Microsoft Windows 98, specially developed drivers are included with delivery. The driver architecture corresponds to the architecture of the Microsoft Win 32 Driver Model (WDM). This true 32-bit device driver offers full support for all features of Microsoft Windows 98. The CAPI 2.
HB_B1V30.book Seite 36 Mittwoch, 7. Februar 2001 3:19 15 Installing the New Hardware Device 3. Answer the question about whether the device is included in the list with “No” and click “Next”. 4. In the next window, answer “No” to the questions, “Do you want Windows to search for your new hardware?” and click “Next” again. 5. In the next window, select the hardware type to be installed. Select the entry “Other devices”. Then click “Next”. 6. The Windows device driver database is generated.
HB_B1V30.book Seite 37 Mittwoch, 7. Februar 2001 3:19 15 Configuring the ISDN-Controller B1 v3.0 10. A message in the next window announces that the computer must be shut down. Remove the CD from the CDROM drive and click “Yes”. The computer must be shut down before the ISDN-Controller hardware is physically installed so that all settings made can be activated. 11. Turn off the computer and any other connected devices and pull the power plug. 6.2 Configuring the ISDN-Controller B1 v3.
HB_B1V30.book Seite 38 Mittwoch, 7. Februar 2001 3:19 15 Installing the Driver Software Use the “F1” key at any time to view a help text for the current installation step. Click “Next”. 2. Select the ISDN-Controller to be installed. For information about the controllers listed, click the “Info” button. Click “Next”. 3. In the next window, enter the folder in which the driver software of the AVM ISDN-Controller B1 v3.0 is to be installed. When your entries are complete, click “Next”. 4.
HB_B1V30.book Seite 39 Mittwoch, 7. Februar 2001 3:19 15 Starting Operation of the ISDN-Controller B1 v3.0 6.5 Starting Operation of the ISDNController B1 v3.0 By default the controller is loaded automatically every time Windows 98 is started. Because the controller is loaded before the items in the “Startup” program group, it is no problem to include communications programs based on CAPI in the “Startup” group. If the ISDN-Controller B1 v3.
HB_B1V30.book Seite 40 Mittwoch, 7. Februar 2001 3:19 15 Changing the Settings 6.6 Changing the Settings After installation has been concluded, you have the option of changing the following settings of the ISDN-Controller B1 v3.0: l D-channel protocol l activate automatic data compression (CAPI SoftCompression X75/V42bis) Open the “B1 Setup” program from the “AVM” program group and follow the instructions there.
HB_B1V30.book Seite 41 Mittwoch, 7. Februar 2001 3:19 15 Removing the ISDN-Controller B1 v3.0 6.8 Removing the ISDN-Controller B1 v3.0 To remove the AVM ISDN-Controller B1 v3.0 from Windows 98, proceed as follows: 1. Open the Windows 98 Control Panel with “Start / Settings”. 2. Double-click the “Add/Remove Software” icon. 3. The list of software installed includes an entry for the “AVM ISDN-Controller B1 Family” (or the last AVM ISDNController installed).
HB_B1V30.book Seite 42 Mittwoch, 7. Februar 2001 3:19 15 Installation in Windows 95 7 Installation in Windows 95 For use in Microsoft Windows 95, specially developed drivers are included with delivery. This 32-bit device driver (VxD) offers full support for all features of Microsoft Windows 95. The CAPI 2.0 supplied with the controller supports Windows applications and applications in DOS windows at the same time. For more information about CAPI, see the section “The Applications Interface CAPI 2.
HB_B1V30.book Seite 43 Mittwoch, 7. Februar 2001 3:19 15 Installing the New Hardware Device 4. In the next window, select the hardware type to be installed. Select the entry “Other devices”. Then click “Next”. 5. The Windows device driver database is generated. Windows 95 then shows a list of hardware models and manufacturers. Click the “Have Disk...” button here. 6. Insert the CD included in the controller package into your CD-ROM drive.
HB_B1V30.book Seite 44 Mittwoch, 7. Februar 2001 3:19 15 Configuring the ISDN-Controller B1 v3.0 7.2 Configuring the ISDN-Controller B1 v3.0 In the second step of installation, change the jumper position on the AVM ISDN-Controller B1 v3.0 if necessary. Use the value suggested by the Add New Hardware Wizard. Upon delivery, the jumper is set to the I/O address 150 (see the section “Setting the I/O Address” on page 14).
HB_B1V30.book Seite 45 Mittwoch, 7. Februar 2001 3:19 15 Starting Operation of the ISDN-Controller B1 v3.0 4. The next step is to specify the protocol of your ISDN line. Activate the desired option and then click “Next”. 5. The installation program then copies all files to the specified folder. 6. Once copying has been completed, a window displaying the settings of the ISDN-Controller B1 v3.0 appears. Confirm these settings by clicking “OK”.
HB_B1V30.book Seite 46 Mittwoch, 7. Februar 2001 3:19 15 Changing the Settings Unloading the ISDN-Controller To unload the ISDN-Controller B1 v3.0, click “B1 Unload”. After unloading, a message appears reporting that the AVM ISDN-Service is no longer available. Confirm this message by clicking “OK”. Loading the ISDN-Controller The ISDN-Controller can be loaded manually by clicking the “B1 Load” icon in the “AVM” program group.
HB_B1V30.book Seite 47 Mittwoch, 7. Februar 2001 3:19 15 Installing Additional Controllers 7.7 Installing Additional Controllers Up to four active AVM ISDN-Controllers may be installed in your computer at the same time. It is also possible to combine active AVM ISDN-Controllers for ISA and PCI buses in one computer. To install an additional AVM ISDN-Controller B1 v3.0, simply repeat the entire installation procedure as described. Start by installing a new hardware device.
HB_B1V30.book Seite 48 Mittwoch, 7. Februar 2001 3:19 15 Removing the ISDN-Controller B1 v3.0 5. At the conclusion of uninstallation you will be prompted to restart Windows so that the changes can be implemented. Only one ISDN-Controller may be removed at a time. If multiple ISDN-Controllers are installed and all are to be removed, perform the above procedure several times (without restarting Windows between the individual uninstallation procedures). 48 ISDN-Controller B1 v3.
HB_B1V30.book Seite 49 Mittwoch, 7. Februar 2001 3:19 15 Installation in Windows 3.x 8 Installation in Windows 3.x For use in Microsoft Windows 3.x, specially developed drivers are included with delivery. This 32-bit device driver (VxD) exploits the possibilities of Windows’ “protected mode”. The CAPI 2.0 supplied with the controller supports Windows applications and applications in DOS windows at the same time. For more information about CAPI, see the section “The Applications Interface CAPI 2.
HB_B1V30.book Seite 50 Mittwoch, 7. Februar 2001 3:19 15 Entering a Changed I/O Address Installation can be aborted at any time by clicking the “Cancel” button. 6. Enter the directory in which the driver software is to be installed. Once your entries are complete, click “Next”. 7. Indicate which D-channel protocol is used on your ISDN line by clicking the desired option. In the same dialog, specify whether automatic data compression should be activated for X.75 connections.
HB_B1V30.book Seite 51 Mittwoch, 7. Februar 2001 3:19 15 Configuring the ISDN-Controller B1 v3.0 8.2 Configuring the ISDN-Controller B1 v3.0 To configure the controller with a new I/O address, proceed as follows: 1. Start the “B1 Setup” program by double-clicking on the corresponding icon in the “AVM” program group. The following window is opened: Dialog of the “B1 Setup” program 2. Enter new values for the I/O address and the interrupt here.
HB_B1V30.book Seite 52 Mittwoch, 7. Februar 2001 3:19 15 Starting Operation of the ISDN-Controller B1 v3.0 If the I/O address and interrupt of the ISDN-Controller must be changed after installation, for instance, because new hardware devices were installed, change the position of the jumper on the ISDN-Controller first. Then open the program “B1 Setup” and enter the new values there. 8.3 Starting Operation of the ISDNController B1 v3.
HB_B1V30.book Seite 53 Mittwoch, 7. Februar 2001 3:19 15 Changing the Settings 8.4 Changing the Settings After installation has been concluded, you have the option of changing the following settings of the ISDN-Controller B1 v3.0: l D-channel protocol l activate automatic data compression (CAPI SoftCompression X75/V42bis) Information about CAPI SoftCompression is available in the section “CAPI SoftCompression X75/V42bis” on page 83. To change settings, proceed as follows: 1. Open the SETUP.
HB_B1V30.book Seite 54 Mittwoch, 7. Februar 2001 3:19 15 ISDNLOAD.CFG – I/O address and interrupt – Base module (specifies the T4 file): “b1.t4” stands for the D-channel protocol DSS1, “b1tr6.t4” for 1TR6, and ”b1usa.t4” for NI1 and 5ESS – :PROTOCOL (specifies the D-channel protocol): “\x00” stands for DSS1, “\x06” for 1TR6, “\x03” for NI1, and “\x05” for 5ESS Example: [ISDN-Controller-00] IO Address = 150 Interrupt = 5 Base Module = b1.
HB_B1V30.book Seite 55 Mittwoch, 7. Februar 2001 3:19 15 SYSTEM.INI l For a PCI controller, it is not necessary to enter the I/O address and interrupt. Also note the information in the manual for the PCI controller. SYSTEM.INI The same changes must be made in the SYSTEM.INI file as well. The entry in SYSTEM.
HB_B1V30.book Seite 56 Mittwoch, 7. Februar 2001 3:19 15 Installation in MS-DOS 9 Installation in MS-DOS For the use of the AVM ISDN-Controller B1 v3.0 in MS-DOS, special drivers are included with delivery. Once installed, the driver software makes the programming interface CAPI 2.0 available to the entire system. For more information about CAPI, see the section “The Applications Interface CAPI 2.0” on page 78. 9.
HB_B1V30.book Seite 57 Mittwoch, 7. Februar 2001 3:19 15 Entering a Changed I/O Address Use the arrow keys to browse through the list. Confirm your selection with “Return”. 6. Now specify the installation directory. Confirm your selection with “Return”. 7. Specify which D-channel protocol is used on your ISDNline. Press the “Tab” key to jump to the next option. Confirm with “Return”. 8. In the next window, indicate whether you would like to activate automatic data compression V.42bis for X.
HB_B1V30.book Seite 58 Mittwoch, 7. Februar 2001 3:19 15 Configuring the ISDN-Controller B1 v3.0 9.2 Configuring the ISDN-Controller B1 v3.0 The I/O address set using the jumper must match the entry in the controller software. Proceed as follows to enter the I/O address: 1. Open the “B1 Setup” program. The following dialog appears on the screen: Dialog of the “B1 Setup” program 2. In the first input field, enter the I/O address set on the controller.
HB_B1V30.book Seite 59 Mittwoch, 7. Februar 2001 3:19 15 Starting Operation of the ISDN-Controller B1 v3.0 If the I/O address and interrupt of the ISDN-Controller must be changed after installation, for instance, because new hardware devices were installed, change the position of the jumper on the ISDN-Controller first. Then open the program “B1 Setup” and enter the new values there. 9.3 Starting Operation of the ISDNController B1 v3.
HB_B1V30.book Seite 60 Mittwoch, 7. Februar 2001 3:19 15 Changing the Settings To load the driver for the AVM ISDN-Controller B1 v3.0 automatically each time the computer is started, add the call for the IBASE.BAT batch procedure to the AUTOEXEC.BAT file. (Remember to include the path!). 9.
HB_B1V30.book Seite 61 Mittwoch, 7. Februar 2001 3:19 15 Installing Additional Controllers – Base module (specifies the T4 file): “b1.t4” stands for the D-channel protocol DSS1, “b1tr6.t4” for 1TR6, and ”b1usa.t4” for NI1 and 5ESS – :PROTOCOL (specifies the D-channel protocol): “\x00” stands for DSS1, “\x06” for 1TR6, “\x03” for NI1, and “\x05” for 5ESS Example: [ISDN-Controller-00] IO Address = 150 Interrupt = 5 Base Module = b1.
HB_B1V30.book Seite 62 Mittwoch, 7. Februar 2001 3:19 15 Removing the ISDN-Controller B1 v3.0 The ibase command loads all ISDN-Controllers installed. 9.6 Removing the ISDN-Controller B1 v3.0 To remove the AVM ISDN-Controller B1 v3.0 in MS-DOS, proceed as follows: 1. First unload the driver with the command ibase - 2. Then use the relevant DOS commands to delete the directory in which the drive software is located. 3. If the command ibase has been entered in the file AUTOEXEC.
HB_B1V30.book Seite 63 Mittwoch, 7. Februar 2001 3:19 15 Installation in Novell NetWare 10 Installation in Novell NetWare The driver software for the AVM ISDN-Controller B1 v3.0 in Novell NetWare can be installed in the Novell NetWare versions 5.x, 4.x and 3.x. Two installation variants are supplied for Novell NetWare 4.x and 5.x: Stand-Alone CAPI and CAPI Manager. If you would like to use the Novell CAPI Manager, make sure that it is installed before installing the ISDN-Controller B1 v3.0.
HB_B1V30.book Seite 64 Mittwoch, 7. Februar 2001 3:19 15 Installing the Driver Software 1. Start your computer. 2. Insert the “AVM ISDN-Controller B1 v3.0” CD in your CD drive. 3. Enter the following command: load nwconfig to load the installation menu of the Novell NetWare server. The “Configuration Options” menu of the installation program appears. 4. Select “Product options” from this menu and press “Return”. On a NetWare 3.x server, now a list of the programs already installed is displayed.
HB_B1V30.book Seite 65 Mittwoch, 7. Februar 2001 3:19 15 ISDN-Controller B1 v3.0 Configuration with Stand-Alone CAPI At the conclusion of installation, the README file for the AVM ISDN-Controller B1 v3.0 is displayed on the screen. 9. Press “Esc” to end the display. 10. Press “Esc” as often as necessary to close all submenus and return to the “Configuration Options” menu. 11. Select “Exit” to leave the installation program.
HB_B1V30.book Seite 66 Mittwoch, 7. Februar 2001 3:19 15 Starting ISDN-Controller B1 v3.0 Operation with Stand-Alone CAPI 5. Leave the configuration by pressing “Esc”. Select “Yes” to confirm that you want to save the new settings. The ISDN-Controller B1 v3.0 settings can be changed at any time using this method. 10.3 Starting ISDN-Controller B1 v3.0 Operation with Stand-Alone CAPI The ISDN-Controller must be loaded manually each time the system is started.
HB_B1V30.book Seite 67 Mittwoch, 7. Februar 2001 3:19 15 ISDN-Controller B1 v3.0 with CAPI for the CAPI Manager 10.5 ISDN-Controller B1 v3.0 with CAPI for the CAPI Manager Proceed as follows to configure and start operation of the AVM ISDN-Controller B1 v3.0 with CAPI for the CAPI Manager: 1. Enter the following command at the system console: load inetcfg 2. The “Internetworking Configuration” window appears. Select the “Boards” entry and press “Return”. A list displays all available ISDN-Controllers.
HB_B1V30.book Seite 68 Mittwoch, 7. Februar 2001 3:19 15 Installing Additional ISDN-Controllers with the CAPI Manager For more information about CAPI SoftCompression, see the section “CAPI SoftCompression X75/V42bis” on page 83. 10. Exit the configuration dialog by pressing “Esc” twice and select “Yes” to confirm that you want to save the new settings. 11. The final step in the configuration process is to update the system and load the ISDN-Controller.
HB_B1V30.book Seite 69 Mittwoch, 7. Februar 2001 3:19 15 Removing the ISDN-Controller B1 v3.0 2. The “Configuration Options” menu of the installation program appears. Press “Return”. 3. Select the “Product options” item from the menu and press “Return”. If you are removing the ISDN-Controller from a NetWare 3.x server, a list of the programs already installed appears. 4. If you are removing the ISDN-Controller from a NetWare 4.x or 5.
HB_B1V30.book Seite 70 Mittwoch, 7. Februar 2001 3:19 15 Installation in OS/2 11 Installation in OS/2 For use in OS/2, specially developed drivers are included with delivery. This CAPI driver also supports existing OS/2 applications based on CAPI 1.1. For more information about CAPI, see the section “The Applications Interface CAPI 2.0” on page 78. 11.
HB_B1V30.book Seite 71 Mittwoch, 7. Februar 2001 3:19 15 Installing the Driver Software 6. Next, enter the I/O address corresponding to the jumper setting on the controller hardware. Press the “Tab” key to move to selection bar to the desired value and confirm your selection by pressing “Return”. 7. The next step is to specify the interrupt to be used by the ISDN-Controller. Confirm with “Return”. 8. Specify the D-channel protocol used on your ISDN line. 9.
HB_B1V30.book Seite 72 Mittwoch, 7. Februar 2001 3:19 15 Starting Operation of the Controller B1 v3.0 If the I/O address and interrupt of the ISDN-Controller must be changed after installation, for instance, because new hardware devices were installed, change the position of the jumper on the ISDN-Controller first. Then enter this I/O address and any new interrupt setting in the ISDNLOAD.CFG file. Another option is to re-install the driver software and enter the changed values during installation. 11.
HB_B1V30.book Seite 73 Mittwoch, 7. Februar 2001 3:19 15 Changing the Settings 11.3 Changing the Settings After installation, the setting for the D-channel protocol may be changed. Proceed as follows: Start the INSTALL.EXE program as described in the section “Installing the Driver Software” on page 70 and follow the instructions. 11.4 Installing Additional Controllers Up to four active AVM ISDN-Controllers and ISDN-Controllers for the ISA and PCI bus may be combined in one computer.
HB_B1V30.book Seite 74 Mittwoch, 7. Februar 2001 3:19 15 Installing Additional Controllers :PROTOCOL = \x00 [ISDN-Controller-01] IO Address = 250 Interrupt = 10 Base Module = b1tr6.t4 :PROTOCOL = \x06 Then switch off the computer and physically install the second ISDN-Controller into the system. Make sure that the jumper setting on the ISDN-Controller corresponds to the I/O address entered in the file.
HB_B1V30.book Seite 75 Mittwoch, 7. Februar 2001 3:19 15 Removing the Controller B1 v3.0 11.5 Removing the Controller B1 v3.0 To remove the AVM ISDN-Controller B1 v3.0 from OS/2, proceed as follows: 1. Start the installation program from the CD. The program reports that an installed ISDN-Controller was found. 2. Select the “Uninstallation” option and follow the instructions on the screen. The entries added to the CONFIG.SYS during installation of the ISDN-Controller are deleted. 3.
HB_B1V30.book Seite 76 Mittwoch, 7. Februar 2001 3:19 15 The AVM ISDN-Controller B1 v3.0 on Point-to-Point ISDN Lines 12 The AVM ISDN-Controller B1 v3.0 on Point-to-Point ISDN Lines By default, the AVM ISDN-Controller B1 v3.0 is installed with settings for BRI lines in point-to-multipoint configuration. To operate the controller with point-to-point lines (also called direct-dial-in or DDI lines), a number of special settings must be made depending on the operating system used.
HB_B1V30.book Seite 77 Mittwoch, 7. Februar 2001 3:19 15 The AVM ISDN-Controller B1 v3.0 on Point-to-Point ISDN Lines Windows NT 4.0 Server/Workstation The “B1 Server Edition” developed especially for the AVM products Network Distributed ISDN for Windows NT, AVM ISDN Access Server and the ISDN MultiProtocol Router for Windows NT provides for easy configuration over a selection menu.
HB_B1V30.book Seite 78 Mittwoch, 7. Februar 2001 3:19 15 AVM System Architecture 13 AVM System Architecture This chapter presents information about the ISDN interface CAPI 2.0, the IDM architecture and the AVM system drivers included in the package, along with special CAPI features of the AVM ISDN-Controller B1 v3.0. 13.1 The Applications Interface CAPI 2.0 After the ISDN-Controller B1 v3.0 has been installed, the ISDN interface CAPI 2.0 is available in the computer.
HB_B1V30.book Seite 79 Mittwoch, 7. Februar 2001 3:19 15 Benefits of CAPI Benefits of CAPI CAPI has evolved into an internationally recognized standard. The key factor in this development has been the numerous advantages offered by this uniform interface: independence from specific manufacturers and resulting high investment security, a wide variety of compatible applications for all kinds of operating systems and ISDN protocols, etc.
HB_B1V30.book Seite 80 Mittwoch, 7. Februar 2001 3:19 15 IDM Architecture l Support for one or several BRIs and PRIs through one or several ISDN adapters l Support for multiple concurrent applications l Message definitions independent of operating systems l A message-passing mechanism tailored to specific operating systems for optimum system integration l An asynchronous, event-driven mechanism for high throughput 13.
HB_B1V30.book Seite 81 Mittwoch, 7. Februar 2001 3:19 15 The AVM System Drivers The ISDN Driver Model is the framework for all driver components of AVM ISDN products. The IDM describes how ISDN services are integrated and how they are accessed by applications. It also defines the transparent integration of ISDN hardware resources in the operating system. One of the most important functions the IDM makes possible is the coupling of existing communication components (such as RAS) with CAPI-based hardware.
HB_B1V30.book Seite 82 Mittwoch, 7. Februar 2001 3:19 15 AVM ISDN CAPI Port Driver The AVM system drivers are located on the “AVM ISDN-Controller B1 v3.0” CD in the folder PROGRAMS\\ . The latest versions are also available for downloading from the AVM Data Call Center or from AVM’s FTP server on the Internet. For a detailed description of each driver’s functions, please see the Help file in the corresponding folder.
HB_B1V30.book Seite 83 Mittwoch, 7. Februar 2001 3:19 15 AVM ISDN TAPI Services for CAPI Unlike the AVM ISDN CAPI Port Driver, the AVM NDIS WAN CAPI driver cannot be controlled by AT commands. It uses the standard protocols for network connections over ISDN (“HDLC” and “PPP over ISDN”). AVM ISDN TAPI Services for CAPI The AVM ISDN TAPI Services for CAPI are universal drivers for the use of TAPI applications with AVM ISDN-Controllers in Windows.
HB_B1V30.book Seite 84 Mittwoch, 7. Februar 2001 3:19 15 CAPI SoftFax If you use older ISDN applications that do not support this method of data compression, you have the option of activating data compression directly in the driver software of the ISDN-Controller B1 v3.0. This switches on data compression for all ISDN connections such that the controller will attempt to negotiate V.24bis data compression with the remote site for all X.75 connections, independent of the CAPI application.
HB_B1V30.book Seite 85 Mittwoch, 7. Februar 2001 3:19 15 Technical Summary 14 Technical Summary 14.1 Connector Pin Assignments The ISDN-Controller is connected to the ISDN BRI by a standard RJ45 connector. The pin assignments of this connector are shown in the following tables.
HB_B1V30.book Seite 86 Mittwoch, 7. Februar 2001 3:19 15 Features at a Glance 14.
HB_B1V30.book Seite 87 Mittwoch, 7. Februar 2001 3:19 15 Technical Specifications at a Glance 14.3 Technical Specifications at a Glance l ISDN plug-in card for ISA/EISA-Bus (SMT), dimensions ca. 160 x 105 mm.
HB_B1V30.book Seite 88 Mittwoch, 7. Februar 2001 3:19 15 Technical Assistance from AVM Support 15 Technical Assistance from AVM Support AVM provides numerous sources of information to assist you in your day-to-day work with the AVM ISDN-Controller B1 v3.0. New drivers and software updates for your ISDNController B1 v3.0 are available for downloading free of charge from AVM’s Internet site or the AVM Data Call Center (ADC).
HB_B1V30.book Seite 89 Mittwoch, 7. Februar 2001 3:19 15 AVM Support The AVM Internet Site AVM publishes detailed information and free software updates in the Internet. Direct your browser to www.avm.de and: l Click “Products” for detailed information on all current AVM products, as well as announcements of new products and product versions. l Click “Service” to consult the FAQs: the answers to Frequently Asked Questions about AVM products. Here you will find solutions for specific situations.
HB_B1V30.book Seite 90 Mittwoch, 7. Februar 2001 3:19 15 Support by Fax Support by Fax If you have no connection to the Internet, AVM Support can be reached at the fax number: +49 (0)30 / 39 00 44 05 Please supply the following information in your support request: l Which AVM ISDN-Controller model are you having trouble with? l What is the version number of the driver you are using? You can find this information in the README file in the “AVM” program group.
HB_B1V30.book Seite 91 Mittwoch, 7. Februar 2001 3:19 15 Support by Fax If the connection to the ADC fails, what error messages are displayed? l Describe your PC configuration in as much detail as possible, including the system type, sound card type, any other components installed, and the allocated resources (interrupts and I/O addresses). ISDN-Controller B1 v3.
HB_B1V30.book Seite 92 Mittwoch, 7. Februar 2001 3:19 15 Troubleshooting 16 Troubleshooting This chapter describes general malfunctions and specific error messages, and suggests remedies. The error messages are grouped according to the operating platforms in which the AVM ISDN-Controller B1 v3.0 can be operated. 16.1 General Malfunctions The AVM ISDN-Controller is not detected or not initialized.
HB_B1V30.book Seite 93 Mittwoch, 7. Februar 2001 3:19 15 General Malfunctions l Is your ISDN line active? Use another terminal device, such as an ISDN telephone, to check it. l Is your network terminator (NT) installed correctly? Some NTs must be connected to an electrical outlet as well as to the incoming ISDN line.
HB_B1V30.book Seite 94 Mittwoch, 7. Februar 2001 3:19 15 General Malfunctions Applications like Connect32 and FRITZ!com are unable to connect to analog dial-in ports. To connect to analog systems, appropriate communications software is needed in addition to the ISDN-Controller. With programs like FRITZ!fax, for example, you can connect to Group 3 (analog) fax machines.
HB_B1V30.book Seite 95 Mittwoch, 7. Februar 2001 3:19 15 Error Messages 16.2 Error Messages Error Messages in Windows 2000 Please refer to the Windows 2000 documentation from Microsoft.
HB_B1V30.book Seite 96 Mittwoch, 7. Februar 2001 3:19 15 Error Messages in Windows Me/98/95 Error Messages in Windows Me/98/95 Error message: “Controller-xx with I/O address could not be found” Possible cause: The position of the jumper that sets the I/O address on the ISDN-Controller does not correspond to the entry in the Control Panel (Device Manager), or the hardware is not installed. Remedy: The I/O address set with the jumper must correspond to the entry in the Device Manager.
HB_B1V30.book Seite 97 Mittwoch, 7. Februar 2001 3:19 15 Error Messages in Windows Me/98/95 Error message: “Controller with I/O address does not answer” Possible cause: Hardware defect, or installation files are damaged. Remedy: Repeat the entire installation and then run the hardware test program “B1 Test”. If the hardware is defective, please contact your vendor or AVM. Error message:“...... at least one application/user task is registered.
HB_B1V30.book Seite 98 Mittwoch, 7. Februar 2001 3:19 15 Error messages in Windows 3.x Error message: “Passive and active controllers cannot be installed simultaneously.” Possible cause: You tried to install a passive ISDN-Controller (such as the A1) in a system which already has an active AVM ISDN-Controller B1 v3.0 installed. Remedy: You may install up to four active AVM-ISDN Controllers in one PC. Active and passive ISDN-Controllers cannot be used together in the same system, however.
HB_B1V30.book Seite 99 Mittwoch, 7. Februar 2001 3:19 15 Error messages in Windows 3.x Error message: “Error in the configuration file. Incorrect B1 controller type.” Possible cause: Different types of controllers (ISDN-Controllers for the ISA and PCI buses) are combined in your system. During the installation of the additional controller, the ISDNLOAD.CFG and SYSTEM.INI files were not changed correctly.
HB_B1V30.book Seite 100 Mittwoch, 7. Februar 2001 3:19 15 Error messages in MS-DOS Remedy: Run the“B1 Unload” program from the “AVM” program group to unload the ISDN-Controller and then start the test program again.
HB_B1V30.book Seite 101 Mittwoch, 7. Februar 2001 3:19 15 Error messages in OS/2 Remedy: Note the instructions for installing additional controllers in the section “Installing Additional Controllers” on page 60. When adding an AVM ISDN-Controller for a different bus type, the line Type=XX must be added in the ISDNLOAD.CFG file (“B1at” for ISA controller, “B1pci” for PCI controller).
HB_B1V30.book Seite 102 Mittwoch, 7. Februar 2001 3:19 15 Error messages in Novell NetWare Error messages in Novell NetWare Error message: “CAPI not loaded.” Possible cause: You tried to start an ISDN application without loading the AVM ISDN-Controller B1 v3.0 first. Remedy: Load the Controller B1 v3.0 by entering load capi20 at the system console and then start your ISDN application. Error message: “Error in configuration file, no ISDNController defined.
HB_B1V30.book Seite 103 Mittwoch, 7. Februar 2001 3:19 15 Error messages in Novell NetWare Error message: “Installation error, Controller-xx with I/O address does not answer.” Possible cause: The ISDN-Controller was not completely loaded, or the hardware has been damaged. Remedy: Repeat the complete ISDN-Controller installation procedure. To test the hardware, you may install the ISDNController in DOS and then run the program “B1 Test”. In case of a hardware defect, please contact your dealer or AVM.
HB_B1V30.book Seite 104 Mittwoch, 7. Februar 2001 3:19 15 Error messages in Novell NetWare Remedy: First end all applications that use the ISDN-Controller. Then you can unload or uninstall it. Error message: “Installation error, I/O address not available.” Possible cause: The I/O address selected during installation of the ISDN-Controller is used by another hardware device and is not available. Remedy: Establish which I/O addresses are available in your system.
HB_B1V30.book Seite 105 Mittwoch, 7. Februar 2001 3:19 15 Support for Multiple Subscriber Numbers (MSNs) 17 Support for Multiple Subscriber Numbers (MSNs) 17.1 Introduction What are MSNs? Deutsche Telekom provides new ISDN subscribers with EuroISDN lines. Several terminal devices may be operated at a single ISDN access. A given terminal device on the Euro-ISDN connection is selected by dialing the MSN (Multiple Subscriber Number) assigned to it.
HB_B1V30.book Seite 106 Mittwoch, 7. Februar 2001 3:19 15 Mapping an MSN to an EAZ Mapping an MSN to an EAZ To map an MSN to an EAZ, proceed as follows: 1. Configure your application for a certain EAZ (from 1 to 9). Refer to the application’s manual for instructions. If the application is configured for the EAZ 0 (zero), it will respond to all MSNs configured in the system by MSN.EXE. 2. Load the controller by typing the command ibase at the DOS prompt. 3. Run MSN.
HB_B1V30.book Seite 107 Mittwoch, 7. Februar 2001 3:19 15 Canceling/Resetting MSN–EAZ Mapping Canceling/Resetting MSN–EAZ Mapping The following commands can be used to cancel an MSN assignment or to reset the MSN mapping: l Cancels the MSN assignment to the given EAZ so that a new MSN may be mapped to it. msn -f l Resets the MSN mapping for the given EAZ so that the ISDN-Controller is in its original state.
HB_B1V30.book Seite 108 Mittwoch, 7.
HB_B1V30.book Seite 109 Mittwoch, 7. Februar 2001 3:19 15 Windows 2000 95 Windows 3.x 98 Windows Me/98/95 96 Windows NT 95 errors general 92 F FAQs 89 fax protocols 84 features of the ISDN-Controller B1 v3.0 86 G general malfunctions 92 Windows NT 25 installing additional controllers with Stand-Alone CAPI Novell NetWare 66 installing the driver software MS-DOS 56 Novell NetWare 63 OS/2 70 Windows 2000 17 Windows 3.
HB_B1V30.book Seite 110 Mittwoch, 7. Februar 2001 3:19 15 installing additional ISDN-Controllers with the CAPI Manager 68 installing the driver software 63 removing the controller 68 starting ISDN-Controller B1 PCI operation with Stand-Alone CAPI 66 Novell Netware configuring the controller with CAPI for the CAPI Manager 67 Novell Netware with Stand-Alone CAPI 66 OS/2 72 Windows 3.
HB_B1V30.book Seite 111 Mittwoch, 7.