
User guide


39
5.2.1 Add Mark Under Fix
While in HSI mode, it is possible to create a User Mark under the current position fix. From the
HSI screen:
> ‘MENU’ + “ADD MARK UNDER FIX” + ‘ENTER’
An information box will appear confirming the creation of the User Waypoint and informing of the
default name applied by the software; press ‘ENTER’ to accept. To edit this Mark see Par. 8.1.3 and
Par. 8.2.2.
5.2.2 Setup Datafields
The HSI Data Window can be customized by the user to display navigational data required for his
flight; similar to the Moving Map Data Window (see Par. 3.2). You can edit the data fields from the
HSI page:
> ‘MENU’ 1 sec. + “HSI SCREEN” + ‘ENTER’ + ‘MENU’ + “SETUP DATA FIELDS...” +
‘ENTER’
After pressing ‘ENTER’ a box in the Data Window will be highlighted. Select the box to be edited
and press ‘ENTER’. The OPTIONS box will appear allowing you to select the item to display in this
box. Once selected, press ‘ENTER’ to accept.
You can then scroll to another box and proceed as above. Once all boxes are set up, press ‘CLEAR’
to exit.
5.2.3 Default Datafields
This will restore the data field settings to the default values of Track (TRK), Ground Speed (GS), To
Descent, Distance (DST), Estimated Time Enroute (ETE) and Altitude (ALT). From the HSI screen:
> ‘MENU’ + “DEFAULT DATA FIELDS” + ‘ENTER’
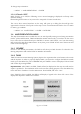
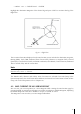
5.2.4 Compass Orientation
The Compass Orientation allows you to set the orientation mode for the HSI compass to either
North-up or Track-up. The Compass Orientation controls the rotation such that track heading
(Track-up or North-up) always appears at the top of the screen.
> ‘MENU’ 1 sec + “HSI SCREEN” + ‘ENTER’ + ‘MENU’ + “COMPASS ORIENTATION”
+ ‘ENTER’
Note
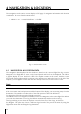
Full screen HSI is displayed now with black background if “DARK” option is selected in “Data Window Color”
setting. The same rule that is applied to Data Window HSI thumbnail.