
Cyclades-PR2000 Access Router Installation Manual


Cyclades-PR2000
25Chapter 4 - Step-by-Step Instructions
STEP SEVEN
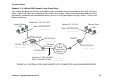
NAT parameters will now be determined for routing outside of the local LAN. Network Address Translation
maps the local IP addresses, registered in the local address range menu below, to the one global IP address
assigned by the access provider. Local IP addresses not indicated in this menu will be discarded.
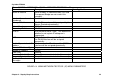
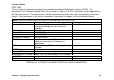
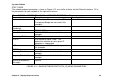
Menu CONFIG =>SECURITY =>NAT =>LOCAL ADDRESS =>ADD RANGE
Parameter Example Your Application
First IP Address 192.168.0.10
Last IP Address 192.168.0.30
FIGURE 4.8 NAT LOCAL ADDRESS RANGE MENU PARAMETERS
The factory preset values for all other NAT parameters are appropriate for this example.
STEP EIGHT
Now that the parameters have been defined, enter into each menu described above, in the order presented
(read chapter 3, Using Menus, if you have not done so already). Set the parameters in each menu according
to the values you wrote in the figures above. Save the configuration to flash memory at each step when
requested — configurations saved in run memory are erased when the router is turned off. If you saved part of
the configuration to run memory for some reason, save to flash memory now using the menu option ADMIN
=>WRITE CONFIGURATION =>TO FLASH.
STEP NINE
The Ethernet interface can be tested as described in the troubleshooting appendix. The SWAN interface can
be tested in a similar manner. At this point, you should create a backup of the configuration file (in binary) and
print out a listing of the configuration.