Page |1 Titan One Quick Start Guide Avolites Ltd 184 Park Avenue, Park Royal, London, NW10 7XL, England. Switchboard: +44 (0) 208 965 8522 Sales Direct: +44 (0) 208 955 9220 Fax: +44 (0) 208 965 0290 www.avolites.
Page |2 Contents 1 Introduction 2 Layout 3 Getting Started – New Show and Patching 4 Groups 5 Workspaces 6 Controlling Fixtures 7 Palettes 8 Recording Cues 9 Basic Timings 10 Simple Effects – Shape Generator 11 Chases 12 Cue Lists 13 Pixel Mapper 14 Saving the Show 15 Have Fun! Avolites Ltd 184 Park Avenue, Park Royal, London, NW10 7XL, England. Switchboard: +44 (0) 208 965 8522 Sales Direct: +44 (0) 208 955 9220 Fax: +44 (0) 208 965 0290 www.avolites.
Page |3 Useful Avolites phone numbers:Avolites England Sales and service* (+44) (0) 20 8965 8522 Service out of hours*(+44) (0) 78 3117 8888 Fax (+44) (0) 20 8965 0290 Email sales@avolites.com Website http://www.avolites.com *Before contacting Avolites for service enquiry please ensure that you have the product serial number and the Software version. The latest version of this manual and Console Software can be downloaded from the website www.avolitesdownloads.
Page |4 1 Introduction Welcome to the Titan One Quick Start Guide! Titan One is intended for two purposes: - with the USB – DMX dongle plugged in as a full lighting control system that will output one universe of DMX or Artnet without the dongle connected it will become an easy to use Simulator that will output 12 lines of DMX or Art-Net with a spoiler, enabling you to program or edit a show on your laptop using any Art-Net visualiser, and then load this straight into any Titan console.
Page |5 2 Layout Titan One has been specially designed so that everything is available on a single touch screen. All the functions of the regular consoles are available, plus a few extras to help you move around the virtual console more easily, i.e. virtual faders and encoders. Avolites Ltd 184 Park Avenue, Park Royal, London, NW10 7XL, England. Switchboard: +44 (0) 208 965 8522 Sales Direct: +44 (0) 208 955 9220 Fax: +44 (0) 208 965 0290 www.avolites.
Page |6 3 Getting Started – New Show and Patching 1. To start a new show, go to [Disk], then press [New Show] and hit [Ok]. You will now have an empty showfile, with four default workspaces. 2. Now to start patching, press the [Patch] button. Press Softkey G [Patch View]. You have two tabs – “Patched Fixtures” and “Personality List”. As we have no fixtures patched into the desk yet, select “Personality List”. 3. Click on the search bar, and search for Generic Dimmer.
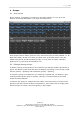
Page |7 When you have patched all your fixtures in, your ‘Patched Fixtures’ tab should look like this: 4. Each fixture has its own colour code 5. Each DMX line has a usage bar 6. The bar at the top of the screen shows how much of the universe is used up/free. In the main body of the window, you get a breakdown for each fixture which tells you the mode it’s in, what its address is, the legend, where it’s patched to, whether it’s frozen, or pan/tilt inverted.
Page |8 4 4.1 Groups Auto groups At the moment, “Autogroup” is turned on in the Patch options, so if you go to the Fixtures and Groups Workspace, your page will look like this: Auto groups create a master group for every new fixture type you have patched (i.e. All Robin 600e Spot), so that every time you patch more of the same fixture, they are added to this group, and also quantity groups, so every time you patch a quantity greater than 1, a group will be created for this. 4.
Page |9 5 5.1 Workspaces Creating your own workspace The buttons down the left hand side of the screen are your workspaces. To save your own, simply arrange windows as you want them, then click into an empty workspace button, give it a name then press [Enter]. Softkey G [Open Workspace Window] will give a list of available windows to open. 1. Under the ‘I’, there are arrangement options including size and position of window, and button and text size. 6 6.
P a g e | 10 this menu you can toggle Sofykey C between [Freeze Current Values] and [Release to Playback Values]. If you want to always put dimmer information into the programmer when you turn a fixture on, then press [@] twice to send the fixture to full. Once your fixtures are on, you have two ways to control them – using the wheels or the Attribute Control Window. If you are using the wheels, then you can change attribute bank using the letters above the virtual encoders.
P a g e | 11 If you select a percentage value and hold down, a slide bar will appear. As with using the encoders, as soon as you change a value it will highlight in cyan, indicating it is in the programmer. If you then want to take this attribute out of the programmer, click it again and it will go grey. 6.
P a g e | 12 information under the legend, and the ‘S’ in the top right corner indicates a shared palette. Auto legend has provided the colour picker information from the colour picker. 7.3 Creating a Normal Palette To create a normal position palette: Press [Clear], select just the 4 floor spots and press [Locate] and move them into a drummer position. You can do this using [Fan] and [Highlight] to fine tune. Now click into an empty palette in the Position window and call it ‘Drums’.
P a g e | 13 8 8.1 Recording Cues Record Modes There are three main recording modes to create a cue or memory: Channel mode - records only the channels you have changed for the fixtures in the programmer.
P a g e | 14 second channel mode cue. Because the second cue only contains values for position and gobo, it will carry the last value for colour through, as it has nothing to change it with. Now, have a go at record by Stage by keeping these playbacks up, then adding blinders information on top in the programmer and saving this first by Fixture, then the same information in Stage.
P a g e | 15 9 Basic Timings 9.1 Timing Menu By default, all LTP channels will snap to the final cue position as soon as you fire the fader, and dimmer control is on the fader. To change this, press [Edit Times], then press the playback you wish to edit. 9.2 Attribute Timings You can also get to Attribute group timings (eg all colour channels) by pressing the button above the encoders ( [C] in this case).
P a g e | 16 The dashes mean that channel is currently using global times. When you have finished editing times, simply press exit – the console saves changes as you make them. Avolites Ltd 184 Park Avenue, Park Royal, London, NW10 7XL, England. Switchboard: +44 (0) 208 965 8522 Sales Direct: +44 (0) 208 955 9220 Fax: +44 (0) 208 965 0290 www.avolites.
P a g e | 17 10 10.1 Simple Effects – Shape Generator Creating a Shape Depending on what you want to achieve, we have two effects engines in Titan – a shape generator for more simple effects, and a pixel mapper for more complex ones. With shape generator, there are 3 parameters you can change for any shape – size, speed and spread, and the shapes are arranged by category. Go to [Shapes and Effects] and then choose [Shape Generator]. First, select some fixtures, [Locate] them and then select [Create].
P a g e | 18 11 Recording Chases 11.1 Starting Recording a Chase Chases obey exactly the same rules of recording as normal cues do (Channel/Fixture/Stage), you are just recording a series of cues to loop in sequence onto a single handle. When you press [Record] and choose [Create Chase], then the first time you press a playback button, you are only assigning a handle for a chase. In order to record your first step, you must then press the button again. 11.
P a g e | 19 12 Cue Lists 12.1 Tracking By default cue lists operate with tracking, this can be turned off under [Playback Options]. Having tracking turned on means that the cue list only records the changes you make, which is very useful for updating. For example, if in Cue 1, you set the colour to red, and then change the colour again in Cue 5 to blue, the red information is only actually saved in Cue 1, and is tracked through Cues 2 – 4.
P a g e | 20 If you press [View] and then choose the cue list, you will get the following display appear: When you have a cue list connected, to update a live step, press [Record] [Cue] then choose from softkeys or [Cue] again to merge into current step. To update a cue time, press [Live Time] to go into the current steps time. To edit a different cue, specify on Softkey A. If you then press an attribute button such as [C] for colour it will take you straight to colour timings.
P a g e | 21 12.4 Tips - - Autoloads will not track, if they are to be used in consecutive cues they should be autoloaded into all required cues The default behaviour of a cue list is that when the fader is brought to zero, it will remain connected in the current cue. To kill it, press [Off] then the cue list.
P a g e | 22 13 13.1 Advanced Effects - Pixelmapping Creating a Layout To create more complex and customisable effects, use Pixel Mapper. The layout is done on a group basis, so you could have the same fixtures in multiple layouts for different effects. First create a group, and then go to [Shapes and Effects] -> [Pixel Mapper] -> [Edit Group Layout] Avolites Ltd 184 Park Avenue, Park Royal, London, NW10 7XL, England.
P a g e | 23 13.2 Creating an Element When you have done this, the next time you select the group it will always apply this layout to it. Now locate them, and go to the workspace labelled [Effect Editor]: Create an element, and you then have lots of modifiers, including XY for positioning, width and height for stretching the element etc: Avolites Ltd 184 Park Avenue, Park Royal, London, NW10 7XL, England. Switchboard: +44 (0) 208 965 8522 Sales Direct: +44 (0) 208 955 9220 Fax: +44 (0) 208 965 0290 www.
P a g e | 24 The colour of the layer is available under the master Layer controls (Layer 1, Layer 2 etc) 13.3 Adding Animation Once you’ve made and adjusted your element, add an animation: Have a go at layering up different animations with each other, different colours of the same element moving in opposite directions, and especially the draw your own tab – creating custom colour shapes is now incredibly easy. 13.