INSTRUCTION BOOKLET ELECTRIC COOKER CSIE 503 W Please read this instruction booklet before using the appliance 1
Important Safety Information You MUST read these warnings carefully before installing or using the appliance. If you need assistance, contact our Customer Care Department on 08705 950950 Installation ● This cooker must be installed by qualified personnel, according to the manufacturer’s instructions and to the relevant British Standards. • This cooker is heavy. Take care when moving it. ● Remove all packaging before using the cooker.
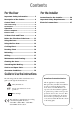
Contents For the User For the Installer Important Safety Information .............. 2 Instructions for the Installer ............. 26 Description of the Cooker .................... 4 Important Safety Requirements ......... 26 Control Panel ...................................... 5 Electrical connections ....................... 27 The Oven Cavity ......................................... 5 Accessories ................................................5 Operation ........................................
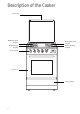
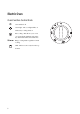
Description of the Cooker Cooker lid Back left normal hotplate Back right normal hotplate Front left rapid hotplate RAPID Control panel NORMAL NORMAL RAPID OVEN & GRILL Front right rapid hotplate MINUTE MINDER MAINS ON THERMOSTAT ON + STOP SET TIME PUSH BOTH Oven door Storage drawer 4
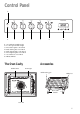
Control Panel 2 RAPID NORMAL NORMAL RAPID OVEN & GRILL MINUTE MINDER MAINS ON THERMOSTAT ON + STOP 1 1. 2. 3. 4. 5. 6. 7. 8.
Operation Electric Hotplates To switch on a hotplate, turn the relevant control knob to the required heat setting. The control knob is numbered 0 - 6 0 - OFF 1 - Minimum 6 - Maximum. The hob has two types of hotplates: Normal Hotplates (Back right and left) We recommend the plates are switched to maximum (6) for a short while to boost the plate, and then adjusted to the required setting.
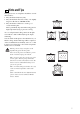
i Hints and Tips Saucepans for use on solid plates should have several characteristics: ● ● ● They should be fairly heavy duty They should fit the heat area exactly, or be slightly larger for efficient use, NEVER smaller. They should have a flat base to ensure good contact with the plate. This is particularly important when using pans for high temperature frying or pressure cooking. As soon as liquid starts boiling, turn down the plate control knob so that it will barely keep the liquid simmering.
Electric Oven Oven Function Control Knob O Oven switched off Oven Light - The oven light will be on without any cooking function Fan cooking - This allows you to roast or roast and bake simultaneously using any shelf, without flavour transference. 50-max Range of temperature regulation for Fan cooking Grill - The heat comes only from the top element.
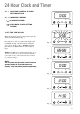
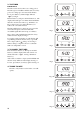
24 Hour Clock and Timer 1. ( - ) DECREASE CONTROL & TIMER SETTING BUTTON 2. ( + ) INCREASE CONTROL ( ( + - ) COOKPOT SYMBOL SET TIME STOP ) PUSH BOTH CLOCK SETTING SYMBOL PUSH BOTH 1 2 - + 1. SET THE TIME OF DAY When the electricity supply is first switched ON, the display will flash 0.00. See Fig. 1. Press buttons (1) and (2) together. The display will read 88.88. See Fig. 2. Release buttons, 0.00 will appear in the display as Fig. 3. Within 5 seconds press button (2), 12.
2. THE TIMER IMPORTANT The timer can be used to time a set cooking period. The timer gives an audible reminder at the end of any period of cooking up to 23 hours and 59 minutes. To set, press button (1) and the display will read 0 . 00 , see Fig. 6. Release button (1) and press and hold button (2). The display will count up in one minute intervals until the interval to be timed is reached, e.g. 30 minutes, see Fig. 7. If necessary, press and hold button (1) to achieve the correct time interval.
Before the First Use of the Oven Remove all packaging, both inside and outside the oven, before using the oven. Before first use, the oven should be heated without food. During this time, an unpleasant odour may be emitted. This is quite normal. ☞ 1. Set the oven function control knob to MAX. 2. Open a window for ventilation. 3. Allow the oven to run empty for approximately 45 minutes. This procedure should be repeated with the grill function for approximately 5-10 minutes.
i Hints and Tips Condensation and steam When food is heated it produces steam in the same way as a boiling kettle. The oven vents allow some of this steam to escape. However, always stand back from the oven when opening the oven door to allow any build up of steam or heat to release. If the steam comes into contact with a cool surface on the outside of the oven, e.g. a trim, it will condense and produce water droplets. This is quite normal and is not a fault with the oven.
Using the Fan Oven The air inside the oven is heated by the element around the fan situated behind the back panel. The fan circulates hot air to maintain an even temperature inside the oven. The advantages of cooking with this function are: ✓ Faster Preheating As the fan oven quickly reaches temperature, it is not usually necessary to preheat the oven although you may find that you need to allow an extra 5-7 minutes on cooking times.
Cooking Chart This chart is intended as a guide only. It may be necessary to increase or decrease the temperature to suit your individual requirements. Only experience will enable you to determine the correct setting for your personal requirements. Food Thermostat Runner Position Time Biscuits, cookies 2 trays 160-180 1-3 18-25 min. Bread, yeast doughs 2 trays 170-200 1-3 35-45 min. Cakes, Victoria sandwich 2 trays 160-180 1-3 20-28 min.
i Hints and Tips Runner positions are not critical, but make sure the shelves are evenly spread. When cooking more than one dish in the fan oven, place dishes centrally on the shelves rather than several dishes on one shelf. When the oven is full, you may need to allow slightly longer cooking time. A shelf may be placed on the floor of the oven. Place dishes on a shelf in this position rather than on the oven base, to allow air circulation around the food. When the oven is full of the same food, e.g.
Defrosting i Hints and Tips The oven fan operates without heat and circulates the air, at room temperature, inside the oven. This increases the speed of defrosting. However, please note that the temperature of the kitchen will influence the speed of defrosting. This function is particularly suitable for delicate food which could be damaged by heat, e.g. cream filled gateaux, iced cakes, pastries, bread and other yeast products.
Grilling Grilling must be carried out with the oven door closed. The grill pan handles must be removed from the pan. ☞ How to Use the Grill 1. Turn the oven control function knob to . 2. Adjust the grid and grill pan runner position to allow for different thicknesses of food. Position the food close to the element for faster cooking and further away for more gentle cooking. Preheat the grill for a few minutes before sealing steaks or toasting. Adjust the shelf as necessary, during cooking.
Maintenance and Cleaning Before any maintenance or cleaning can be carried out, you must DISCONNECT the cooker from the electricity supply. The Hob Top The hob is best cleaned whilst it is still warm, as spillage can be removed more easily than if it is left to cool. Regularly wipe over the hob top using a soft cloth well wrung out in warm water to which a little wasing up liquid has been added.
Cleaning the Oven Before cleaning always allow the cooling fan to cool the oven down before switching off at the electricity supply. The oven should be kept clean at all times. A build-up of fats or other foodstuffs could result in a fire, especially in the grill pan. Cleaning materials Before using any cleaning materials on your oven, check that they are suitable and that their use is recommended by the manufacturer. Cleaners that contain bleach should NOT be used as they may dull the surface finishes.
Oven Cavity The enamelled oven cavity is best cleaned whilst the oven is still warm. Wipe the oven over with a soft cloth soaked in warm soapy water after each use. From time to time it will be necessary to do a more thorough cleaning, using a proprietary oven cleaner. If the soilage has become set, after the oven has cooled down, the following process will help to soften the splatters to help make cleaning easier. the grill/ meat pan on the oven shelf ☞ 1. Place positioned in the lowest runner. 2.
Something Not Working If the appliance is not working correctly, please carry out the following checks before contacting your local Service Force Centre. IMPORTANT: if you call an engineer to a fault listed below, or to repair a fault caused by incorrect use or installation, a charge will be made even if the appliance is in guarantee. SYMPTOM SOLUTION ■ The hob hotplate does not heat up.
Service and Spare Parts If you require spare parts or an engineer contact your local Service Force Centre by telephoning: 08705 929 929 Your call will be routed to the Service Centre covering your post code area. The addresses of Tricity Bendix Service Force Centres are detailed on the following pages. When you contact the Service Centre, they will need the following information: 1. Your name, address and post code. 2. Your telephone number 3. Clear and concise details of the fault 4.
Guarantee Conditions TRICITY BENDIX STANDARD GUARANTEE CONDITIONS We, Tricity Bendix, undertake that if, within 12 months of the date of the purchase, this Tricity Bendix appliance or any part thereof is proved to be defective by any reason only of faulty workmanship or materials, we will, at our option, repair or replace the same FREE OF ANY CHARGE for labour, materials or carriage on condition that: * The appliance has been correctly installed and used only on the gas and electricity supply stated on the
TRICITY BENDIX SERVICE FORCE To contact your local Tricity Bendix Service Force Centre telephone 08705 929 929 CHANNEL ISLANDS GUERNSEY Guernsey Electricity PO Box 4 Vale , Guernsey Channel Islands JERSEY Jersey Electricity Company PO Box 45 Queens Road St Helier Jersey Channel Islands JE4 8NY SCOTLAND ABERDEEN (M05) AUCHTERMUCHY (M03) BLANTYRE (M07) DUMFRIES (M01) DUNOON (M 67) GLASGOW (M04) INVERNESS (M06) ISLE OF ARRAN (OWN SALES) ISLE OF BARRA (OWN SALES) ISLE OF BUTE (M66) 24 8 Cornhill
TRICITY BENDIX SERVICE FORCE To contact your local Tricity Bendix Service Force Centre telephone 08705 929 929 MIDLANDS BIRMINGHAM (M18) BOURNE (M44) BRIDGNORTH (M72) 66 Birch Road East, Wyrley Road Industrial Estate Witton Birmingham B67DB Manning Road Ind Estate Pinfold Road Bourne PE10 9HT 1 Underhill Street Bridgnorth Salop WV16 4BB GLOUCESTER (M23) 101 Rycroft Street Gloucester GL1 4NB HEREFORD (M31) Unit 3 Bank Buildings Cattle Market Hereford HE4 9HX HIGHAM FERRERS (M51) The Old Barn Westfie
Instructions for the Installer Technical Data Model Number: CSIE 503 W Dimensions Height Depth Width Oven Capacity 900 mm 595 mm 597 mm 1.8 Cu.
Electrical connections Any electrical work required to install this hob should be carried out by a qualified electrician or competent person, in accordance with the current regulations. THIS COOKER MUST BE EARTHED. The cooker should be connected to a double pole switch with a minimum gap of 3 mm. between the switch contacts and of a type suitable for the required load in compliance with the current electric regulations.