
Instruction Manual


Tools required for the installation:
• Phillips Head Screw Driver
• Electric or Portable Drill
IMPORTANT!
• For safety reasons, the wall or mounting surface must be capable of supporting the combined weight of the mount and
the display; otherwise the structure must be reinforced.
• Safety gear and proper tools must be used. Failure to do so can result in property damage and/or serious injury.
• Make sure that no electrical cables, water pipes or gas pipes are located within the wall.
(A) M8x63 Lag Bolt X 2 (B) Concrete Anchor X 2 (C) Lag Bolt Washer X 2
(D) Small Spacer X 4 (E) Large Spacer X 4 (F) M6 Washer X 4
(G) M4x12 Bolt X 4 (H) M4x30 Bolt X 4 (I) M4 Lock Washer X 4
(J) M5x12 Bolt X 4 (K) M5x30 Bolt X 4 (L) M5 Lock Washer X 4
(M) M6x12 Bolt X 4 (N) M6x35 Bolt X 4 (O) M6 Lock Washer X 4
(P) M8x16 Bolt X 4 (Q) M8x40 Bolt X 4 (R) M8 Lock Washer X 4
• 1/4” (6 mm) Drill Bit + Stud Finder ( Drywall Installation )
• 7/16” (11 mm) Masonry Bit ( Concrete Installation )
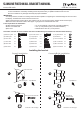
Drywall Installation
Concrete/Brick Installation
Center of the stud
Stud Finder Tape Measure Tape Measure
Use a pen to mark the holes Use a pen to
mark the holes
SLIMLINE FIXED WALL BRACKET MANUAL
www.av-link.co.uk Order Ref: 129.353UN
1a
2a
1b
2b
Also make sure that all of the hardware has been included with your bracket.You should find the following:
• Ratchet Driver with 1/2” (13 mm) Socket • Spirit Level
Installing the bracket
Continues on the next page Continues on the next page
NOTE: Please read and follow these installation instructions carefully, and always work within the guidelines of your
screen manufacturer. Assembly and fitting should be performed by a capable installer at their own risk.
We are not liable for any damage caused by improper installation.