Moving Message Display User Manual Item Ref: 153.110, 153.111, 153.112, 153.114 Version 2.
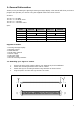
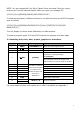
1: General Information Thank you for purchasing the QTX Light moving message display. This manual will show you how to program and operate your device using the supplied hand-held remote control. Versions: 153.110: 153.111: 153.112: 153.113: 7 7 7 7 x x x x 80 RED 80 Multi colour 120 RED 120 Multi colour Spec: Item 153.110 Power LED Colour 153.111 153.112 5Vdc, 3A Red Multi Colour 153.
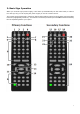
2: Basic Sign Operation When you connect sign’s power supply, it will start up automatically. On the other hand, in order to turn the sign off, you can unplug the power supply or use the remote control. The remote control has primary functions (letters and numbers printed on the buttons) and secondary functions (highlighted just above).
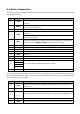
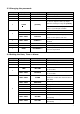
2.1 Button Explanation The first part of this chapter explains what each primary function (printed on the button) does and the meaning for each. Item Key 1 ESC 2 PROG 3 CPW Description Takes you back to the previous option or to escape editing and run the program Enter the Edit Program Mode. Select file numbers 01 to 99 to enter message. (see section 3.1) Use for edit or reset password (see reset password section 3.
Appendix 1) 20 SPE Select the display speed of the message. (see Section 3.2 & Appendix 1) 21 GRA 22 PHR 23 BEEP Select graphic option, Use to Make, Edit or use a current Graphic already stored in the Memory (see Section 3.5) Select a programmed animation in the message. (see Section 3.2 & Appendix 1) 24 Select beep sound in the message.
NOTE: You can change the Font Style, Speed, Pause time and Colour by simply pressing ALT and the selected option before you type you message EG: [CYCLIC][5x11][GREEN][PAUSE1]WELCOME[CYCLIC] To make words display in different frames or one after the other press ENT to display type as follows: [CYCLIC][5x11][GREEN]WELCOME[CYCLIC][5x11][RED]TO[CYCLIC]SHOP NAME[CYCLIC] This will display the three words differently one after another To erase a program press CLR then ENT to delete the program and start again 3.
3.
3.5 Making Custom Graphics: You can make your own style graphics to suit your needs by selecting individual pixels and adding them within a sequence.
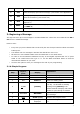
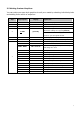
Appendix 1: Function DISPLAY Meaning [CYCLIC] Random effect [IMMED] Immediate [OPEN←] Slides in from Right [OPEN→] Open from Left [OPEN<>] Open from Center [OPEN><] Open to Center [COVER<>] Cover from Center [COVER←] Cover from Right [COVER→] Cover to Left [COVER><] Cover to Center [SCROLL↑] Scroll Up Direction of text [SCROLL↓] Scroll Down movement [INTER><] Interlace to Center [INCOVER><] Interlace to Cover [COVER↑] Cover Up [COVER↓] Cover Down [SCANLN] Scan Line [EX
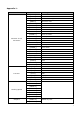
[GRAPH C] [GRAPH D] [GRAPH E] [GRAPH F] [GRAPH G] [GRAPH H] Animation Pause Length [GRAPH I] City [GRAPH J] Car [GRAPH K] Ship [GRAPH L] Telephone [GRAPH M] Birds [GRAPH N] Ship [GRAPH O] Swim [GRAPH P] Cat [ANIM1] Merry X'Mas [ANIM2] Happy New Year [ANIM3] 4th July [ANIM4] Happy Easter [ANIM5] Happy Halloween [ANIM6] Don't Drink & Drive [ANIM7] No Smoking [ANIM8] Welcome [PAUSE 1] Pause for 2 seconds [PAUSE 2] Pause for 3 seconds [PAUSE 3] Pause for 4 seconds [PAUSE
TROUBLESHOOTING: No display: Check if the power socket located at the back is connected Ensure AC power plug is plugged in to the wall outlet Check to see if the mains power in to the external power supply is connected No response to remote control: Check that the batteries in the remote have enough energy Ensure the batteries are installed at the correct polarity Ensure a clean line of sight between the remote and the sign No display but response to the remote: Check if the AUTO ON/AUTO OFF time setti