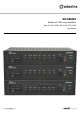
RM SERIES Rackmount 100V mixer-amplifiers Item ref: 953.110UK, 953.111UK, 953.
Caution: Please read this manual carefully before operating Damage caused by misuse is not covered by the warranty Introduction Thank you for choosing the Adastra RM-series rackmount 100V amplifier as part of your public address system. This amplifier is designed to offer high quality, dependable service for mobile and installed systems. Please read this manual fully and follow the instructions to achieve the best results with your new purchase and to avoid damage through misuse.
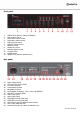
Front panel 1. 2. 3. 4. 5. 6. 7. 8. 9. 10. 11. 12. USB/SD audio player (+FM tuner RM240S) MIC 1volume control MIC/LINE 2 volume control MIC/LINE 3 volume control LINE 4 volume control LN5/USB volume control BASS EQ control TREBLE EQ control MASTER volume control VU meter LEDs POWER switch Speaker zone switches (RM240S only) Rear panel 13. 14. 15. 16. 17. 18. 19. 20. 21. 22. 23. 24. 25. 26.
Connection and setup Connect the rear IEC inlet (14) to the mains using the supplied mains lead (or an equivalent approved type). Ensure that the voltage is correct as indicated on the voltage selector (13) and that the mains outlet is switched on. Alternatively, the amplifier can be powered by a 24V battery, such as a lorry or boat battery, by connecting the “+” and “-” of the battery to the 24Vdc INPUT (15) on the rear panel. Ensure that DC cables are capable of handling the current (10A min.
Speaker outputs The RM series amplifiers can be used either as 100V line amplifiers or standard low impedance power amplifiers. These 2 configurations cannot be used together, so it is important to decide which method will be used at the start. 100V line systems For 100V line systems, connect the amplifier to the first speaker in the system using double-insulated speaker wire which has adequate current rating to handle the total output of the amplifier.
Operation When all connections to the amplifier are made, turn all rotary controls down and switch on the power (11) and a power “ON” LED will illuminate. Turn BASS and TREBLE controls to the 12 o’clock position (pointing straight up) and turn the MASTER rotary control (5) up part way for testing. Ensure a signal is being fed to one of the line inputs 2, 3, 4 or 5 and gradually increase the volume control for that channel until the output is heard through the speakers.
USB/SD/(FM) audio player 1. 2. 3. 4. 5. 6. 7. 8. 9. USB / SD / (FM) input source selector REPEAT button (repeat play / random play) USB port: accepts USB storage device EQ select: step through 5 different presets SD CARD INPUT Previous track/FM channel, volume down Play/Pause track or FM channel select mode (press and hold for FM auto tune) Next track/FM channel or volume up LED digital display RM60 and RM120 are fitted with a built-in USB/SD audio player.
Specifications Power supply Output power: RMS Outputs : Speaker Output: Line Inputs Volume controls Equalizer : Bass / Treble USB/SD/(FM) controls Rear panel DIP switches Phantom power THD Dimensions Weight RM60 RM120 RM240S 110/230Vac, 50/60Hz (IEC) or 24Vdc option (screw terminals) 60Wrms 120Wrms 240Wrms 100V / 8 Ohm / COM 100V / 8 Ohm / COM 4 x 100V / 8 Ohm / COM RCA signal output Mic XLR, 2 x mic/line jack, 2 x RCA line Mic1, mic/line2+3, line4+5 (USB), master 100Hz ±10dB / 10kHz ±10dB USB/SD, repeat,