User Manual HD Player Pro Rev.2 AV Stumpfl GmbH Mitterweg 46 A-4702 Wallern Tel.: +43-7249-42811 Fax: +43-7249-428114 E-Mail: AVstumpfl@AVstumpfl.com Internet: http://www.AVstumpfl.
FCC Notices It’s herewith confirmed to comply with the requirements of FCC Part 15 Rules. Operation is subject to the following two conditions: This device may not cause harmful interference. This device must accept any interference received, including interference that may cause undesired operation. Note: This equipment has been tested and found to comply with the limits for a Class B digital device, pursuant to part 15 of the FCC Rules.
Index 1. PACKAGE CONTENTS ........................................................................................................................5 2. INTRODUCTION ..................................................................................................................................5 3. FEATURES...........................................................................................................................................6 4. HARDWARE OVERVIEW ....................................
9.5 Features ........................................................................................................................................39 10. SCHEDULE FUNCTION .....................................................................................................................40 10.1 Install the Schedule software .........................................................................................................40 10.2 Start the Schedule Software ..........................................
1. PACKAGE CONTENTS 1. HD Player Pro 2. Remote Control 3. CF Card Protective Cover 4. Video & Audio Cable 5. RS-232 Cable (optional) 6. VGA to Y.Pb.Pr Cable 7. Power Adapter 8. Quick Guide 9. CD Driver - Schedule Software - IP Detect Tool - User Manual 2. INTRODUCTION The new „HD Player“ by AV Stumpfl supports professional High Definition video playback from Compact Flash card. Integrated hardware decode acceleration ensures smooth full HD playback and clear images.
3. FEATURES Synchronized Playback Function: Synchronize up to 254 units using Ethernet on same subnet. Seamless-function: possibility to playback videos with nearly no breakout (only for H.
4.
Power Switch: Toggle between main power on & off DC Input: for the power adapter. (DC 12V / 1.
5.1 Entering Text or IP-Address Keys need to be pressed multiple times to enter the letter corresponding to that key. Enter an IP Address For Example: To enter IP address”192.168.100.100”, Step 1: Press “1” once, then “1” is displayed, and color of “1” is orange Step 2: When the color of “1”turns white, press “9” once, then “9” is displayed Step 3: Repeat steps 1 and 2 to enter and complete the IP address For Example: To enter the letter “a” press the button “2” twice 6.
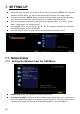
7. SETTING UP ▼ In the main menu, using the “▼” button on remote control to select the “SETUP” item, and then press the “ENTER” button. You will be presented with the HD Player Pro settings screen. You can also press the “SETUP” button on remote control to directly open the settings screen.
Assign IP Address: If the HD Player Pro is connected to a network without a DHCP server or you want to use Local FTP Server function, enter the fixed IP address, Mask, Gateway and DNS for the HD Player Pro. PS. Refer to 5.1 for how to enter IP address by remote control. NOTE: Before setting the IP address, Mask, Gateway and DNS, check the network information of your PC. Please follow the steps below to get the network information of your PC.
7.1.2 Setting the Network from the IP Detect Tool With the bundle tool “IP Detect”, users can search for HD Player Pro on the local area network. Users are also able to change the IP setting via this tool. For example, you want to assign a static IP to HD Player Pro by the steps as below: Step1: Insert the driver CD into your CD-ROM drive, then open the Folder IP Detect and run the IPSetup.exe. Step2: Click on the Install IP Detect to install the IP detect tool.
Step3: Double click on the icon to start the tool. Step4: Click on the “Auto Detect” button, then the tool will show all available HD Player Pro in the local area network. NOTE: When use HD Player Pro under a DHCP-enabled network, user sometimes does not know which IP address is assigned to HD Player Pro. User could also use this tool as a “Finder”, for locating the IP address of HD Player Pro.
Step6: The default IP mode of HD Player Pro is DHCP. User should change the mode to “Manual”, if he wants to assign a static IP address to HD Player Pro. Then enter the preferred “IP”, “Net Mask” and “Gateway” in the “Network Setting”. Finally, click on the “Setup” button for completing the setting. NOTE: The IP setting will not show on the OSD menu instantly, but it should be available after pressing “Setup” button. The prefer IP address will show on the OSD menu when HD Player Pro restart.
7.2 FTP Setup - Local FTP Server: Turn on/ off the HD Player Pro server. (If you use the HD Player Pro server, please disable the DHCP function and input a fixed IP address, Mask, Gateway and DNS of the HD Player Pro) Local FTP Server Setup: Set the “Port”, “User ID” and “Password” of the HD Player Pro. (The Default Port: 21, User ID: root, Password: admin) FTP Auto Download: Enable/ Disable the FTP auto download function.
NOTE: GMT and applied regions Time Zone Region Time Zone Region (GMT-12:00) Eniwetok, Quazalen (GMT+02:00) Helsinki, Riga, Tallinn (GMT-11:00) Midway, Ireland, Samoa (GMT+03:00) (GMT-10:00) Hawaii (GMT+03:00) Nairobi Moscow, Saint Petersburg, Volgograd (GMT-09:00) (GMT+03:00) Baghdad (GMT+03:00) Kuwait, Raid (GMT+03:30) Tehran (GMT-07:00) Alaska Pacific GMT (U.S. & Canada); Tijuana Continental GMT (U.S.
Local Time: Set the system time manually. NOTE: If the NTP Server and Local Time have been set, the NTP Server will be the first priority (the HD Player Pro is already connected to the network). Local HTTP Server: Enable/ Disable the HTTP command function. Local HTTP Server Setup: To set the “Port”, “User ID” and “Password” of the HD Player Pro.
7.4 18 Other Setup Play OSD Display: Enable or disable the OSD display. Auto Play Movies: Auto play movie files on the CF card after power on. Pictures: Auto play picture files on the CF card after power on (slideshow function). All Files: Auto play all files (movie and picture files) on the CF card after power on. MultiLayer: Directly execute Multiple Display after power on. Off: Turn off the Auto Play function.
Export Setting File: Press the “Enter” button to export the configuration value to the CF card. Step1: Copy the file “HDPlayerSetting.txt” on the CF card to your PC. Use the “Wordpad” to open the file, and you can see all the configuration value of HD Player Pro. Step2: You can modify directly the configuration value on your PC. Example: [NETWORK] Disable Options: Disable, RJ45, WiFi The “Network” function is disabled; you can directly change the mode to RJ45.
7.5. Scrolling Text Setup 20 Multiple Display: Movie (full) Movie (small) Movie + Pic (L) Movie + Pic (R) Picture Slide: Sets the mode of picture slideshow (By Slide Time/ Match Video). Scrolling text: Sets the style of the font. Supported fonts are: Latin1, Latin2, Japanese and Greek Scrolling text color: Select the color of the text; you can choose between white, yellow, green or rotation of this three colors.
8. USING THE HD PLAYER PRO 8.1 Play media files on the CF-Card Step 1: Insert the CF card with media files, then turn on the HD Player Pro and press the “ENTER” button on the remote control when “’mnt/CF” is highlighted to take you into the CF card. Step 2: Select the type of data (VIDEO/ AUDIO/ PICTURES) you want to play, and then press the “ENTER” button on remote control to switch into the “VIDEO LIBRARY”, “AUDIO LIBRARY” or “PICTURE LIBRARY”.
8.1.1 Using the Remote Control when Media File is playing SETUP: Press the button to adjust the brightness, contrast or saturation while the video or picture is displayed.
Original Size Second Press:ZOOM 02 First Press:ZOOM 01 Third Press:ZOOM 03 23
8.2 Multiple display zones Step 1: Put your movies, pictures (only supports PNG format/ size: 213x641/ 96DPI) and text file on the CF card. Picture Files If you select the “By Slide Time” item of the picture slide mode; please name the picture files 0.png ~ 9.png. If you select the “Match Video” item of the picture slide mode, the file name of the picture must be the same of the corresponding movie file. Text File Use the “Notepad” to create a text file on your PC.
8.3 Log function Step1. Please turn on the Log Function first. (Refer to 7.4 Other Setup) Step2 .The new log files are automatically generated every day (the log files will be stored in the “syslog” folder on the memory card). Step3. The log file (.txt) can be viewed on your PC using WordPad. 8.4 Seamless-Function The Seamless Playback function allows the HD Player Pro to transition between videos using LED Buttons Box (page 50) or Play Button Box (page 47) without any delay.
8.
Item Description [file] Enter the filename you want to download. 001.mpg Note: The length of file name and extension cannot exceed 20 characters. 002.mpg 0.png 1.png schedule.ini The file schedule.ini is created by the Schedule Maker software. (refer to section 10) The file message1.txt is a text file that can change scrolling text settings. Use the “Notepad” to create the text file on your PC as shown below, and named the file message1.txt (you can refer to the text file (message1.
Step2: Remember to save the file after editing, and named the command file d + MAC address.txt. Example: The MAC address of HD Player Pro is 0013fe098819, and named the file d0013fe098819.txt. NOTE: The MAC address of HD Player Pro will be displayed in the setup menu. Step3: Put all the files (included media files/ command file (ex. d0013fe098819.txt/ schedule.ini/ message1.txt) to the FTP server. The HD Player Pro will read the command file (ex. d0013fe098819.txt), and download the specified files.
8.6 Controlling the HD Player Pro (RS232/TCP) Use the tool “Tera Term” or other tools to control the HD Player Pro with ASCII command. To enable this function the RS232 Control must be set to “Command” RS232-Control: baud rate: 19200 8N1 TCP-Control: Port 23 NOTE: 1. The reaction time of the HD Player Pro is up to three seconds. 2. Make sure the RS232 function is enabled (refer to section 7.5). 3. Use an crossed RS232-Cable for controlling the HD Player Pro 4.
8.7 How to sync several HD Player Pro Step1. Please connect all HD Player Pro via a RJ-45 Cable with an Ethernet Switch Step2. Assign IP Address to HD Player Pro: The Address must be in the same Subnet, Gateway and DNS. e.g.: Master e.g.: Slave 1 Please make sure that you never assign the same IP Address several times.
Step3. Turn on the Sync-Control on every HD Player: Step4. Set Master/Slave: Set one HD Player Pro to be the Master and the other units (up to 254 units) to be Slaves.
NOTE: HDPlayerSettings.txt-File For easier configuration you are able to export the “Settings File” of the HD Player onto the CFCard: Press Enter to Export Settings File Insert the CF-Card with the “HDPlayerSettingsd.txt” in your PC. Open the “HDPlayerSettings.txt”-File with notepad.exe or wordpad.exe or any other text editor.
In the HDPlayerSettings.txt-File you can assign a new IP Address and change other Settings. When you now reinsert the CF-Card to the HD Player Pro it will “read” these Settings and assumes these Settings as the new ones. ATTENTION: If you set a Local IP, please turn of “IP Assigned by DHCP” (ref.: 7.1.1) 8.7.1 Important to know: General The HD Player sync-Function only work after an “Autostart” movie of the HD Player Pro (Startup time approx.
9. HTTP COMMAND FUNCTION Make sure that the HD Player Pro is already connected to the network. (Refer to 7.1) Also check the “Local HTTP Server” function has been enabled, and the “Local HTTP Server Setup” has been completed (refer to 7.2). Set your router or firewall, and open the port 80 for the HD Player Pro. The following figure is an example - please refer to your user’s manual of router for opening ports.
9.1 Control Control: Select one of the control command s, and press the “Send” to control the HD Player Pro immediately. Stop: Stop playback Play: Start playback. Pause: Pause the playback. Prev: Play the previous file. Next: Play the next file. Volume: Adjust the volume. Up: Cursor up Down: Cursor down Autoplay: Select the auto play mode. Enable: Enable or disable the auto play function. Movies: Auto play movie files on the CF card after power on.
9.2 Network Network Enable: Enable or disable the network function. Interface: Select your network connection Ethernet (wired) or Wireless. General Setup Enable DHCP: Enable or disable the DHCP function. IP/ Subnet/ Gateway/ DNS server: Enter the fixed IP address, Subnet, Gateway and DNS for the HD Player Pro.
9.3 Server Download from FTP Server Enable: Enable or disable the FTP auto download function. Port: The default port for FTP is 21. In most cases you should not change this number. If the FTP site uses a port other than 21, you should enter the correct port. IP address: Enter the domain name or IP address of the remote FTP server. Path: Enter the folder path that you want to share. User name: Enter the user name of the remote FTP server.
9.4 38 Time NTP Server Enable: Enable or disable the NTP server function. GMT Server: Enter the NTP server IP address like: 66.187.233.4. Time Zone: Set the time zone of your location.
9.5 Features Web Interface Enable: Enable or disable the HTTP command function. Port: Enter the port of the HD Player Pro (default port: 80) User ID: Enter the user name of the HD Player Pro (default ID: root). Password: Enter the password of the HD Player Pro (default password: admin).
10. SCHEDULE FUNCTION NOTE: The “NTP Server” or “Local Time” must be set before using the Schedule Function. (refer to 7.2) 10.1 Install the Schedule software Step1: Insert the driver CD into your CD-ROM drive, then open the Folder “Scheduler” and run the IPSetup.exe. Step2: Click on the Install IP Detect to install the IP detect tool. .
10.2 Start the Schedule Software You might double click the “Schedule Maker” icon on your desktop for opening the “Schedule Generator”. Or you might click on → → → < Schedule Maker > for starting the program. There are two parts of program: “Basic Schedule” and “Advance Schedule” in the window. 10.2.1 Basic Schedule In the “Basic Schedule” mode, you could arrange a basic schedule that instructs the player to play specified video files in the ordinary time.
Select the file that you want to modify in the list, and press the “Modify” button. Remove: Click this button to remove the file from the list. Move Up / Move Down: Click these buttons to change the order that the files are played.
Press the “SAVE” button and a pop-up window will appear. Select the path, then click the “SAVE” button to save your setup. NOTE: Do not rename the file (schedule.ini), otherwise the HD Player Pro will not be able to read the file. 10.2.2 Advance Schedule In the “Advance Schedule” mode, you can select files that you want to play, and can also set up the play times, and the initial and end time of each file. There are “Time Setup” and “File Setup” in the “Advance Schedule”.
Step 2: Click the “Add” button in the “File Setup” section to open the “Schedule File Editor” window. Click the “Browser” button to select a file that you want to play. You can also set up the “Play Times” of the file in the window. Click the “OK” button to complete the setup. Step 3: Repeat the steps 1 and 2 to add other files. Step 4: After finishing all setup, press the “SAVE” button and a pop-up window will appear. Select the path, then click the “SAVE” button to save.
10.2.3 Explanation of the Warning Message No any schedule!!Can’t Save! There is no schedule file in the “Basic Schedule” or “Advance Schedule” can be saved. Please add and edit a new schedule file first. Date Setup Error! There are some errors in the “Advance Schedule”. Check the date/ time of the schedule for conflict or error. No any schedule file in advance schedule!!Can’t Save!! There is no schedule file in the advance schedule. Please add files that you want to play in the advance schedule.
11 OPTIONAL AUXILIARY EQUIPMENT 11.1 Play-Button Box (SCV-HDZ-PBB) The Play Button Box supports up to 12 play-button inputs. Press one of the play buttons to play the corresponding file. Hardware Connection Step 1: Put 6 demo files on CF card. (1 default file and 5 demo files) NOTE: The files are sorted by filename in ascending order or in alphanumerical order. Each button is mapped to a file by this order. For Example: There are 6 demo files on the CF card. The file names are a01.xxx, 33.xxx, b55.
11.3 PIR sensor (SCV-HDZ-PIR) Application 1: The PIR Sensor is an external remote control receiver. Application 2: The PIR Sensor is a motion detector. 11.3.1 Using the PIR Sensor Step 1: Set the repeat mode to the “Repeat Default”. Step 2: Insert the CF card to the HD Player Pro, and the HD Player Pro will play the default file automatically while powered on. Step 3: After sensing approaching subjects, the HD Player Pro will play all the demo files once. 11.
11.4.2 Ex. Using the wireless Touch Sensor Buttons Put 6 demo files on CF card. (1 default file and 5 demo files) NOTE: The files are sorted by filename in ascending order or in alphanumerically order. Each button is mapped to a file by this order. For Example: There are 6 demo files on the CF card. The file names are a01.xxx, 33.xxx, b55.xxx, 1abc.xxx, 07.xxx and A01.xxx. ( xxx is extension of the file ) Default File:07.xxx Demo File 1:1abc.xxx Demo File 2:33.xxx Demo File 3:A01.xxx Demo File 4:a01.
11.5 LED button box Hardware Installation Control Video Playback using the LED Play-Button ex. 5 LED Play-Buttons (Button Box supports up to 8 LED Play-Buttons) Step1. Put 6 demo files on memory card. (1 default file and 5 demo files) NOTE: The files are sorted by filename in ascending order or in alphanumerical order. Each button is mapped to a file by this order. For Example: There are 6 demo files on the memory card. The file names are a01.xxx, 33.xxx, b55.xxx, 1abc.xxx, 07.xxx and A01.xxx.
14. USB AUTO-COPY FUNCTION Step1: Use “Notepad” to create a file on your PC and named the file “AUTOCOPY.ini” (this File must be empty). Step2: Put the files that you want to copy and the file “AUTOCOPY.ini” onto the USB flash driver. Step3: Insert the USB flash drive to the HD Player Pro, and it will automatically copy the files from USB flash drive to CF card (it takes about 30sec until the HD Player starts copying the Files). ATTENTION: All Files on the CF-Card/SDHC-Card will be deleted.
13 TROUBLESHOOTING Situation Check Point 1. 2. 3. No Picture 4. 5. 1. No Response From the Remote Control No sound No Responding while pressing the wirelesstouch – sensor buttons Network Not Working Players are not in sync HD Player Pro doesn´t react on the RS233/TCP Commands My Video playback is bucking Check power cable and power switches. Ensure the video cables are connected between the player and the HD Player Pro.
15. RECOMMENDED CF-CARDS Manufacturer Productname Size [GB] SanDisk OEM 4 SanDisk OEM 8 SanDisk OEM 16 SanDisk Extreme 8 SanDisk Extreme III 2 SanDisk Extreme IV 4 SanDisk Extreme IV 8 600x 8 400x 16 ultimate600x 16 Transcend Transcend Kingston 16. RECOMMENDED VIDEO FILE FORMATS 52 MPEG-4.10 (H.264) BP@L3 SMPTE 421M (VC-1) MP@HL and AP@L3 WMV9 MP@HL MPEG-2 MP@HL MPEG-4.2 ASP@L5 (720p, 1-point GMC) max. Bitrate: 40 Mbps. max.