
User Manual


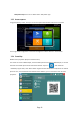
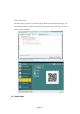

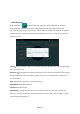
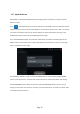
Table Of Contents
- 1 .Safety information
- 2. IP Camera Tester Introduction
- 3. Operation
- 3.1 Installing the Battery
- 3.2 Instrument connection
- 3.2.1 IP camera connection
- 3.2.2 Analog camera connection
- 3.3 OSD menu
- 3.3.1 Lite mode
- 3.3.2 Drop-down Menu
- 3.3.3 Screen capture
- 3.3.4 TesterPlay
- 3.3.5 Rapid video
- 3.3.6 IP discovery
- 3.3.7 Rapid ONVIF test
- 3.3.8 IP camera test
- 3.3.9 Video monitor test
- 3.3.10 CVI camera test
- 3.3.11 TVI camera test
- 3.3.12 AHD camera test
- 3.3.13 Network tool
- (1)IP address scan
- (2)PING Test
- (3)Network test (Ethernet bandwidth test)
- (4)Port Flashing
- (5)DHCP server
- (6)Trace route
- (7)Link monitor
- 3.3.14 Rapid IP Discovery
- 3.3.15 PoE power / DC12V 3A power output
- 3.3.16 Audio Record
- 3.3.17 Data monitor
- 3.3.18 Audio player
- 3.3.19 Media Player
- 3.3.20 RTSP Player
- 3.3.21 Hik test tool
- 3.3.22 Dahua test tool
- 3.3.23 Update
- 3.3.24 Office
- 3.3.25 LED Flashlight
- 3.3.26 Browser
- 3.3.27 Notepad:
- 3.3.28 System Setting
- 3.3.29 File explorer
- 3.3.30 Theme
- 3. 4 Audio test
- 3.5 PoE power output
- 3.6 DC12V 3A power output
- 4. Specifications

Page.7.
Note: If the IP camera requires PoE power, then connect the IP camera to the IP tester’s LAN port. The
tester will supply PoE Power for the IP camera. Click on the icon labeled POE to turn the PoE Power off
or on.
3.2.2 Analog camera connection
(1) Connect the camera's video output to the IP tester’s VIDEO IN. The image will display on the tester
after pushing the PTZ icon
(2) Connect the camera or the speed dome RS485 controller cable to the tester RS485 interface (Note
positive and negative connection of the cable).
3.2.3 HD Coaxial camera connection
* CVI, TVI, AHD camera are classified as HD coaxial cameras. Hereby the following instruction of how