
User Manual
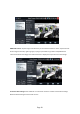

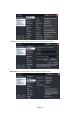
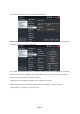
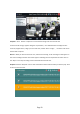

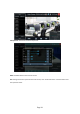
Table Of Contents
- 1 .Safety information
- 2. IP Camera Tester Introduction
- 3. Operation
- 3.1 Installing the Battery
- 3.2 Instrument connection
- 3.2.1 IP camera connection
- 3.2.2 Analog camera connection
- 3.3 OSD menu
- 3.3.1 Lite mode
- 3.3.2 Drop-down Menu
- 3.3.3 Screen capture
- 3.3.4 TesterPlay
- 3.3.5 Rapid video
- 3.3.6 IP discovery
- 3.3.7 Rapid ONVIF test
- 3.3.8 IP camera test
- 3.3.9 Video monitor test
- 3.3.10 CVI camera test
- 3.3.11 TVI camera test
- 3.3.12 AHD camera test
- 3.3.13 Network tool
- (1)IP address scan
- (2)PING Test
- (3)Network test (Ethernet bandwidth test)
- (4)Port Flashing
- (5)DHCP server
- (6)Trace route
- (7)Link monitor
- 3.3.14 Rapid IP Discovery
- 3.3.15 PoE power / DC12V 3A power output
- 3.3.16 Audio Record
- 3.3.17 Data monitor
- 3.3.18 Audio player
- 3.3.19 Media Player
- 3.3.20 RTSP Player
- 3.3.21 Hik test tool
- 3.3.22 Dahua test tool
- 3.3.23 Update
- 3.3.24 Office
- 3.3.25 LED Flashlight
- 3.3.26 Browser
- 3.3.27 Notepad:
- 3.3.28 System Setting
- 3.3.29 File explorer
- 3.3.30 Theme
- 3. 4 Audio test
- 3.5 PoE power output
- 3.6 DC12V 3A power output
- 4. Specifications

Page.21.
User Set: Modify camera user name, password etc parameters
Network setting:Click “Network Set” to change the IP address. Some cameras cannot support change
IP address, so there is no change after saving.
If it is network video input to the tester, as the tester supports resolution up to 1080p, the input image
will be very clear after it is enlarged. This is greatly helpful for the installers to ensure the IP camera’s
video coverage and decide the IP camera’s install site.
Image can only be enlarged on SD mode (The icon “ONVIF” is SD mode.)
Select relative function on the bottom Toolbar to operate, “Snapshot” , “Record”, “Photos ”,
“Video playback”, “Storage set”, “PTZ control” etc.