
User Manual

Live Preview Introduction
NVR User Manual
41
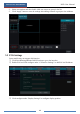
④ Check “Trigger Camera” and click configure under it to bind POS to the camera. One POS
can be bound to more than one channel, but one channel can only bind one POS.
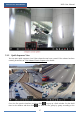
⑤ Click “Apply” to save the settings and then the trade information will be displayed on the
preview image in real-time.
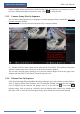
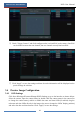
5.4 Preview Image Configuration
5.4.1 OSD Settings
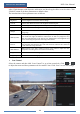
Click StartSettingsCameraImageOSD Settings to go to the interface as shown below.
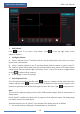
Select the camera, input the camera name (or double click the camera name in the camera list
to change the camera name), enable or disable the name and time OSDs (if enabled, drag the
red name and time OSDs directly in the image view area to change the OSDs’ display position)
and select the date and time formats. Click “Apply” to save the settings.