
User Manual

Device Management
NVR User Manual
97
② Make sure the router supports UPnP function and the UPnP is enabled in the router.
③ Set the NVR’s IP address, subnet mask and gateway and so on corresponding to the router.
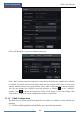
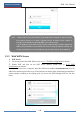
④ Check “Enable” in the interface as shown below and then click “Apply” button.
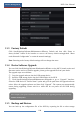
Click “Refresh” button to refresh the UPnP status. If the UPnP status were still “Invalid UPnP”
after refreshing it for many times, the port number would be wrong. Please change the mapping
type to “Manual” and then click to modify the port until the UPnP status turns to “Valid
UPnP”. Refer to the following picture. You can view the external IP address of the NVR. Input
the external IP address plus port in the IE address bar to access the NVR such as
http://183.17.254.19:81.
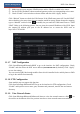
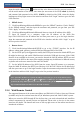
11.1.7 NAT Configuration
Click StartSettingsNetworkNAT to go to the interface for NAT configuration. Check
“Enable” and then select the NAT server address (nat.autonat.com by default). Click “Apply”
to save the settings.
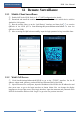
You can scan the QRCode through mobile client which is installed in the mobile phone or PAD
to log in the mobile client instantly.
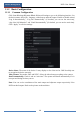
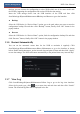
11.1.8 FTP Configuration
Some models may not support this function.
Click StartSettingsNetworkFTP to go to the interface for FTP configuration. Check
“Enable” and input the server name, port, username and password, max file size and remote
directory.
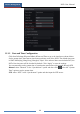
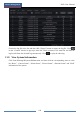
11.1.9 View Network Status
Click StartSettingsNetworkNetwork Status to view the network status or click on
the tool bar at the bottom of the live preview interface to view network status conveniently.