
User Manual


Record & Disk Management
NVR User Manual
57
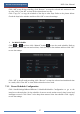
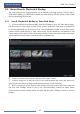
Click “All” to set all day recording; click “Reverse” to swap the selected and unselected time
in a day; click “Clear All” to clear all the selected area in a day.
Click “Copy To” to copy the schedule of the day to other days. Refer to the picture below.
Check the days in the window and then click “OK” to save the settings.
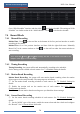
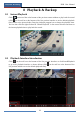
Set Week Schedule
Click or and then click “Manual” beside to set the week schedule. Refer to
the picture below. Set the start and end time, check the days in the window and then click “OK”
to save the settings.
Click “All” to set all week recording; click “Reverse” to swap the selected and unselected time
in a week; click “Clear All” to clear all the selected area in a week.
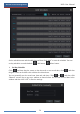
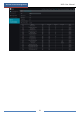
7.3.2 Record Schedule Configuration
Click StartSettingsRecordRecord ScheduleSchedule Configuration to go to the
interface as shown below. Set the schedule of sensor record, motion record, timed record and
intelligence record. Click “None” in the drop-down menu to clear the schedule. Click “Apply”
to save the settings.