
User Manual

Playback & Backup
NVR User Manual
67
time slice mode. In “Day” mode, click / on the left/right side of the time scale to
view the record of the last/next day; click “Minute” in the “Picture” option under the time scale
to select “Minute” mode (in “Minute” mode, click the time scale to change the time of the 60
display windows) and click “Hour” to select “Hour” mode.
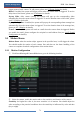
Method Two: Click beside “Camera Thumbnail” on the left top corner of the interface to
select the time slice mode.
Method Three: Right-click the mouse on any area of the time-sliced interface to go back to the
upper interface.
8.3.2 Search, Playback & Backup by Time
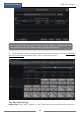
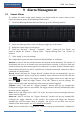
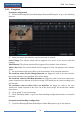
① Click StartSearch and BackupBy Time to go to “By Time” tab as shown below.
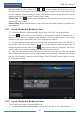
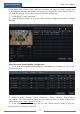
② Click on the bottom of the interface to add playback camera. A maximum of 16
cameras can be added for playback. Click “Modify” on the top right corner of the camera
window to change the camera and click “Clear” to remove the camera.
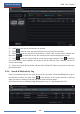
③ Click the camera window to play the record in the small playback box on the left side of
the interface. You can set the date on the top left of the interface, check the event type as
required and click the time scale or click under the time scale to set the time. The camera
window will play the record according to the time and event type you set.
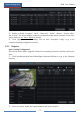
④ Drag the color blocks on the time scale to select the record data (or click “Set Backup
Time” button on the bottom left corner of the interface to set the backup start time and end time)
and then click “Backup” button for record backup. Click “Playback” button to play the record
in the playback interface.
8.3.3 Search, Playback & Backup by Event
Some models may support searching POS event.
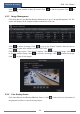
① Click StartSearch and BackupBy Event to go to “By Event” tab as shown below.