
User Manual


Playback & Backup
NVR User Manual
64
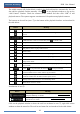
Button
Menu List
Meaning
--
Move tool. Click it to move the tool bar anywhere.
Enable Audio
Click it to enable audio. You can listen to the camera audio by
enabling audio.
Snap
Click it to snap.
Zoom In
Click it to go to the zoom in interface. The zoom in interface is
similar to that of the camera window in the live preview interface.
Click to pause the record playing; click to play the
record. When the record is paused in forward playing mode, you
can click to view the previous frame and click to
view the next frame.
Add Tag
Click it to add tag. You can play back the record by searching the
added tag. Click it and then input the tag name in the popup
window. Click “Add” to add tag.
Switch Camera
Click it to switch the playback camera. Click it and then check the
camera in the popup window. Click “OK” to change the camera.
Close Camera
Click it to close the playback camera.
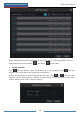
Introduction of area ④:
Click to set the date; click to set the time and then the playback camera will play the
record from the time you set. You can check the record type as required for record playback;
first you should click on the tool bar at the bottom of the interface to clear all the playback
camera, then check the record type ( : manual record; : sensor based record; : motion
based record; : schedule record; : intelligence record) and finally click in the
playback window to add camera for playback (the record time scale will show the record data
of the checked record type only after the above operations).
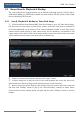
Introduction of the record time scale (area ⑤):
A tool bar will appear after moving the mouse to the record time scale. Click / to
zoom the timeline; click to recover the timeline to 24 hours’ ratio. Drag the timeline or
slide the scroll wheel of the mouse on the time scale to show the hidden time on the top or
bottom of the timeline. You can also click to show the hidden time on the top of the
timeline or click to show the hidden time on the bottom of the timeline. Drag the slider at
the bottom of the time scale to show the hidden playback cameras.
The record time scale shows different record types with different colors. The green block
stands for manual record, red block stands for sensor based record, yellow block stands for
motion based record, blue block stands for schedule record and cyan block stands for
intelligence record. Click the record block to set the time and then the playback camera will
play the record from the time you set.
Drag the color block on the time scale to select the backup area and then right click the area or
click to pop up a backup information window. Click “Backup” button in the window to
pop up the backup window. Select the device, backup path a nd backup format and then click
“Backup” button to start the backup.