
User Manual


Alarm Management
NVR User Manual
72
Duration: it refers to the interval time between the adjacent motion detections. For instance, if
the duration time is set to 10 seconds, once the system detects a motion, it will go to alarm and
would not detect any other motion (specific to camera) in 10 seconds. If there is another motion
detected during this period, it will be considered as continuous movement; otherwise it will be
considered as a single motion.
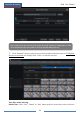
③ Drag the camera image to set the motion area. You can set more than one motion area.
Click “All” to set the whole camera image as the motion area. Click “Reverse” to swap the
motion area and the non-motion area. Click “Clear” to clear all the motion areas.
④ Click “Apply” to save the settings. Click “Processing Mode” to go to the alarm handling
configuration interface of the motion alarm.
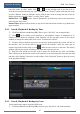
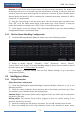
9.2.2 Motion Alarm Handling Configuration
① Click StartSettingsAlarmMotion Alarm to go to the following interface.
② Enable or disable “Record”, “Snapshot”, “Push”, “Alarm-out”, “Preset”, “Buzzer”,
“Pop-up Video” and “E-mail”. The alarm handling setting of motion alarm is similar to that of
the sensor alarm (see 9.1 Sensor Alarm for details).
③ Click “Apply” to save the settings. You can click “Motion Settings” to go to the motion
configuration interface.
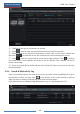
9.3 Intelligence Alarm
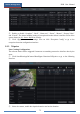
9.3.1 Object Detection
Object Detection Configuration:
① Click StartSettingsCameraIntelligent DetectionObject Detection to go to the
following interface.
② Select the camera, enable the object detection and set the duration and detect type. There
are two detect types: Abandon object and missing object.
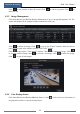
Abandon object: The relevant alarms will be triggered if there are articles left in the detection
area drew by the users.
Missing object: The relevant alarms will be triggered if there are articles missing in the
detection area drew by the users.
③ Select the warning area and input the area name. You can add 4 warning areas at most.
④ Draw the warning area of the object detection. Refer to the interface as shown above.