
Manual
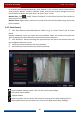
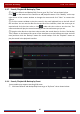


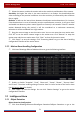

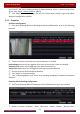
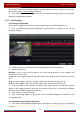
Table Of Contents
- Contents
- 1 Introduction
- 2 Basic Operation Guide
- 3 Wizard & Main Interface
- 4 Camera Management
- 5 Live Preview Introduction
- 6 PTZ
- 7 Record & Disk Management
- 8 Playback & Backup
- 9 Alarm Management
- 10 Account & Permission Management
- 11 Device Management
- 12 Remote Surveillance
- Appendix A FAQ
- Appendix B Calculate Recording Capacity
- Appendix C Compatible Device List

Alarm Management
DVR User Manual
69
9 Alarm Management
9.1 Sensor Alarm
To complete the entire sensor alarm settings, you should enable the sensor alarm of each
camera and then set up the alarm handling of each camera.
① Click StartSettingsAlarmSensor Alarm to go to the following interface.
② Select the alarm type (NO or NC) according to trigger type of the sensor.
③ Enable the sensor alarm of each camera.
④ Check the “Record”, “Snapshot”, “Push”, “Alarm-out” and “Preset” and enable or disable
the “Buzzer”, “Pop-up Video”, “ Pop-up Message Box” and “E-mail” as required.
⑤ Click “Apply” to save the settings.
The configuration steps of the above-mentioned alarm linkages are as follows.
Duration: it refers to the interval time between the adjacent motion detections. For instance,
if the duration time is set to 10 seconds, once the system detects a motion, it will go to alarm
and would not detect any other motion (specific to camera) in 10 seconds. If there is another
motion detected during this period, it will be considered as a continuous movement;
otherwise it will be considered as a single motion.
Record: check it and then the “Trigger Record” window will pop up automatically (you can also
click the “Configure” button to pop up the window). Select camera on the left side and then
click
to set the camera as the trigger camera. Select trigger camera on the right side and
then click to cancel the trigger camera. Click the “OK” button to save the settings. The
trigger cameras will record automatically when the sensor alarm is triggered.
Snapshot: check it and then the “Trigger Snapshot” window will pop up automatically.
Configure the trigger camera in the window. The trigger cameras will snap automatically when
the sensor alarm is triggered.
Push: check it and choose NO or OFF. If it is ON, the system will send messages when the
sensor alarm is triggered.
Alarm-out: check it and then the “Trigger Alarm-out” window will pop up automatically.