
Manual
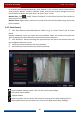
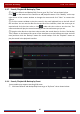


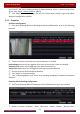
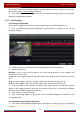
Table Of Contents
- Contents
- 1 Introduction
- 2 Basic Operation Guide
- 3 Wizard & Main Interface
- 4 Camera Management
- 5 Live Preview Introduction
- 6 PTZ
- 7 Record & Disk Management
- 8 Playback & Backup
- 9 Alarm Management
- 10 Account & Permission Management
- 11 Device Management
- 12 Remote Surveillance
- Appendix A FAQ
- Appendix B Calculate Recording Capacity
- Appendix C Compatible Device List

Alarm Management
DVR User Manual
71
② Select the camera, enable the motion and set the sensitivity and duration of the camera.
Sensitivity: the higher the value is, the more sensitive it is to motion. You should adjust the
value according to the practical conditions since the sensitivity is influenced by color and time
(day or night).
Duration: it refers to the interval time between the adjacent motion detections. For instance,
if the duration time is set to 10 seconds, once the system detects a motion, it will go to alarm
and would not detect any other motion (specific to camera) in 10 seconds. If there is another
motion detected during this period, it will be considered as a continuous movement;
otherwise it will be considered as a single motion.
③ Drag the camera image to set the motion area. You can set more than one motion area.
Click “All” to set the whole camera image as the motion area. Click “Reverse” to swap the
motion area and the non-motion area. Click “Clear” to clear all the motion areas.
④ Click “Apply” to save the settings. Click “Processing Mode” to go to the alarm handling
configuration interface of the motion alarm.
9.2.2 Motion Alarm Handling Configuration
① Click StartSettingsAlarmMotion Alarm to go to the following interface.
② Enable or disable “Snapshot”, “Push”, “Alarm-out”, “Preset”, “Buzzer”, “Pop-up Video”
and “E-mail”. The alarm handling setting of motion alarm is similar to that of the sensor alarm
(see 9.1 Sensor Alarm
for details).
③ Click “Apply” to save the settings. You can click “Motion Settings” to go to the motion
configuration interface.
9.3 Intelligence Alarm
9.3.1 Object Detection
Object Detection Configuration:
① Click StartSettingsCameraIntelligent DetectionObject Detection to go to the