MHDV2445-O3-D0 24" 60cm FULL HD LED LCD Television with Built in DVD Player USER MANUAL Thank you for purchasing this LCD TV. Before connection and operation of this product please read the manual carefully and completely. Please keep this manual for future reference. N294 Version 1.
Contents INTRODUCTION..............................................................................1 SAFETY AND WARNINGS.............................................................3-5 BASE STAND ASSEMBLY INSTRUCTION ......................................... 6 WALL MOUNTING INSTALLATION GUIDELINES............................... 6 INSTALLATION......................................................................... 7 -10 REMOTE CONTROL.................................................................
SAFETY AND WARNINGS High voltages are used in the operation of this television receiver. Do not remove the cabinet back from your set. Refer servicing to qualified service personnel. Never stand on, lean on, or suddenly push the television or its stand. You should pay special attention to children. Serious injury may result if it falls. To prevent fire or electrical shock hazard, do not expose the television receiver to rain or moisture.
SAFETY AND WARNINGS CAUTION Never tamper with any components inside the TV, or any other adjustment controls not mentioned in this manual. All LCD-TVs are high voltage instruments. When you clean up dust or water drops on the LCD PANEL or CABINET, the power cord should be pulled out from the receptacle, then wipe the TV with a dry soft cloth. During thunder and lightning, unplug the power cord and antenna cord to prevent damage to your TV.
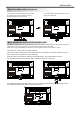
INSTALLATION Base Stand Assembly Instruction 1. Place the TV with the display side down on a flat surface.Use a cloth to protect. Locate the bottom at the stand. 2. Fix the bottom with turning the screw tightly on the stand. WALL MOUNTING INSTALLATION GUIDELINES For wall mounting with the optional bracket, please read the following instruction and the bracket instruction. Make sure qualified service personnel perform the operation.
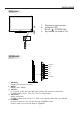
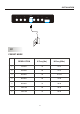
INSTALLATION Front panel 30 3 1: 2: 1 2 3: Remote control sensor. Indicator LED: BLUE POWER ON. Key board (on side of TV). 30 KEYBOARD SOURCE MENU CH+ CHVOL+ VOLSTANDBY 1 2 3 4 5. SOURCE Display the input source menu. MENU D isplay main MENU. CH+/CHIn TV mode, press CH+ or CH- to change the channel up and down. In MENU mode, press CH+ or CH- to select items. VOL+/VOLAdjust sound level. In MENU mode, press VOL+ or VOL- to adjust the item that you selected.
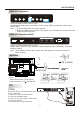
INSTALLATION REAR AV Connections AV L R POWER Y Pb Pr HDMI2 All the terminals are(from left to right): AV composite video input, Audio input, Power socket, YPbPr (component video) input, HDMI2 input. Note: 1. AV and YPbPr share one audio channel. 2. When the HDMI2 port receives a DVI signal, the audio signal is received from the YPbPr/AV Audio channel.
INSTALLATION AV L R POWER Y Pb Pr HDMI2 PC PRESET MODE RESOLUTION V.Freq.(Hz) H.Freq.(KHz) 1 720*400 70 31.47 2 640*480 60 31.47 3 800*600 56 35.156 4 800*600 60 37.88 5 800*600 72 48.08 6 1024*768 60 48.36 7 1024*768 70 56.
INSTALLATION AV EQUIPMENT You can use the input terminals on TV set rear as follows.
REMOTE CONTROL REMOTE CONTROL 1 18 2 A-B 19 20 3 4 22 5 21 7 ANGLE 23 MENU 25 24 6 8 / 9 26 10 27 11 12 28 13 14 15 CH VOL 29 REP 30 16 17 1:POWER :To set the TV to standby or power on. 4: : In DVD mode(if available),or in USB mode, used as reverse key, in teletext mode used as subpage key. 5: : In DVD mode(if available),or in USB mode, used as forword key, in teletext mode used as reveal key. 8.TEXT: To enter or exit TELETEXT. 10: : Displays the main on-screen menu.
REMOTE CONTROL TELETEXT Teletext is an information system broadcast by certain channels which can be consulted like a newspaper. It also offers access to subtitles for viewers with hearing problems or who are not familiar with the transmission language (cable networks, satellite channels, etc.) Press: TEXT You will obtain: This is used to call or exit teletext modes. The summary appears with a list of items that can be accessed. Each item has a corresponding 3 digit page number.
OPERATION Installation Guide Please select an OSD Language Cesky English Dansk Espanol Fran ais Magyar Hrvatski Nederlands Portugues Deutsch E Italiano ~ k Polski Norsk Pycck OK Country Australia Bulgaria Denmark Germany Austria Croatia Finland Greece Italy Luxembourg Belgium Czech France Hungary Netherlands OK This screen only appears when the TV is turned on for the first time, or reset to factory settings.You can choose language, country and auto tuning programs.
OPERATION 2).DTV Manual tuning: You can select a DTV channel then find the program in this channel. Press to select the channel, then press OK to search the programs . NOTE: The Bad Normal Good bar graph on this screen shows signal intensity. DTV Manual Tuning _ VHF CH + 5 Press OK to search Bad Nomal Good 3). ATV Manual tuning : You can change the sound system, search the analog TV channels and fine tune them, then store the channels you selected.
OPERATION Favourite Press to choose the program, press FAV button, it will show on the right side of the program. Choose the FAV program, press FAV button again, you can cancel the FAV, will disappear . Once your favorite group is created, you can press the FAV key to quickly access your favourite channel. 2. PICTURE MENU The second item of the MENU is PICTURE MENU.You can adjust picture effects here, such as contrast, brightness, etc. Press to move, press OK to adjust.
OPERATION 5.OPTION MENU To enter the Option Menu, press MENU button and the press or buttons to select the Option Menu. Once in Option Menu, press or buttons to select the settings you wish to adjust. Press MENU button to return to the Main Menu. OSD Language English Audio Languages Subtitle Languages Country Australia Restore Factory Default < OPTION > NOTE: Restore factory default will clear all the programs and password. 6.
OPERATION Sample1.ts Resolution: 720x576 AudioTrack: 1/2 Subtitle: 1/1 Size: ½ 30574 KBytes Close 8.EPG Menu (Electronic Program Guide). The EPG Menu is used to look at what is being broadcasted in DTV or Radio modes. Press the EPG Button to access the EPG Menu. You will receive detailed program information of the channel you are currently watching as well as the 7 Day Program guide.
DVD OPERATION DVD SIDE PANEL 9 Dolby Digital Multi-angle 32 KODAK picture CD OPEN/CLOSE PLAY/PAUSE Subtitle choices 8 MP3 files on CD-R/CD-RW Audio choices 16:9 DVD video LB TV Aspect Ratio modes Caution This product incorporates copyright protection technology that is protected by U.S. patents and other intellectual property rights.
DVD OPERATION SYSTEM SETUP MENU OPERATION Press the DVD SETUP button on the remote control, the SETUP MENU will be displayed. After accessing the setup menu, press the direction buttons for up and down movement to select an item desired, and press RIGHT direction button to select the SUBMENU item. Then press the ENTER/OK button to confirm. Press LEFT direction button to return to the upper level menu. To exit the setup, press the SETUP button again.
DVD OPERATION MP3/WMA/JPEG PLAYBACK PICTURE CD PLAYBACK A PICTURE CD disc will show a similar directory structure as shown in the following picture. A MP3/WMA disc will show a directory structure as shown in the picture above. Press Direction key to choose the root directory and then press ENTER/OK button to enter into the sub directory. Press Direction key to choose the desired track and then press ENTER/OK or PLAY to enjoy the music or movie.
DVD OPERATION Function Buttons 2:OPEN/CLOSE To open the disc tray, press OPEN/CLOSE; To close the disc tray, press OPEN/CLOSE again. 3:TITLE: In DVD mode, return TITLE menu. 4:REV During DVD, CD Mp3 or VCD playback, press REV to scan in reverse. The player will review the disc at different times speed. Press PLAY to resume normal playback. 5:FWD During DVD, CD,MP3, or VCD playback, press FWD to scan forward.The player will cue the disc at different speed. Press PLAY to resume normal playback.
DVD Trouble shooting If you have any questions, please consult the troubleshooting guide below: REMOTE NOT WORKING NO PICTURE OR SOUND Ensure the power button is on. Make sure the Main unit s POWER button is on Ensure the power outlet is operational. Ensure the remote batteries are working. Ensure the power cord is not damaged. Point the remote control directly at the player s Ensure the power plug is connected IRsensor. firmly to the outlet.
TROUBLE SHOOTING Trouble phenomenon Symptom Picture Inspection Check Audio Snow Noise antenna position, direction or connection Ghost Normal audio antenna position, direction or connection Interference Noise electronic equipment, car/ motorcycle, fluorescent light Mute Volume (check if mute is activated or if the audio system connections are not correct) Normal Picture Power cord is not inserted Power switch is not opened Contrast and brightness/volume setup Press standby key on the remote c
INTRODUCTION LCD : Viewing Picture Size (diagonal) 23.6"(60cm) Resolution 1920x1080 Aspect Ratio 16:9 Display colours 16.2M Brightness 250 cd/m2 Contrast ratio 1000:1 Response time 3.5 ms View angle 170(H)/160(V) TV: TV system DVB-T decode DVB-T de-modulation Digital TV: DVB-T Analog TV: PAL/SECAM Audio: MPEG2 Audio Layer I&II Video: MPEG2 Transport MP@HL Demodulator : COFDM OFDM Mod.
TV/DVD Product Warranty Subject to the warranty repair conditions below, in addition to any applicable statutory warranties this product is warranted for (3 years - TV component) and (1 year - DVD component) from the original date of purchase covering both parts and labour. The benefits conferred by this warranty are in addition to and not in derogation of all rights and remedies in respect of this product which the consumer has under the Trade Practices Act and other State and Territory laws.