Installation Guide for your Windows® Home Server 2011 system An installation guide to getting your new HumuHumu Home Server up and running.
Version: September 2011 Page |2
Table of Contents Quick Start ............................................................................................ 4 Unboxing and powering on ............................................................... 4 First time access via webpage ......................................................... 5 Keyboard and country settings ..................................................... 6 Verify date and time........................................................................
Quick Start HumuHumu would like to thank you for purchasing our Home Server 2011 product. We’re really excited by what Microsoft has to offer with Windows Home Server 2011 and we think you’ll love it as well. Below are some simple steps that you need to follow first before you can start using your new Home Server. Unboxing and powering on 1) Unbox your Home Server.
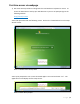
First time access via webpage 1) Our Home Server products are designed to be used without a keyboard or mouse. To access the Home Server load up your web browser on your PC or laptop and go to the following website: http://server/connect You will be presented with the following screen. Click on the “Download and run the setup wizard” button. Picture 1 – Download and run the setup wizard You may be prompted to run or save the wizard applet. You need to choose “run”.
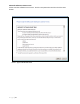
Keyboard and country settings Choose the correct country, time and keyboard settings. For UK users this would be United Kingdom. Once completed, click the Next button.
Verify date and time Make sure the date and time are correct. Incorrect settings could stop your Home Server from working correctly. Once completed, click the Next button.
Microsoft Software License Terms Please read the software license terms. Click the acceptance box and then click the Next button.
Product Key Your product key is located underneath your Home Server. Make a note of the product key number and type this into the box. Once completed, click the Next button. Picture 6 – Type in product key – located under the Home Server Use the space below to write down your product key.
Personalize your Server You need to choose a server name. The server name can be up to 15 characters in length. The password needs to be at least 8 characters and must contain uppercase letters and numbers. Don’t forget your password. We suggest you make note of it in a secure location. The password hint can help you remember what your password might be. For instance you may choose a password “Sydney2000” and the password hint could be “Millennium Vacation”. Once completed, click the Next button.
Update your server automatically We highly recommend that you choose “Use recommended settings”. This ensures your server always receives the latest updates when they are released from Microsoft. Once completed, click the Next button.
Updating and preparing your server Once you have filled in the previous screens, the server will continue to install the software with your custom settings. This process will take approximately 10 minutes. During this time, please keep your browser window open so that you can monitor the progress. The server will automatically restart a number of times before it’s finished.
Connecting to your home server The screen below will be displayed once you are ready to connect your first PC to the Home Server. Click on the connect button and follow the on screen wizard. The wizard installs the Windows Home Server Connector software on your home computer and joins it to the server. Your Home Server will then automatically back up your home computer, monitor its health, and enable you to configure and to remotely administer the Home Server from your home computer.
Factory Reset Should there ever be a software problem with your Home Server that stops it from working, you can use the supplied USB memory stick (labeled WHS 2011 OS Recovery) to recover your server. IMPORTANT If you perform the factory reset and don’t have an existing server backup, ALL EXISTING DATA ON THE HARD DRIVES WILL BE DELETED Therefore, this factory reset should only be performed when you are sure you have a backup of your data. If you are not sure, please not do perform this procedure.
6) After a few minutes you will be presented with the Windows Home Server setup screen. Since you will be perform a data recovery from your USB hard disk, you need to choose the “Repair an existing installation” 7) Follow the on screen instructions to recover your server from a previous backup. Factory reset without external USB drive 1) Remove all externally connected devices like printers and USB drives. 2) Connect an external monitor, keyboard and mouse to the server.
Further Help Microsoft have provided online manuals at http://onlinehelp.microsoft.com/en-us/windowshomeserver2011 Video tutorials are available at http://www.youtube.com/user/WindowsHomeSvr2011 If you need any further help, please contact HumuHumu Support on 0845 519 8419 Monday – Friday (10.00am – 5.00pm) or email support@humuhumu.co.
AWIECO Products HumuHumu are including 2 amazing software add-ins for Windows Home Server 2011. These are already preinstalled on your Home Server. DriveInfo The AWIECO DriveInfo is a free add-in for Windows Home Server 2011. The add-in integrates itself into the "Server Folders and Hard Drives" area of your Dashboard. It shows a graphical overview of your hard disks and drives inside the Dashboard. The AWIECO DriveInfo also picks up all your standard shared folders and user created shares.
RemoteLauncher The AWIECO RemoteLauncher add-in for Windows Home Server 2011 is a free and useful addin, which gives you more administrative possibilities to manage your Home Server remotely. If you need other tools and applications to run over the Dashboard, you can simply add them by a right mouse click. With this add-in, you can start applications installed on your Home Server and they will appear running on your client PC.
Resources Public Resources Windows Home Server blog: For more up to date news about Windows Home Server, please visit Microsoft’s Blog http://go.microsoft.com/fwlink/?LinkId=188746 Windows Home Server public forums: Microsoft provides public forums where other community members can assist you in resolving any issues. http://go.microsoft.com/fwlink/?LinkID=168988 Installation Instructions: For the most up to date installation instructions, please visit: http://go.microsoft.