
Installation Guide

Basic Tools Required (not included)
Tape Measure & Pencil Level
Phillips Screwdriver
Drill with ¼” bit (Cement or Masonry bit for concrete installation)
Ladder
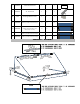
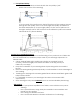
Note: Make sure that the awning you purchased exceeds the window width.
Allow for clearance for windows or doors in opens outward.
General Comments
Wash your hands before installation when handling the fabric.
Always be careful with the fabric during installation.
Drills, screwdrivers and other items can puncture the fabric.
Punctures during installation is not covered by the warranty.
A second person to assist in holding the awning during installation is
RECOMMENDED.
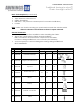
Included in awning kit
Item
Part Number
Description
Awnings Traditional & Classic
Designs
4ft
6ft
8ft
A
1200145
Head Rod Clamps
2
3
4
B
1200144
Hinge w/bolt attached
2
2
2
C
1200148
Eye End
2
2
2
D
1200093
Screws #10 (1 ½”)
10
12
14
E
1200146
Elbow
2
2
2
F
1200146
Pulleys
3
3
3
G
1200720
Internal Connectors
2
4
6
H
1200142
Cleat
1
1
1
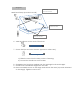
Installation Instructions
Traditional Awnings in a box™
Classic Awnings in a Box™