
Installation Guide


STEP 15: From the inside of the awning, make (2) marks on the wall 6” up from
that line where the awning frame touches the wall. . This is where the bottom of
the brackets will be placed.
STEP 16: From the inside of the awning, make two marks on the wall 6” in from
the top outside corners of the awning where the (CNB) and (TB) bars meet the
wall. Make another mark at the center of (TB). This is where the top brackets will
be placed.
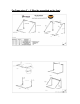
STEP 17: Install the brackets to the wall with the following hardware and tools:
(The long leg of the bracket is against the wall and faces toward the inside of the
awning.)
CONCRETE BLOCK WALLS: (1) ½” masonry bit with a 3/8” shank,
(5-8) 5/16”x 3” masonry anchor bolts, 9/16” socket. You will also need a
roll of weather stripping.
METAL BUILDINGS: (1) 2x6x8 #2YP cut into 12” blocks for the back
side of the metal, (5-8) 5/16”x 4” lag bolts, (5-8) 5/16” washers, rubber
installation strips (in the shape of the metal) and a 3/8” drill bit. Bolt
through the washer, the bracket and the metal into wood blocks behind
the metal. Before tightening the bracket insert the rubber strips between
the building and the awning.
ANY TYPE OF SIDING: (5-8) ¼”x 4” toggle bolts, (5-8) ¼” washers,
(1) Flat head screwdriver (1) ½ drill bit (or if you hit a stud): (5-8)
5/16”x4” lag bolts, (5-8) 5/16” washers, (1) 3/16” drill bit and a 9/16”
socket. You will also need a roll of weather stripping.
CONCRETE, BRICK OR STONE: (1) ½ masonry bit with a 3/8” shank,
(5-8) 5/16”x 3” masonry anchor bolts, (5-8) 5/16”x1/4” bushings, 9/16”
socket. You will also need a roll of weather stripping.
STUCCO: (5-8) ¼”x 4” toggle bolts, (5-8) ¼” washers, (1) Flat head
screwdriver (1) ½ drill bit (or if you hit a stud): (4) 5/16”x4” lag bolts, (5-
8) 5/16” washers, (1) 3/16” drill bit and a 9/16” socket. You will also need a
roll of weather stripping.
STEP 18: Place the awning temporarily up on the brackets to make sure that it
fits prior to tightening the bolts. In cases where the wall is not flat, you may need
to install several bushings under the bracket so that the awning will fit properly in
the pocket of the bracket. Remove the awning.
STEP 19: Tighten the brackets to the wall.
STEP 21: Over 5’ only: Using the same fasteners as you used on the brackets,
level the (WS or PA)s and secure them to the wall.