
Installation Guide


Due to the wide variety of building surfaces, Awntech does not supply
the hardware to install your awning on the wall. You will need to
purchase installation hardware at your local do-it-yourself center. We
will advise you on different surface applications.
• Please read the instructions fully before assembly.
• This awning must be fully assembled prior to installing it onto
the wall.
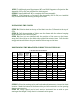
STEP 1: Separate all of the parts by part number so they will be easy to assemble.
PARTS LIST
Size 2 3 4 5 6 7 8 9 10 11 12 13 14 15 16 17 18 19
(TB) Top Bar - C Channel 1 1 1 1 1 1 1 1 2 2 2 2 2 2 2 2 2 2
(FB) Front Bar 1 1 1 1 1 1 1 1 2 2 2 2 2 2 2 2 2 2
(NC) Hypotenuse / Cover Support 2 2 2 3 3 3 4 4 5 5 5 5 5 7 7 7 7 7
(P) Projection 2 2 2 2 2 2 2 2 2 2 2 2 2 2 2 2 2 2
(B) Back Bar 2 2 2 2 2 2 2 2 2 2 2 2 2 2 2 2 2 2
(PA) Projection Bar Assembly 1 1 1 2 2 3 3 3 3 3 5 5 5 5 5
OTHER PARTS SELF TAPPING SCREWS, Z-BRACKETS
Tools Required: Electrical Drill, ¼” Nut Driver Bit, Full Socket Set, Full set of Steel
and Masonry Bits, Tape Measure, Safety Glasses, 4’ Level, A Safe Ladder, #2 Pencil
YOU MAY ALSO NEED A HELPER DEPENDING ON THE SIZE, WEIGHT,
LENGTH AND HEIGHT OF THE AWNING
NOTE: YOU WILL FIND THAT THE FITTINGS HAVE BEEN PRE-INSTALLED,
AS WE HAVE PRE-ASSEMBLED AND INSPECTED IT FOR YOU IN THE
FACTORY.
ASSEMBLING THE FRAME
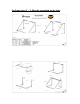
STEP 2: Connect Front Bar (FB) to (2) Back Bars (B). Make sure that the C-
Channel is away from you and close to the wall and also make sure that the Velcro
side of the Back Bar (B) is facing you
STEP 3: You may need a rubber mallet to fully seat the tubing onto the fittings.
STEP 4: Connect both Projection Bars (P) to other ends of the Back Bars (B) and
make sure that the Velcro on the Projection Bar (P) is facing you
STEP 5: Then connect the Front Bar (FB) to the Projection Bars (P) and make
sure that the Velcro is facing up
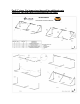
STEP 6: Now install Hypotenuses (NC) with arrows pointing upwards and
attach them to both ends of the Top Bar (TB) and Front Bar (FB)