
Installation Guide


4
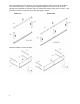
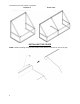
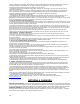
Step 3: Assemble the front structure. The Front Bar (FB) with Velcro, placed on the bottom.
The Velcro will face you. Insert Projection supports (CPS) in to the ends. Note: 5’ to 20’
awnings extra supports are included, they are shorter then (CPS). Place them in inserts. Then
place the Front bar on top and secure with Self tapping screws.
Frame 2’-4’ Frame 5’-24’
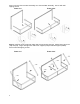
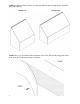
Step 4: Insert the Projection Bars (CNP) in to the bottom slots, and insert the Projection
assembly (CNPA) in to the top slots.