
Installation Guide

*** all the sizes are in inches
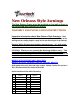
Model
Space
between
TB and
SA
Canopy
(Fabric)
height Projection Model
Space
between
TB and
SA
Canopy
(Fabric)
height Projection
NO21 24 12 16 NO21-NV 24 12 16
NO32 36 18 24 NO32-NV 36 18 24
NO43 48 24 32 NO43-NV 48 24 32
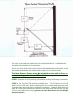
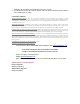
STEP 3: Install the Spear Arms (SA). The space between the top of the (TB) and the
Bottom of the (SA) must be according the chart above.
STEP 4: Once the Spear Arms are installed then connect the Front Bar (TB) to the
Spear Arms (SA). The Velcro on the (FB) must face up.
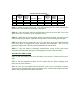
STEP 5: Install the NC (left and right) with arrows facing upwards. The holes on the
(FB) and (FB) are pre drilled. Make sure that the Velcro on (NC) facing left and right
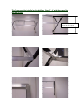
STEP 6: If the awning is larger then 4’ (52.5”) wide then you must install additional
(NC)s and (BP)s to complete the frame assembly and installation. BP is for the
projection support and is directly connected between FB and the Wall
STEP 7: Once the frame is completely installed then secure all the joints where
connectors are attached by driving one self tapping screw from inside the frame.
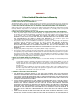
INSTALLING THE COVER
STEP 8: Slide the tubing at the top of the fabric cover into the C-Channel at the top of
(TB).
STEP 9: Pull the remainder of fabric over the frame with the valance hanging down
below the (NC) and (FB) bars.
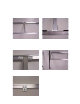
STEP 10: Once you are satisfied with the position of the cover on the frame, wrap the
Velcro strips on the fabric tabs around the exterior bars. Pull the tabs snugly and attach
them to the pre-installed Velcro tape on the bars.