
Installation Guide

NOTE: YOU WILL FIND THAT THE FITTINGS HAVE BEEN PRE-INSTALLED, AS WE
HAVE PRE-ASSEMBLED AND INSPECTED IT FOR YOU IN THE FACTORY.
STEP 1: Separate all of the parts by part number so they will be easy to assemble.
YOU MAY ALSO NEED A HELPER DEPENDING ON THE SIZE, WEIGHT, LENGTH
AND HEIGHT OF THE AWNING
NOTE: YOU WILL FIND THAT THE FITTINGS HAVE BEEN PRE-INSTALLED, AS WE
HAVE PRE-ASSEMBLED AND INSPECTED IT FOR YOU IN THE FACTORY.
ASSEMBLING THE FRAME
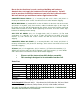
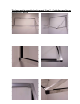
STEP 2: Connect Front Bar (FB) to (2) Back Bars (B). Make sure that the C-Channel is
away from you and close to the wall and also make sure that the Velcro side of the Back
Bar (B) is facing you. (Please see the chart below for the height measurements).
*** all the sizes are in inches
Model
Space
between
TB and P
Height
incl
valance
Projection Model
Space
between
TB and P
Height Projection
NT22 24 31 24 NT22-NV 24 24 24
NT33 36 44 36 NT33-NV 36 36 36
NT44 48 56 48 NT44-NV 48 48 48
STEP 3: You may need a rubber mallet to fully seat the tubing onto the fittings.
STEP 4: Connect both Projection Bars (P) to other ends of the Back Bars (B) and make
sure that the Velcro on the Projection Bar (P) is facing you
STEP 5: Then connect the Front Bar (FB) to the Projection Bars (P) and make sure that
the Velcro is facing up
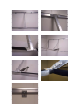
STEP 6: Now install Cover Support (NTC) with arrows pointing upwards and attach them
to both ends of the Top Bar (TB) and Front Bar (FB). Then attach Cover Support Braces
(NTB) to Cover Supports (NTC). This will strengthen the frame
STEP 7: For larger awnings additional parts Cover Support (NTC) and Wall Supports or
Projection Bar Assembly (WS or PA) are provided for extra support
STEP 8: Install additional (NTC) to complete the frame assembly
STEP 9: Wall Supports or Projection Bar Assembly (WS or PA) are installed only if
needed after the Awning is hung on the wall
INSTALLING THE COVER
STEP 10: Slide the bead at the top of the fabric into the C-Channel at the top of (TB)
STEP 11: Pull the remainder of fabric over the frame with the valance hanging down
below the (NTC)s and (FB) bars.
STEP 12: Once you are satisfied with the position of the cover on the frame, wrap the
Velcro strips on the fabric tabs around the exterior bars. Pull the tabs snugly and attach
them to the pre-installed Velcro tape on the bars.