Smart-7 Security Alarm System
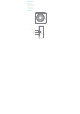
1 Box contents - Smart Alarm x1 - PIR Motion Sensor x1 - Door/Window contact x4 - Remote Control x1 - Documentation x1 2 Design Power Switch Setting Connection
LED indications Red Blink/fixed: System Armed Blue Blink/fixed: System armed in home mode Green Blink/fixed: System disarmed Red/Blue/Green fixed: Connected to the server Red/Blue/Green Blink Slowly: Wi-Fi network disconnected Green Blink Fast: Wi-Fi network settings EZ mode Blue Blink Fast: Wi-Fi network settings AP mode Buttons function Power Switch: Long press to turn ON/OFF the device Setting: Long press to enter Wi-Fi network settings EZ mode Connection: Short press to enter RF accessories connect mode
3 Features - Works with Internet Connection (Wi-Fi Connection) - Wireless connection for an easy installation - Supports up to 10 remote controls, 30 wireless accessories - Arm / disarm the system by remote controls, App (on iOS or Android) - Notifications in case of alert and system status change - Built-in siren (90dB) - Built-in lithium batteries for more than 5hours standby mode. 4 Specifications Product name Smart-7 Backup batteries Lithium Batteries: 3.
Wi-Fi network settings
5 Wi-Fi network settings The WIFI Smart Alarm can work with a 2.4GHz Wi-Fi connection, but not with 5GHz Wi-Fi. Wi-Fi connection: enables you to interact with your control panel by app (iOS / Android). All you need is a Wi-Fi connection at home and an Internet connection on your smartphone (Wi-Fi, 4G, 3G). Step 1: Get your APP ready - Download APP “SmartLife” on your smart phone. The app is available on the App Store and Google Play. - Run and install the APP on your smart phone.
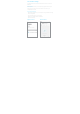
Step 2: Connect the Alarm to your APP There are two way to connect the alarm to APP: EZ and AP mode, please use AP mode when can not connect the alarm in EZ mode. To connect in EZ mode 1. Enter Wi-Fi EZ Mode: Setting button Ensure the system is disarmed before this operation, long press and hold the “Setting button” until hear 3beeps, the Green LEDs start blinks, now your alarm is ready in EZ mode for network setting. 2.
Choose Add Device Connecting Enter Wi-Fi password Set Alarm’s Name
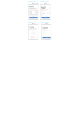
To connect in AP mode 1. Enter Wi-Fi AP Mode: Setting button + connection button Ensure the system is disarmed before this operation, long press and hold the “Setting button + connection button” until hear 3beeps, the Blue LEDs start blinks, now your alarm is ready in AP mode for network setting. 2. Choose the device which will be add choose “Add Manually” → ”Others” → ”Wi-Fi Connector” in the APP. 3. Choose ‘AP Mode’ 4.
Enter Wi-Fi Password Connecting Connect to SmartLife_xxxx Set Alarm’s Name
APP Operation
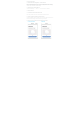
6 APP Operation APP Device List Interface In this interface, you can find your smart alarm already connected, choose the alarm which you want to control. Smart Alarm—Control Interface Click alarm name to enter the control interface. In this page you can control your alarm via the APP. Smart Alarm—Settings Interface Click “Settings” to enter the settings interface. In this page you can change the system settings of your alarm via the app.
Smart Alarm—Change a detector’s zone You can modify the zone of a detector via the app, choose a detector which you want to change its zone type. What do zones do? Normal sensor: It will trigger alarm in Arm/Home mode, it will not triggered in disarm mode. 24H mode: It will trigger alarm in Arm/Home/Disarm mode. 24H mute sensor: It will trigger alarm in Arm/Home/Disarm mode in mute. Delay mode: It will trigger alarm in Arm/Home mode after a delay time, it will not trigger alarm in disarm mode.
For the details about the connection with “Alexa” or “Google Assistant”, please click and view the instructions in the APP.
Daily Use
7 Daily use Arm the system When your system is armed, all detectors are active. By app Connect to your alarm and click on “Arm”. By remote control Press on the “Arm” button of the remote control . Arm in Home mode When your system is armed in Home mode, all detectors are active except those assigned to the Home zone. By app Connect to your alarm and click on “Home mode”. By remote control Press on the “Home” button of the remote control .
8 Connect wireless accessories By the Connection key on the alarm: 1) Ensure the gateway Green LED light on, Press once on the connection button of the gateway, you will hear 1 beep and find the Blue LED light on. 2) Trigger the accessory which will be connected, the gateway beeps once: Connection is successful . If beeps twice, the detector was already connected. By the APP: 1) In your app, choose the alarm, choose Accessories→Detector/Remote→ click “+” ADD.
Accessories
11 PIR Motion Detector Features The PIR is a high performance wireless motion detector boasting a digital dual-core fuzzy logic infrared control chip with intelligent analysis. This technology identifies interferences created by body motion and reduces the false alarm rate. Design 1. LED indicator 2. Detection window 3. Bracket Test / Connection button Detection scope Top view The detector is more sensitive to cross movements than vertical movements.
Mounting Fix the bracket onto the wall with screws and attach the detector to the bracket. We recommend to mount the detector at a height of 2.2m. The detector is more sensitive to horizontal movements than vertical movements. Top 2.2 m Ground Avoid mounting the detector close to windows, air conditioner, heater, refrigerator, oven, sunshine and places where the temperature changes fast or where the air stream flows frequently.
LED indications Blinks continuously: self-testing Blinks once: Motion is detected Blinks twice: self-testing is complete; entering working mode Blinks once every 3 seconds: the batteries must be replaced. Connection to your alarm system The detectors in your kit are already connected and ready to use. If you have deleted the detector from the control panel, you can reconnect it as follows: 1. Press once on the Connection button located on the control panel. 2.
12 Door / Window Detector Design Mounting Mount the magnet 1 cm away from the transmitter and secure the transmitter and magnet with double-sided tape on the door and the door frame respectively.
Distance Holder There are 3 sizes distance holder in the package, it is clickable to each to reach more distance options, for different window frame depths where user will mount the Magnet. Connection to your alarm system The detectors in your kit are already connected and ready to use. If you have deleted the detector from the control panel, you can reconnect it as follows: 1.Press once on the Connection button located on the control panel. 2. Separate the magnet from the Transmitter.
Specifications Power supply: CR2450 3V Battery x1 Static current: ≤ 10 uA Alarm current: ≤ 15 mA Transmitting distance: ≤80 m (in open area) Radio-frequency: 868 MHz Housing material: ABS plastic Operating conditions: -10°C ~ +55°C, ≤80% (non-condensing) Dimensions (L x W x H): Transmitter: 55.7 x 30.
Warning ATTENTION RISK OF ELECTRIC SHOCK DO NOT OPEN CAUTION: TO REDUCE THE RISK OF ELECTRIC SHOCK, DO NOT REMOVE COVER (OR BACK). NO USER SERVICEABLE PARTS INSIDE, REFER SERVICING TO QUALIFIED SERVICE PERSONNEL. This symbol is intended to alert the user to the presence of uninsulated “dangerous voltage” within the product’s enclosure that may be of sufficient magnitude to constitute a risk of electric shock to persons.
Standards This product bears the selective sorting symbol for waste electrical and electronic equipment (WEEE). This means that this product must be handled pursuant to European Directive 2012/19/EU in order to be recycled or dismantled to minimize its impact on the environment. For further information, please contact your local or regional authorities.