
User's Manual
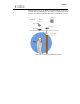


Table Of Contents

Contents
Step 2: Turn on the car while watching the LED to see if it turns
on. (Note: this usually happens only in older vehicles with
very noisy alternators.)
Step 3: If the Tag turns on, move the tag up ½ inch and repeat
test until the Tag no longer turns on.
Step 4: Mark the spot you found on the windshield with some
scotch tape or a washable marker.
Note: The LED light can be hard to see in bright daylight.
Shield the LED with your hand while holding it against the
windshield.
Step 5: Test the various positions to find the one that works best
for your installation and the vehicles involved.
Mounting a Vehicle Tag
Step 1: Apply mounting tape/Velcro on the back of the Tag. Push
the mounting tape/Velcro securely on the back of the Tag.
IMPORTANT! To receive maximum range from the
antenna, the Tag must be mounted with the back of the
Tag facing the glass at least 3 inches off the dashboard.
Step 2: If using Velcro, apply one side of the Velcro mount to the
location where the LED Tag was successfully tested. Then
mount the Tag with the other piece of Velcro onto the
Velcro on the windshield.
Figure 5: Velcro applied to window
Step 3: If using double-sided tape, peal the cover off the double-
sided tape attached to the Tag. Firmly apply the Tag to the
windshield location you found earlier and press the Tag to
the windshield ensuring solid contact.