INTRODUCTION The Fixed Wireless Cordless phone operates through a wireless connection instead of a landline phone cable, enabling the subscriber to set up the phone at any where wireless service is available. Axesstel CDMA Technology Fixed Wireless Cordless phone provides high quality and superior performance with many features such as excellent voice quality,caller ID, three-way calling, call waiting, short message service, speaker phone etc.
TABLES OF CONTENTS Safety Precautions……………….….......4 Advanced Features Checking Parts .……………………...…5 Changing Greeting Message………..28 Setting up Your Phone ……….…….....6 System Reset…………………...…….28 Getting to Know Your Phone ………..8 Restricting Use of the Phone………..30 Display Icons………………………..…......9 Locking / Unlocking the Phone……...30 Function Keys……....…………………....10 Changing the Lock Code………...…..30 Language……………………………30 Basic Operation Making Calls ...…….……………...…..
SAFETY PRECAUTIONS 1. Avoid placing the phone in a dusty location, or near a source of gas or fire. 2. Don't Shake, hit or drop the phone. 3. To clean the outside of the phone, use only a soft, dry cloth. The chemicals in alcohol, benzene or acetone can damage the surface of the phone. 4. Do not twist or pull the cord out of the phone. 5. Do not disassemble the phone. 6. Do NOT use the power adaptor if: - The power cord is damaged. - The phone has been dropped or damaged in any way. 7.
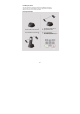
CHECKING THE PARTS After unpacking your phone, make sure that you have all the parts shown below. If any piece is missing or broken, please call your customer service center. 1. Handset 2. Cradle 3. User Manual 4. Power Adaptor 5.
Installing the phone This phone operates by receiving DC power from the AXESSTEL power adaptor, which connects to an electrical outlet. The phone is equipped with a rechargeable battery as a back up in case of an AC power failure. Desktop installation Place the Cradle on the Flat Area Plug the Power adaptor into an appropriate Wall outlet Place the Handset on the Cradle.
Service Status Check Display in the Service Area When the phone’s power is turned on, LCD will display Power ON. LCD will display greeting with date and time. The number of bars of signal strength indicator (antenna icon) indicates the strength of service signal of the area. Display in area with no service When there is no service signal detected in your area, no antenna bar appears. Contact your service provider for the coverage area information. Also move to find better signal areas.
GETTING TO KNOW YOUR PHONE 1.MENU 2.CALL LOG 3.CALENDAR 4.CONTACT 5.SPEAKER 6.MESSAGE 7.END 8.SOUND 9.TALK 1. Menu: Press to access the phone's menus. 2. Call Log: Press to access the Call log sub menu directly. 3. Calendar: Press to access the Calendar menu directly. 4. Contact: Press to access the Contacts sub menu directly. 5. Speaker: Press to activate “Speaker Phone” function. 6. Message: Press to access the Messages menu directly. 7. End: End or Reject the Call. 8.
DISPLAY ICONS Icons display on the screen to indicate what features you are using, signal strength and battery status etc... Indicate the strength of the signal. More bars indicates stronger signal. Indicates the level of battery power. The more bars, the more power. When the battery is low, the icon blinks, and an alert tone sounds. Indicates that all calls are diverted . Indicates that the alarm has been set. Indicates that you have text message. Indicates that you have a voice mail message.
FUNCTION KEYS Press this key to display the phone's main menu. Press this key to access the Calendar menu directly. Press this key to access the Messages menu directly. Press this key to access the Contacts sub menu directly. .Press this key to access the Call log sub menu directly. Press this key to access the Sound menu directly. In conversation state, it is working as the Speaker button. The integrated microphone and speaker on the Main unit allows hands free conversation.
Basic Operation Making Calls Redial Receiving Calls Adjusting Volumes Choosing the Ring Tones Message Service 11
MAKING CALLS 1. Make sure your phone is turned on. 2. Dial the number to call. The LCD window displays the number. 4. Wait for a moment for auto calling or press . 5. When the other person answers, begin conversation. 6. To end the call, press . NOTE1: Modifying a phone number while dialing. -To erase the last digit entered: Press . -To erase the entire number: Press and hold.
REDIAL Redial the number you dialed. 1. Press or key. 2. Press to be called. NOTE: You may not redial when there is no last number dialed stored in the memory. "Call log Empty" message is displayed on the LCD. RECEIVING CALLS When there is an incoming call, the phone rings and shows Incoming Call Animation on the display. 1. Press to answer the call. 2. To disconnect, Press . NOTE: When the ringer volume is set to 0 Level, the phone does not ring.
ADJUSTING VOLUMES You can control the sound volumes including the key tone, Message and the ringer Adjusting earpiece volume Press key repeatedly during a phone call to adjust earpiece volume. Adjusting ring volume 1. Press
MESSAGE SERVICE Message service is a network dependent feature and is available only when your service provider supports it. Make sure your service provider is providing message service before using this function. Sending New Text Messages 1. Press
Received Text Message 1. When a new text message arrives, ‘Message’ will be displayed with arrival time and the Message Icon will be appeared in the icon line. 2. Press key, <2> (Inbox) and use key to select message you want to see and press . 3. The message, arrival time and call back number displays. If the message is longer then single line, scroll up and down by pressing key.
Erasing Received Messages 1. Press
Phone book Internal phone Book Storing in phonebook Searching For Entries in Phonebook Erasing An Entry in Phonebook Erasing All Entries in Phonebook One-Touch Dialing 18
INTERNAL PHONE BOOK Your phone has an internal "Phone Book" in which you can store up to 250 frequently used names and numbers. STORING IN THE MEMORY PHONEBOOK 1. Press
Setting One-Touch Speed Dial 1. Press
ERASING AN ENTRY IN PHONEBOOK To Erase a Specific Number 1. Press
Useful Features Call History Mute Silent Key Pad Selecting Time Mode Setting Time Mode Checking and Clearing Call Times Setting Warning Alerts 22
CALL HISTORY Your phone stores the last 100 outgoing calls, incoming, and missed Calls combined (only when Caller ID function is activated). You can display and redial these numbers. Redialing Outgoing Calls 1. Press
Erasing Call History 1. Press
SETTING THE ALARM You can set the alarm sound daily or one time only. 1. Press
CHECKING AND CLEARING CALL TIMES Checking the Last call Time 1. Press
Advanced Features Changing Greeting Message System Reset Restricting Use of the Phone Locking / Unlocking the Phone Changing the Lock Code 27
CHANGING GREETING MESSAGE This feature lets you change the greeting message that the phone displays in the power on time. 1. Press
To reset your phone settings to manufacture’s defaults and clear all user data, follow these steps: 1. Press
RESTRICTING USE OF THE PHONE You can restrict the use of the phone by unauthorized persons Restricting Outgoing Calls 1. Press
CHANGING THE LOCK CODE The lock code is 0000. It can be changed to any 4 digit number. 1. Press
Optional Features Call Forwarding Call Waiting Three-way Calling / Conference Call 32
Call Forwarding Call Forwarding is a feature that lets you forward your incoming calls to another phone number, even if your phone is turned off or is in no service area. Contact your service provider to activate Call Forwarding. Call Waiting Call Waiting alerts you to a second incoming call while you are on the conversation. When there’s another incoming call, you will hear warning beep. To respond to the call waiting, press or hit shortly the hook switch once.
Miscellaneous Menu Table Specification Conformance Statements 34
MENU OPTION TABLE I II 1) View contacts 1. Contacts 2) New contacts 3) Speed dials 4) Delete all 5) Settings 1) New message 2) Inbox 3) Outbox 5) Template Creates and send new message. Shows all of received messages. Shows all of sent messages. Shows all of saved messages to be sent without number. Shows 10 predefined phrases. 6) Voice MSG Gets voicemail or change the voicemail center number. 4) Draft 2.Messages 3.
Temperature of operation Relative humidity Adapter -10 ~ +50 degrees Celcius 10% ~ 95% Input: AC 100~240V 50~60Hz Output: DC 5V/600Ma Battery Standby Talk 36 72 Hours 2.
Safety Information 1 . SAFETY INFORMATION FOR FIXED WIRELESS TERMINALS .POTE NTIALLY EXPLOSIVE ATMOSPHERES Turn your phone OFF when in any area with a potentially explosive atmosphere and obey all signs and instructions. Sparks in such areas could cauls e an explosion or fire resulting in bodily injury or even death. INTERFERENCE TO MEDICAL DIVICES Certain electronic equipment may be shielded against RF signal from you wireless phone.
SAR INFORMATION THIS MODEL PHONE MEETS THE GOVERNMENT’S REQUIREMENTS FOR EXPOSURE TO RADIO WAVES. Your wireless phone is a radio transmitter and receiver. It is designed and manufactured not to exceed the emission limits for exposure to radiofrequency (RF) energy set by the Federal Communications Commission of the U.S. Government. These limits are part of comprehensive guidelines and establish permitted levels of RF energy for the general population.
U.S.A. U.S.FEDERAL COMMUNICATIONS COMMISSION RADIO FREQUENCY INTERFERENCE STATEMENT INFORMATION TO THE USER NOTE : This equipment has been tested and found to comply with the limits for a Class B digital device pursuant to Part 15 of the FCC Rules.
37