
User`s guide


2: Basic Setup and Operation • 7
Version 1.2 July 2010
Chapter Two:
Setup and Operation
Chapter 1: Introducing Axia IP-Intercom described
the physical connections to the IP-Intercom stations. This
chapter will discuss the operation of the IP-Intercom sta-
tions when used as a standalone system or in conjunction
with your Element console and Livewire audio nodes.
Please be sure to read Chapter 3: Advanced Pro-
gramming so you will understand how you assign the IP
address and Livewire channel numbers to your IP-Inter-
com station. Chapter 3 also describes the web page in-
terface and the advanced features and capability of your
IP-Intercom system.
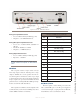
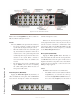
Individual Channel Controls
Talk
This key may be used in momentary or latching
modes. To use it as a momentary PTT (push-to-talk)
switch, you may press and hold the Talk key to talk. If
you want to us it as a latching control, you can tap to
latch Talk mode and tap again to release Talk mode.
The red Talk LED illuminates during Talk Mode, or
when the remote station associated with that key is lis-
tening. The Talk LED may flash to indicate a fault (at-
tempt to communicate with faulty or disconnected panel,
route is locked out by studio IFB, function is overridden
by another station, system failure prohibits completing
route, etc.)
PRIVACY NOTE: If a remote user is assigned
to one of your intercom channels and that user
presses his Listen key (corresponding to your
station), the Microphone LED will indicate solid
RED. This means that the remote user is lis-
tening to you. This is desirable if you want fast,
hands-free operation. If you want to ensure your
privacy - be sure to press your Mute Mic key.
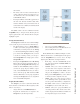
Listen
In a manner identical to the Talk button, this key may
also be used in two different ways. You may press and
hold the Listen key to listen momentarily. You may also
tap the Listen key to latch Listen mode and tap again to
release Listen mode. You may also press multiple keys
and listen on more than one channel if desired.
The yellow Listen LED illuminates during Listen
Mode when an assigned remote station is calling the lo-
cal station. The Listen LED will continue to flash for 5
seconds (by default) after the remote user has discon-
nected to indicate who has recently called. This is use-
ful in a busy operation where there are many short calls
making it difficult to keep track of who has spoken to
you while you are concentrating on other tasks.
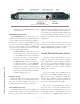
Talk/Listen
If you want to initiate a full-duplex hands-free con-
versation with a remote station, simply press both Talk
and Listen keys. As long as the remote microphone is not
muted, the two-way communication can proceed with-
out any action on the part of the remote user. Remember
communication among IP-Intercom stations is always
full-duplex. Hands-free operation may not be available
when communicating with third-party equipment that
does not support full-duplex operation.
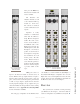
OLED Display (Individual Channels)
This 10-character display will show the Label of the
Source that is assigned to the adjacent Talk and Listen
buttons. The upper part of the display refers to the but-
tons above the display and the lower part of the display
refers to the buttons below the display.
If you have configured the channel with an Alter-
nate Label, that alternate name will be displayed.
Other Controls
OLED Display (CALLSTACK)
This high contrast OLED (Organic Light Emitting
Diode) display is context dependent and is used to dis-
play many different parameters in conjunction with the