
User`s guide

2: Basic Setup and Operation • 9
Version 1.2 July 2010
these menus.
• The Select control can also scroll and select in-
coming calls from stations not assigned to a lo-
cal channel. See the section that follows on the
CALLSTACK channel.
• Pressing the Select control will toggle between
the main and alternate Channel Labels. This
switches all labels on keys and menus. If an al-
ternate label is not available, the main label will
remain on the display
The Select control is used in combination with the
Assign/Enter key to navigate menus. Pressing the As-
sign key performs the “enter” function thus choosing the
highlighted option.
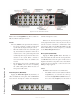
Group (20-Station Panel)
The Group button enables the user to talk to multiple
sources with one press. It is used in two different ways:
• The Group button is used as a Group Talk key
to talk to your station group (discussed below)
in momentary or latching modes. To use Group
as a momentary PTT (push-to-talk) key, simply
press and hold the Group button. If you want
to us this as a latching control, you can tap to
latch Group Talk mode and tap again to release
Group Talk mode.
• Pressing the Assign button and then the Group
button will enter Group Assignment mode, at
which point the Group LED will flash. Tap any
number of channel Listen keys that you wish to
join into the group. Tap any number of previ-
ously selected Listen buttons that you wish to
remove from the group. Talk and Listen LED
indicators illuminate to show group assignment
state. Tap the Group button to leave assignment
mode and its LED extinguishes.
Assign (20-Station Panel)
The Assign key is used in conjunction with the Se-
lect control for several functions. The Assign key works
like an “enter” key to:
• Assign channels to the Talk/Listen buttons.
• Program the channels that are assigned to the
Group button (described previously).
• Choose pre-programmed Shift pages.
• Choose other parameters in IC.20 menus in con-
junction with the Select control.
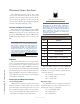
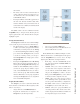
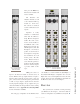
The IC.20 Menu Tree is illustrated in Figure 2-3. The
Select control is used to scroll through the menu options
and the Assign/Enter key is used to choose the high-
lighted option. Menu Tree descriptions follow:
• Home Page - lists the CALLSTACK (incom-
ing call requests) plus the ASSIGN, SHIFT and
STATUS options.
• ASSIGN - takes you to a list of available inter-
com users that can be assigned to dedicated in-
tercom channels. Scroll with the Select control
and press the Assign key to make a selection.
Then press the Microphone key on the channel
to which you wish to assign the new user.
• SHIFT - takes you to a list of presets, referred
to as Shift Pages. These preset Shifts are used
to load up entire 20-channel key configurations.
The Select control is used to scroll the list and
the Assign key is used to make your choice.
• STATUS - takes you to a page that will list vari-
ous status parameters. The current version of the
software displays the IC.20 Intercom Label and
the temperature (degrees C) of the unit.
Figure 2-3: IC.20 Memu Tree