
User`s guide


3: Advanced Programming • 13
Version 1.2 July 2010
Chapter Three:
Advanced Programming
This chapter will walk you through the use of the
IP-Intercom panel’s built in web pages to configure
advanced features quickly, easily — and remotely!
Assigning an IP Address
There are a few different ways to assign an IP ad-
dress to your Axia IP-Intercom station.
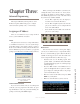
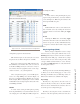
iProbe
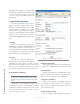
The quickest and easiest way to assign an IP address
to an IP-Intercom station is to use our system manage-
ment utility, iProbe. Axia’s iProbe software contains a
BootP server. If iProbe is running when the IP-Intercom
station’s ID button is pressed, you will see a pop-up that
prompts you for IP address and subnet mask parameters.
Figure 3-1: iProbe - BootP
Pop-up Window
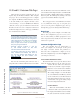
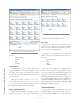
IC.20 Front Panel Controls
If you do not have iProbe and you are working with
an IC.20, you may program the IP address by press-
ing the ID button on the rear panel and following the
prompts on the front panel OLED displays.
When you first press the ID button, you will see the
existing IP address of the unit. If it is “factory fresh”,
you will see the display as shown in Figure 3-2. These
four OLEDs display the four octets of the unit’s IP ad-
dress. The factory default is 0.0.0.0.
• Use the Mic or Spkr key above the display to
increment or decrement the IP address.
• Use the Mic and Spkr keys below the first dis-
play to select whether you are setting the IP Ad-
dress or the Subnet Mask.
• Press the Mic key below OK on the fourth dis-
play to save your settings.
Figure 3-2: IC.20 Front Panel IP Address Displays
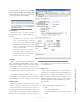
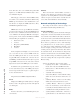
BootP Server
Since the IC.1 does not have a front panel display,
you may need a different way to assign its IP address.
We use a standard utility program called BootP that’s
available in the Support section of the Axia Audio web
site. To assign the IP address, follow these steps:
• Download and save the BootPS program. Tem-
porarily disable your Windows Firewall. Double-
click the bootps.exe program. A command prompt
window will open.
• Press the <ID> button on the IP-Intercom rear
panel and bootps.exe will recognize the button
press, display the existing IP address and prompt
you for new IP address entry.
• Enter the desired new IP address and press <EN-
TER> on your keyboard.
• Make note of the IP address you have entered.
Figure 3-3: IC.1 BootP Server Window