
User`s guide

4: Setup and Conguration • 16
©2014 Axia Audio - Rev.1.3.8
Axia console module setup
The console module connects to the controller bus
within the surface frame. This module is a controller to
the intercom station which is resident in the DSP Engine.
When the controller module is online, the intercom sta-
tion located in the DSP Engine will notify other stations
through mDNS of its presence. Without the module on-
line, the intercom station will shut down. The intercom
station will take the host name from the DSP Engine.
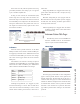
To congure this intercom station you must access it
through the web interface of the DSP Engine. Select the
Intercom link from the available links of the DSP En-
gine.
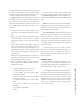
To dene the station for other stations, dene the
unique Intercom Label and provide an Alternate Label
which is displayed on OLED displays by default.
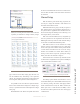
Figure 4-3
Dene two unique Livewire channels. The rst is the
audio source of the intercom station. When this station
sends audio to other stations, this is the audio channel
received. The second channel, Preview mix channel, is
used as a console source prole for insertion into Exter-
nal Preview function of the console. When other stations
send audio to this station, the received audio is in the
preview speaker. When you have the second channel de-
ned, don’t forget to generate a Source prole and dene
this source as the External Preview source in each of the
Show proles congured to the surface.
The Call drop ash, Trigger levels, Dim level, and
Latch timeout settings are the same as described
previously for the rackmount/desktop units.
IC.10X Expander Chassis
The IC.20 IP-Intercom station may be equipped with
a 10-channel expander unit known as the IC.10X. This is
a rack-mount chassis with only an AC receptacle, an ID
button and a Livewire jack on the rear panel. There are
no audio connections or logic ports on the IC.10X.
The conguration and operation of the IC.10X is
quite straight-forward and if you have understood our
previous section on the IC.20, you will have no problem
extending that knowledge to the IC.10X.
IP Address
The IC.10X has an ID button on the rear panel. This
switch is used in conjunction with Axia iProbe software
or the BootP utility as described in detail at the begin-
ning of this chapter.
The IP address may also be changed from the System
page of the conguration. Remember that if you change
the IP address, you will lose the connection to your web
browser and it will be necessary to “point” your browser
at the new IP address to restore the connection.
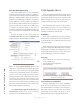
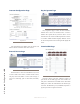
Home Page
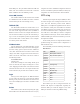
The IC.10X has only two options on the home page
as shown in Figure 4-4
• Intercom Expansion Conguration
• System Parameters
Figure 4-4: IC.10X Home Page
Intercom Expansion Conguration
This page simply allows you to specify the Label of
the IC.20 master to which you are associating the expan-
sion and which bank of 10 stations you are assigning to
this module. You may have more than one IC.10X as-
sociated with an IC.20 master - just be sure to specify
different channel ranges for each expansion chassis.