FRANCAIS Installation Guide ENGLISH AXIS 212 PTZ/ AXIS 212 PTZ-V Network Camera DEUTSCH ITALIANO ESPAÑOL
AXIS 212 PTZ/ AXIS 212 PTZ-V Installation Guide Page 3 Introduction This guide provides instructions for installing the AXIS 212 PTZ/AXIS 212 PTZ-V Network Camera on your network. For all other aspects of using the product, please see the AXIS 212 PTZ/AXIS 212 PTZ-V User’s Manual, available from www.axis.com or on the Axis Network Video Product CD. 1. 2. 3. 4.
Page 4 AXIS 212 PTZ/ AXIS 212 PTZ-V Installation Guide Description Camera unit Status indicator (LED) Audio out Microphone Control button Power connector Power indicator (LED) Audio in Dome casing for AXIS 212 PTZ I/O terminal connector Network indicator (LED) Network connector Dome casing for AXIS 212 PTZ-V Cover plate Cover plate Serial Number (S/N) - This is required during installation. Please retain it for future reference.
AXIS 212 PTZ/ AXIS 212 PTZ-V Installation Guide Page 5 Installing the hardware Refer to the illustration on page 4 for a detailed overview of the AXIS 212 PTZ/AXIS 212 PTZ-V. Make a note of the serial number (S/N), which is located on the product label on the base of the camera unit casing. The serial number is used in the installation. The AXIS 212 PTZ/AXIS 212 PTZ-V is designed for indoor use only.
Page 6 AXIS 212 PTZ/ AXIS 212 PTZ-V Installation Guide Completing the installation 1. Use a blower to remove dust from the lens. 2. Clean the dome with a dry soft cloth to remove dust and finger prints (for AXIS 212 PTZ-V only). 3. Mount the casing using the supplied tamper-proof screws and screw driver. For AXIS 212 PTZ If using the angled wall mount, hook the side of the casing onto the tab on the angled wall mount (see page 4) and secure the dome casing on the other side using a tamperproof screw.
AXIS 212 PTZ/ AXIS 212 PTZ-V Installation Guide Page 7 Setting the IP address The AXIS 212 PTZ/AXIS 212 PTZ-V is designed for use on an Ethernet network and must be assigned an IP address to make it accessible. Windows AXIS IP Utility and AXIS Camera Management are the recommended methods for setting an IP address in Windows.
Page 8 AXIS 212 PTZ/ AXIS 212 PTZ-V Installation Guide AXIS IP Utility AXIS IP Utility automatically discovers and displays Axis devices on your network. The application can also be used to manually set a static IP address. AXIS IP Utility is available on the Axis Network Video Product CD, or it can be downloaded from www.axis.com/ techsup Note that you must install the AXIS 212 PTZ/AXIS 212 PTZ-V on the same network segment (physical subnet) as the computer running AXIS IP Utility.
AXIS 212 PTZ/ AXIS 212 PTZ-V Installation Guide Page 9 AXIS Camera Management AXIS Camera Management can automatically discover multiple Axis devices, show connection status, manage firmware upgrades and set IP addresses. ENGLISH Automatic discovery 1. Check that the camera is connected to the network and that power has been applied. 2. Start AXIS Camera Management. In the window that appears double-click AXIS 212 PTZ to open the camera’s home page. 3.
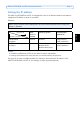
Page 10 AXIS 212 PTZ/ AXIS 212 PTZ-V Installation Guide Other methods of setting the IP address This table shows alternative methods for setting or discovering the IP address. Requirements DHCP Server Operating system in network Installation UPnP™, Optional Windows (ME or XP) Bonjour, Optional Mac OSX (10.
AXIS 212 PTZ/ AXIS 212 PTZ-V Installation Guide Page 11 Bonjour Bonjour (Mac OSX) automatically discovers AXIS 212 PTZ/AXIS 212 PTZ-V once connected to the network. Navigate to the Bonjour bookmark in your browser and click on the camera’s link to access the Web pages. See page 13 for how to set the password. Note that you must install the AXIS 212 PTZ/AXIS 212 PTZ-V on the same network segment (physical subnet) as the computer handling the installation. Bonjour is a trademark of Apple Computer, Inc.
Page 12 AXIS 212 PTZ/ AXIS 212 PTZ-V Installation Guide 4. Close the Command prompt when you see ‘Reply from 192.168.0.125: ...’ or similar. 5. Start your browser, type in http:// in the Location/Address field and press Enter on your keyboard. 6. See page 13 for instructions on how to set the password. Note: •The ARP/Ping command must be issued within 2 minutes of connecting power to the camera. • To open a command prompt in Windows: from the Start menu, select Run...
AXIS 212 PTZ/ AXIS 212 PTZ-V Installation Guide Page 13 Setting the Password Help - Displays online help on all aspects of Setup - Provides the necessary tools for configuring the cam- ENGLISH 1. When accessing AXIS 212 PTZ/AXIS 212 PTZ-V for the first time, the ‘Configure Root Password’ dialog is displayed. 2. Enter a password and then re-enter it, to confirm the spelling. Click OK. 3. Enter the user name root in the ‘Enter Network Password’ dialog.
Page 14 AXIS 212 PTZ/ AXIS 212 PTZ-V Installation Guide Accessing the AXIS 212 PTZ/AXIS 212 PTZ-V from the Internet Once installed, your AXIS 212 PTZ/AXIS 212 PTZ-V is accessible on your local network (LAN). To access the camera from the Internet, network routers must be configured to allow incoming traffic, which is usually done on a specific port. Please refer to the documentation for your router for further instructions.
AXIS 212 PTZ/ AXIS 212 PTZ-V Guide d'installation Page 15 AXIS 212 PTZ/AXIS 212 PTZ-V Caméra réseau Ce guide d'installation vous explique comment installer l’AXIS 212 PTZ/AXIS 212 PTZ-V Caméra réseau sur votre réseau. Pour d'autres informations sur l'utilisation de ce produit, consultez le Manuel de l'utilisateur de la caméra AXIS 212 PTZ/AXIS 212 PTZ-V disponible sur le CD Axis Network Video Product ou surfez sur www.axis.com.
Page 16 AXIS 212 PTZ/ AXIS 212 PTZ-V Guide d'installation Description Caméra Bouton de commande Voyant d'état (DEL) Sortie audio Connecteur E/S Microphone Connecteur d'alimentation Voyant Voyant de réseau d'état (DEL) (DEL) Entrée audio Boîtier du dôme pour AXIS 212 PTZ Connecteur de réseau Boîtier du dôme pour AXIS 212 PTZ-V Plaque du capot Plaque du capot Numéro de série (S/N) - Le numéro de série est nécessaire pendant l'installation.
AXIS 212 PTZ/ AXIS 212 PTZ-V Guide d'installation Page 17 Installation du matériel Reportez-vous à l'illustration à la page 16 pour une représentation détaillée de la caméra AXIS 212 PTZ/AXIS 212 PTZ-V. Notez le numéro de série (S/N) de l'étiquette située au bas du boîtier de la caméra. Le numéro de série sera nécessaire pendant l'installation. La caméra AXIS 212 PTZ/AXIS 212 PTZ-V est conçue pour une utilisation intérieure uniquement. Support mural 1.
Page 18 AXIS 212 PTZ/ AXIS 212 PTZ-V Guide d'installation Terminer l'installation 1. Nettoyez le dôme avec un chiffon doux et sec pour enlever la poussière et les traces de doigt. Dépoussiérez l'objectif avec un ventilateur. 2. Montez la boîtier du dôme à l'aide des vis inviolables et du tournevis fournis.
AXIS 212 PTZ/ AXIS 212 PTZ-V Guide d'installation Page 19 Définition de l'adresse IP L’AXIS 212 PTZ/AXIS 212 PTZ-V a été conçue pour être utilisée sur un réseau Ethernet et doit se voir attribuer une adresse IP pour être accessible. Windows Nous recommandons l'utilisation des applications AXIS IP Utility et AXIS Camera Management pour la définition d'une adresse IP sous Windows.
Page 20 AXIS 212 PTZ/ AXIS 212 PTZ-V Guide d'installation Application AXIS IP Utility L'utilitaire AXIS IP Utility détecte et affiche automatiquement les périphériques Axis de votre réseau. Il permet aussi de définir manuellement une adresse IP statique. Application AXIS IP Utility est disponible sur le CD Axis Network Video Product et à l'adresse www.axis.
AXIS 212 PTZ/ AXIS 212 PTZ-V Guide d'installation Page 21 AXIS Camera Management AXIS Camera Management peut détecter automatiquement plusieurs dispositifs Axis, afficher les états de connexion, gérer les mises à niveau du microcode et définir les adresses IP. Détection automatique Attribuer une adresse IP à un seul dispositif 1.Sélectionnez AXIS 212 PTZ dans l'application AXIS Camera Management, puis cliquez sur le bouton Assign IP (Affecter une IP) . 2.
Page 22 AXIS 212 PTZ/ AXIS 212 PTZ-V Guide d'installation Autres méthodes possibles Ce tableau présente d'autres méthodes permettant de définir ou de déterminer l'adresse IP. Serveur Configuration minimale requise DHCP dans le réseau Méthodes d'installation Système d'exploitation UPnP™ En option Windows (ME ou XP) Bonjour Voir page 23 En option Mac OSX (10.
AXIS 212 PTZ/ AXIS 212 PTZ-V Guide d'installation Page 23 Remarque : Pour installer le service UPnP™ sur votre ordinateur, ouvrez le Panneau de configuration depuis le menu Démarrer et sélectionnez Ajout/suppression de programmes. Sélectionnez Ajouter/Supprimer des composants Windows et ouvrez la section Services de mise en réseau. Cliquez sur Détails, puis sélectionnez UPnP comme service à ajouter. UPnP™ est une marque de certification de UPnP™ Implementers Corporation.
Page 24 AXIS 212 PTZ/ AXIS 212 PTZ-V Guide d'installation Définition de l'adresse IP à l'aide d'ARP/Ping 1. Trouvez une adresse IP sur le même segment de réseau que celui de votre ordinateur. 2. Repérez le numéro de série (S/N) sur l'étiquette de la caméra AXIS 212 PTZ/AXIS 212 PTZ-V. 3.
AXIS 212 PTZ/ AXIS 212 PTZ-V Guide d'installation Page 25 Définition du mot de passe Help (Aide) - Affiche une aide en ligne sur Setup (Configuration) - Contient tous les outils nécessaires pour FRANCAIS 1. Si vous accédez à la caméra AXIS 212 PTZ/AXIS 212 PTZ-V pour la première fois, la boîte de dialogue Configure Root Password (Configurer le mot de passe root) s'affiche. 2. Entrez un mot de passe et entrez-le une seconde fois pour en confirmer l'orthographe. Cliquez sur OK. 3.
Page 26 AXIS 212 PTZ/ AXIS 212 PTZ-V Guide d'installation Accès à la caméra AXIS 212 PTZ/AXIS 212 PTZ-V depuis Internet Une fois installée, votre caméra AXIS 212 PTZ/AXIS 212 PTZ-V est accessible depuis votre réseau local (LAN). Pour accéder à la caméra depuis Internet, vous devez configurer les routeurs réseau afin d'autoriser l'entrée de données, ce qui se fait généralement sur un port spécifique. Consultez la documentation de votre routeur pour obtenir davantage d'instructions.
AXIS 212 PTZ/ AXIS 212 PTZ-V Installationsanleitung Seite 27 AXIS 212 PTZ/AXIS 212 PTZ-V Netzwerkkamera In dieser Anleitung wird die Installation der Kamera AXIS 212 PTZ/AXIS 212 PTZ-V Network Camera im Netzwerk beschrieben. Alle anderen Aspekte der Nutzung dieses Produkts werden im AXIS 212 PTZ/AXIS 212 PTZ-V Benutzerhandbuch beschrieben, das sich auf der mitgelieferten Axis Network Video Product CD befindet. Sie können das Benutzerhandbuch auch von unserer Website unter www.axis.com herunterladen.
Seite 28 AXIS 212 PTZ/ AXIS 212 PTZ-V Installationsanleitung Beschreibung Kameraeinheit Statusanzeige (LED) Audio-Ausgang Mikrofon Netzanschluss Audio-Eingang Netzanzeige (LED) E/A-Anschlussanschluss Steuertaste Netzwerk- Netzwerkanzeige anschluss (LED) Kuppelhaube für AXIS 212 PTZ-V Kuppelhaube für AXIS 212 PTZ Abdeckplatte Abdeck platte Seriennummer (S/N) - Die Seriennummer wird für die Installation benötigt. Notieren Sie sich die Seriennummer, so dass Sie diese stets griffbereit haben.
AXIS 212 PTZ/ AXIS 212 PTZ-V Installationsanleitung Seite 29 Hardware installieren In der Abbildung auf Seite 28 finden Sie einen detaillierten Überblick über die AXIS 212 PTZ/AXIS 212 PTZ-V. Notieren Sie sich die Seriennummer (S/N) der Kamera. Diese befindet sich auf dem Produktaufkleber an der Gehäuseunterseite. Die Seriennummer wird für die Installation benötigt. Die AXIS 212 PTZ/AXIS 212 PTZ-V ist nur für die Verwendung in Innenräumen ausgelegt. Wandmontage. 1. 2. 3.
Seite 30 AXIS 212 PTZ/ AXIS 212 PTZ-V Installationsanleitung Kabel anschließen 1. 2. 3. Verbinden Sie das Netzwerkkabel mit dem Netzwerkanschluss der Kamera. Schließen Sie die Kamera auf eine der folgenden Arten an eine Stromversorgung an: • PoE (Power over Ethernet) über das Netzwerkkabel. Die Kamera erkennt automatisch, ob diese Option von Ihrem Netzwerk unterstützt wird. • Schließen Sie das mitgelieferte Netzteil an den Netzanschluss der Kameraeinheit an.
AXIS 212 PTZ/ AXIS 212 PTZ-V Installationsanleitung Seite 31 E/A-Anschlussleiste Kontakt Funktion Beschreibung 4 Transistoraus gang 3 Digitaler Eingang 2 3,3 V Gleichstrom GND Dieser Ausgang ist für eine Maximalstromstärke von 50 mA und für maximal 24 V Gleichstrom ausgelegt. Er verfügt über einen NPN-Transistor mit offenem Kollektor, dessen Emitter mit dem Masseanschluss verbunden ist.
Seite 32 AXIS 212 PTZ/ AXIS 212 PTZ-V Installationsanleitung IP-Adresse festlegen Die AXIS 212 PTZ/AXIS 212 PTZ-V ist für die Verwendung in einem Ethernet-Netzwerk vorgesehen. Für den Zugriff auf die Kamera muss dieser eine IP-Adresse zugewiesen werden. Windows Es wird empfohlen, die IP-Adresse unter Windows mit Hilfe der Dienstprogramme AXIS IP Utility und AXIS Camera Management festzulegen.
AXIS 212 PTZ/ AXIS 212 PTZ-V Installationsanleitung Seite 33 AXIS IP Utility AXIS IP Utility erkennt automatisch im Netzwerk vorhandene Axis-Geräte und zeigt diese an. Die Anwendung kann auch für das manuelle Festlegen einer statischen IP-Adresse verwendet werden. AXIS IP Utility ist auf der Axis Network Video Product CD enthalten und kann unter www.axis.com/techsup auch aus dem Internet heruntergeladen werden.
Seite 34 AXIS 212 PTZ/ AXIS 212 PTZ-V Installationsanleitung AXIS Camera Management Mit AXIS Camera Management können automatisch mehrere Axis-Geräte erkannt, der Verbindungsstatus angezeigt, die Firmware-Aktualisierungen verwaltet und IP-Adressen festgelegt werden. Automatische Erkennung 1. 2. 3. Stellen Sie sicher, dass die Kamera an das Netzwerk und die Stromversorgung angeschlossen ist. Starten Sie AXIS Camera Management.
AXIS 212 PTZ/ AXIS 212 PTZ-V Installationsanleitung Seite 35 IP-Adressen mehreren Geräten zuweisen AXIS Camera Management beschleunigt die Zuweisung von IP-Adressen an mehrere Geräte, indem IP-Adressen aus einem angegebenen Bereich vorgeschlagen werden. 1. 2. 3. Wählen Sie die zu konfigurierenden Geräte aus (es können auch unterschiedliche Modelle gewählt werden), und klicken Sie auf die Schaltfläche Assign IP (IP-Adresse zuweisen) .
Seite 36 AXIS 212 PTZ/ AXIS 212 PTZ-V Installationsanleitung • Falls ein Festlegen der IP-Adresse nicht möglich ist, müssen ggf. die Einstellungen der Firewall überprüft werden. • Voraussetzung für die Verwendung von AXIS Dynamic DNS Service ist eine Internetverbindung, bei der für den HTTP-Zugriff kein Proxy-Server verwendet wird. • Bonjour kann nur mit Browsern verwendet werden, die Bonjour unterstützen, z. B. Safari.
AXIS 212 PTZ/ AXIS 212 PTZ-V Installationsanleitung Seite 37 IP-Adresse per ARP/Ping zuweisen 1. 2. 3. Wählen Sie eine IP-Adresse aus dem Netzwerksegment, in dem sich auch Ihr Computer befindet. Suchen Sie die Seriennummer (S/N) auf demAXIS 212 PTZ/AXIS 212 PTZ-V Produktaufkleber .
Seite 38 AXIS 212 PTZ/ AXIS 212 PTZ-V Installationsanleitung Festlegen des Kennworts 1. 2. 3. 4. 5. 6. 7. Beim erstmaligen Zugriff auf die AXIS 212 PTZ/AXIS 212 PTZ-V wird das Dialogfeld Configure Root Password (Root-Kennwort konfigurieren) angezeigt. Geben Sie ein Kennwort ein, und wiederholen Sie die Eingabe, um die korrekte Schreibweise zu bestätigen. Klicken Sie auf OK. Geben Sie in das Dialogfeld Enter Network Password (Netzwerkkennwort eingeben) als Kennwort root ein.
AXIS 212 PTZ/ AXIS 212 PTZ-V Installationsanleitung Seite 39 Über das Internet auf die AXIS 212 PTZ/AXIS 212 PTZ-V zugreifen Sobald die AXIS 212 PTZ/AXIS 212 PTZ-V installiert ist, können Sie über Ihr lokales Netzwerk (LAN) auf die Kamera zugreifen. Um auch über das Internet auf die Kamera zugreifen zu können, müssen Sie die Netzwerk-Router so konfigurieren, dass diese den entsprechenden eingehenden Datenverkehr zulassen, was üblicherweise durch Zuweisung eines bestimmten Ports geschieht.
Seite 40 AXIS 212 PTZ/ AXIS 212 PTZ-V Installationsanleitung
Guida all'installazione di AXIS 212 PTZ/ AXIS 212 PTZ-V Pagina 41 AXIS 212 PTZ/AXIS 212 PTZ-V Videocamera di rete Nella presente guida all'installazione vengono fornite le istruzioni per installare la Videocamera di rete di AXIS 212 PTZ/AXIS 212 PTZ-V nella propria rete. Per qualsiasi altro aspetto relativo all'utilizzo del prodotto, vedere il Manuale per l'utente di AXIS 212 PTZ/ AXIS 212 PTZ-V, disponibile sul sito Web di Axis all'indirizzo www.axis.com oppure sul CD dei prodotti video di rete Axis.
Pagina 42 Guida all'installazione di AXIS 212 PTZ/ AXIS 212 PTZ-V Descrizione Unità videocamera Indicatore di stato (LED) Microfono Uscita audio Ingresso audio Pulsante di controllo Morsettiera di alimentazione I/O Connettore di alimentazione Indicatore di alimentazion Indicatore Connettore di rete di rete (LED) (LED) Cupola per Axis 212 PTZ-V Cupola per Axis 212 PTZ Piastra di copertura Numero di serie (S/N) - Il numero di serie è richiesto durante l'installazione.
Guida all'installazione di AXIS 212 PTZ/ AXIS 212 PTZ-V Pagina 43 Installazione dell'hardware Per una panoramica dettagliata dell'AXIS 212 PTZ/AXIS 212 PTZ-V, fare riferimento all'illustrazione a pagina 42. Prendere nota del numero di serie (S/N) riportato sull'etichetta del prodotto situata sulla base dell'alloggiamento della videocamera. Il numero di serie viene utilizzato durante l'installazione. La AXIS 212 PTZ/AXIS 212 PTZ-V è progettata solo per interni. Montaggio a parete. 1. 2.
Pagina 44 Guida all'installazione di AXIS 212 PTZ/ AXIS 212 PTZ-V Completamento dell'installazione 1. 2. 3. Utilizzare un soffietto per rimuovere la polvere dall'obiettivo. Pulire la cupola con un panno morbido e asciutto per rimuovere polvere e impronte digitali (solo per AXIS 212 PTZ-V). Montare la cupola utilizzando le viti antimanomissione e il cacciavite forniti.
Guida all'installazione di AXIS 212 PTZ/ AXIS 212 PTZ-V Pagina 45 Morsettiera di alimentazione I/O Pin Funzione Descrizione 4 Uscita transistor 3 Entrata digitale 2 3,3 V CC Questa uscita supporta un carico massimo di 50 mA e un voltaggio massimo di 24 V CC e dispone di un transistor di tipo NPN opencollector con connessione dell'emettitore collegato alla presa a terra.
Pagina 46 Guida all'installazione di AXIS 212 PTZ/ AXIS 212 PTZ-V Impostazione dell'indirizzo IP L'AXIS 212 PTZ/AXIS 212 PTZ-V è progettata per l'installazione su una rete Ethernet e per essere accessibile necessita dell'assegnazione di un indirizzo IP. Windows AXIS IP Utility e AXIS Camera Management sono i metodi consigliati per impostare un indirizzo IP in Windows.
Guida all'installazione di AXIS 212 PTZ/ AXIS 212 PTZ-V Pagina 47 AXIS IP Utility AXIS IP Utility consente di individuare e visualizzare automaticamente la presenza di periferiche Axis sulla rete. Consente inoltre di impostare manualmente un indirizzo IP statico. L'AXIS IP Utility è disponibile nel CD dei prodotti video di rete Axis oppure può essere scaricata dal sito Web all'indirizzo www.axis.
Pagina 48 Guida all'installazione di AXIS 212 PTZ/ AXIS 212 PTZ-V AXIS Camera Management È possibile utilizzare AXIS Camera Management per individuare automaticamente la presenza di più dispositivi Axis, mostrare lo stato di connessione, gestire gli aggiornamenti del firmware e impostare gli indirizzi IP. Rilevamento automatico 1. 2. 3. Verificare che la videocamera sia collegata alla rete e alimentata correttamente. Avviare AXIS Camera Management.
Guida all'installazione di AXIS 212 PTZ/ AXIS 212 PTZ-V Pagina 49 Nota: AXIS 212 PTZ/AXIS 212 PTZ-V saranno mostrate in AXIS Camera Management come AXIS AXIS 212 PTZ. Altri metodi disponibili In questa tabella sono illustrati gli altri metodi disponibili per impostare oppure individuare l'indirizzo IP . Server DHCP nella rete Sistema operativo UPnP™ Vedere pagina 50 Opzionale Windows (ME o XP) Bonjour Vedere pagina 50 Opzionale Mac OSX (10.
Pagina 50 Guida all'installazione di AXIS 212 PTZ/ AXIS 212 PTZ-V UPnP™ La funzionalità UPnP™ è attiva per impostazione predefinita nell'AXIS 212 PTZ/AXIS 212 PTZ-V. Se è abilitata anche sul computer in uso (con sistema operativo Windows ME o XP), la videocamera verrà automaticamente rilevata e verrà aggiunta una nuova icona in "Risorse di rete". Fare clic su questa icona per accedere all'AXIS 212 PTZ/AXIS 212 PTZ-V. Vedere anche pagina 52 per istruzioni su come impostare la password.
Guida all'installazione di AXIS 212 PTZ/ AXIS 212 PTZ-V Pagina 51 Impostazione dell'indirizzo IP con ARP/Ping 1. 2. 3. Acquisire un indirizzo IP sullo stesso segmento di rete cui è connesso il computer utilizzato. Individuare il numero di serie indicato sull'etichetta del prodotto dell'AXIS 212 PTZ/ AXIS 212 PTZ-V.
Pagina 52 Guida all'installazione di AXIS 212 PTZ/ AXIS 212 PTZ-V Impostazione della password 1. 2. 3. 4. 5. 6. 7. Quando si accede all'AXIS 212 PTZ/ AXIS 212 PTZ-V per la prima volta, viene visualizzata la finestra di dialogo "Configure Root Password" (Configura la password principale). Immettere la password, quindi inserirla di nuovo per confermarne l'esattezza. Fare clic su OK. Immettere il nome utente root nella finestra di dialogo "Enter Network Password" (Inserire la password di rete).
Guida all'installazione di AXIS 212 PTZ/ AXIS 212 PTZ-V Pagina 53 Accesso all'AXIS 212 PTZ/AXIS 212 PTZ-V da Internet Una volta installata, l'AXIS 212 PTZ/AXIS 212 PTZ-V è accessibile dalla LAN. Per accedere alla videocamera da Internet, è necessario configurare i router di rete per consentire il traffico dei dati in entrata, operazione che solitamente viene effettuata su una porta specifica. Per ulteriori istruzioni sul router, fare riferimento alla documentazione.
Pagina 54 Guida all'installazione di AXIS 212 PTZ/ AXIS 212 PTZ-V
AXIS 212 PTZ/ AXIS 212 PTZ-V Guía de instalación de Página 55 AXIS 212 PTZ/AXIS 212 PTZ-V Cámara de red Guía de instalación Esta guía de instalación incluye las instrucciones necesarias para instalar la AXIS 212 PTZ/ AXIS 212 PTZ-V Cámara de red en su red. Para obtener información sobre la utilización del producto, consulte el Manual del usuario de AXIS 212 PTZ/AXIS 212 PTZ-V, disponible en www.axis.com o en el CD sobre el producto de vídeo de red de Axis. Pasos de instalación 1. 2. 3. 4.
Página 56 AXIS 212 PTZ/ AXIS 212 PTZ-V Guía de instalación de Descripción Unidad de la cámara Indicador de estado (LED) Salida de audio Conector del terminal de E/S Botón de control Conector Micrófono de alimentación Entrada de audio Indicador de alimentación Indicador de red (LED) (LED) Conector de red Carcasa de la burbuja para AXIS 212 PTZ Carcasa de la burbuja para AXIS 212 PTZ-V Placa de la cubierta Placa de la cubierta Número de serie (N/S) - El número de serie es necesario durante la in
AXIS 212 PTZ/ AXIS 212 PTZ-V Guía de instalación de Página 57 Instalación del hardware Consulte la ilustración de la página 56 para ver en detalle la AXIS 212 PTZ/AXIS 212 PTZV. Anote el número de serie (N/S) que aparece en la etiqueta del producto situada en la base de la carcasa de la unidad de la cámara. El número de serie se utiliza durante la instalación. La AXIS 212 PTZ/AXIS 212 PTZ-V está destinada al uso en interiores exclusivamente. Soporte de pared 1. 2. 3.
Página 58 AXIS 212 PTZ/ AXIS 212 PTZ-V Guía de instalación de Finalización de la instalación 1. 2. Limpie el domo con con un pañuelo suave y remueva polvo o huellas dactilares y use una fuente de aire para limpiar el polvo de el lente. Monte la carcasa de la burbuja utilizando los tornillos de alta resistencia y el destornillador suministrados.
AXIS 212 PTZ/ AXIS 212 PTZ-V Guía de instalación de Página 59 Bloque de conectores de terminales de E/S Pines Función Descripción 4 Salida del transistor 3 Entrada digital 2 1 3,3 V DC GND Esta salida cuenta con una carga máxima de 50 mA, un voltaje máximo de 24 V CC y un colector abierto de transistor NPN con un emisor conectado al pin de toma de tierra. Si se utiliza un repetidor externo, debe conectarse un diodo en paralelo a la carga, como protección ante oscilaciones del voltaje.
Página 60 AXIS 212 PTZ/ AXIS 212 PTZ-V Guía de instalación de Configuración de la dirección IP La AXIS 212 PTZ/AXIS 212 PTZ-V está diseñada para funcionar en una red Ethernet y debe configurarse una dirección IP para facilitar el acceso. Windows AXIS IP Utility y AXIS Camera Management son los métodos recomendados para configurar una dirección IP en Windows.
AXIS 212 PTZ/ AXIS 212 PTZ-V Guía de instalación de Página 61 AXIS IP Utility AXIS IP Utility descubre y muestra automáticamente los dispositivos Axis que existen en la red. Esta aplicación puede utilizarse para asignar manualmente una dirección IP estática. AXIS IP Utility está incluido en el CD sobre el producto de vídeo de red de Axis y también puede descargarse desde www.axis.com/techsup.
Página 62 AXIS 212 PTZ/ AXIS 212 PTZ-V Guía de instalación de AXIS Camera Management AXIS Camera Management puede detectar automáticamente varios dispositivos Axis, mostrar el estado de la conexión, administrar las actualizaciones del firmware y configurar direcciones IP. Detección automática 1. 2. 3. Compruebe que la cámara está conectada a la red y que recibe alimentación. Inicie AXIS Camera Management.
AXIS 212 PTZ/ AXIS 212 PTZ-V Guía de instalación de Página 63 Otros métodos disponibles Esta tabla muestra métodos alternativos para configurar o descubrir direcciones IP. Servidor DHCP en red Sistema operativo UPnP™ Consulte la página 64 Opcional Windows (ME o XP) Bonjour Consulte la página 64 Opcional Mac OSX (10.
Página 64 AXIS 212 PTZ/ AXIS 212 PTZ-V Guía de instalación de UPnP™ La funcionalidad UPnP™ está habilitada de forma predeterminada en la AXIS 212 PTZ/AXIS 212 PTZ-V. Si también está habilitada en su ordenador (Windows ME o XP), el equipo detectará la cámara automáticamente y se añadirá un nuevo icono a “Mis sitios de red”. Haga clic en este icono para acceder a la AXIS 212 PTZ/AXIS 212 PTZ-V. Consulte también la página 66 para obtener instrucciones sobre cómo configurar la contraseña.
AXIS 212 PTZ/ AXIS 212 PTZ-V Guía de instalación de Página 65 Configuración de la dirección IP con ARP/Ping 1. 2. 3. Adquiera una dirección IP en el mismo segmento de red en el que está conectado su equipo. Ubique el número de serie (N/S) en la etiqueta del producto de la AXIS 212 PTZ/AXIS 212 PTZ-V.
Página 66 AXIS 212 PTZ/ AXIS 212 PTZ-V Guía de instalación de Configuración de la contraseña 1. 2. 3. 4. 5. 6. 7. Al acceder a la AXIS 212 PTZ/AXIS 212 PTZ-V por primera vez, aparecerá el diálogo “Configure Root Password” (Configurar contraseña raíz). A continuación, escriba una contraseña y vuelva a escribirla para confirmarla. Haga clic en “OK” (Aceptar). Escriba el nombre de usuario root en el cuadro de diálogo “Enter Network Password” (Escribir contraseña de red).
AXIS 212 PTZ/ AXIS 212 PTZ-V Guía de instalación de Página 67 Acceso a la AXIS 212 PTZ/AXIS 212 PTZ-V desde Internet Una vez instalada, puede accederse a la AXIS 212 PTZ/AXIS 212 PTZ-V desde su red local (LAN). Para acceder a la cámara desde Internet, los encaminadores de red deben estar configurados para permitir el tráfico de datos de entrada, que normalmente se efectúa en un puerto específico. Para obtener más instrucciones, consulte la documentación de su encaminador.
Página 68 AXIS 212 PTZ/ AXIS 212 PTZ-V Guía de instalación de
AXIS 212 PTZ-V Installation Guide v 2.0 December 2007 Copyright © Axis Communications AB, 2007 Part No.