ENGLISH FRANCAIS DEUTSCH AXIS 216FD AXIS 216FD-V AXIS 216MFD AXIS 216MFD-V Fixed Dome Network Camera ITALIANO ESPAÑOL Installation Guide
AXIS 216FD/216FD-V/216MFD/216MFD-V Installation Guide Page 3 AXIS 216FD/216FD-V AXIS 216MFD/216MFD-V Installation Guide Installation steps 1. 2. 3. 4. 5. 6. 7. Check the package contents against the list below. Hardware overview. See page 4. Install the hardware. See page 5. Assign an IP address. See page 7. Set the password. See page 10. Adjust the focus. See page 11. Complete the installation. See page 11. Important! This product must be used in compliance with local laws and regulations.
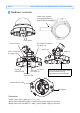
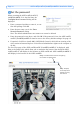
Page 4 AXIS 216FD/216FD-V/216MFD/216MFD-V Installation Guide Hardware overview 16mm cable conduit (not supplied) fitted to AXIS 216FD-V/216MFD-V Cover plates Control button I/O terminal connector (see page 14) Audio out Audio in Power connector (see page 14) Power Network connector indicator LED (see page 14) Network indicator LED Product ID & Serial number (S/N). The serial number may be required during the installation. Status indicator LED Microphone Dimensions HxWxD = 94 x 144 x 132mm (3.
AXIS 216FD/216FD-V/216MFD/216MFD-V Installation Guide Page 5 Install the hardware ! IMPORTANT! - The casing of the AXIS 216FD/216FD-V/216MFD/216MFD-V is not approved for outdoor use - the product may only be installed in indoor environments. Mount the camera 1. Using the drill template, drill two holes in the ceiling/wall. 2. Route and connect all the required cables. See Connect the cables, below. 3.
Page 6 AXIS 216FD/216FD-V/216MFD/216MFD-V Installation Guide Connect the cables 1. Connect the camera to the network using a shielded network cable. 2. Optionally connect external input/output devices, e.g. alarm devices. See page 14 for information on the terminal connector pins. 3. Optionally connect an active speaker and/or external microphone. 4. Connect power, using one of the methods listed below: • PoE (Power over Ethernet).
AXIS 216FD/216FD-V/216MFD/216MFD-V Installation Guide Page 7 Assign an IP address Most networks today have a DHCP server that automatically assigns IP addresses to connected devices. If your network does not have a DHCP server the AXIS 216FD/216FD-V/ 216MFD/216MFD-V will use 192.168.0.90 as the default IP address. If you would like to assign a static IP address the recommended method in Windows is either AXIS IP Utility or AXIS Camera Management.
Page 8 AXIS 216FD/216FD-V/216MFD/216MFD-V Installation Guide AXIS IP Utility - single camera/small installation AXIS IP Utility automatically discovers and displays Axis devices on your network. The application can also be used to manually assign a static IP address. Note that the computer running AXIS IP Utility must be on the same network segment (physical subnet) as the AXIS 216FD/216FD-V/216MFD/216MFD-V. Automatic discovery 1.
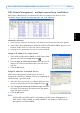
AXIS 216FD/216FD-V/216MFD/216MFD-V Installation Guide Page 9 AXIS Camera Management - multiple cameras/large installations AXIS Camera Management can automatically discover multiple Axis devices, show connection status, manage firmware upgrades and set IP addresses. ENGLISH ENGLISH Automatic discovery 1. Check that the camera is connected to the network and that power has been applied. 2. Start AXIS Camera Management.
Page 10 AXIS 216FD/216FD-V/216MFD/216MFD-V Installation Guide Set the password When accessing the AXIS 216FD/216FD-V/ 216MFD/216MFD-V for the first time, the ‘Configure Root Password’ dialog will be displayed. 1. Enter a password and then re-enter it, to confirm the spelling. Click OK. 2. Enter the user name root in the ‘Enter Network Password’ dialog. Note: The default administrator user name root cannot be deleted. 3. Enter the password as set above, and click OK.
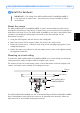
AXIS 216FD/216FD-V/216MFD/216MFD-V Installation Guide Page 11 Adjust the image and focus Open the Live View page in the web interface and make the following adjustments to the camera: 1. Loosen the locking screw and tilt adjustment screws. Image balance ring Note: Due to the dome’s refraction, the image might appear slightly out of focus once the dome has been placed. To compensate, focus on an object slightly closer than the inteded area. 7.
Page 12 AXIS 216FD/216FD-V/216MFD/216MFD-V Installation Guide Accessing the camera from the Internet Once installed, your AXIS 216FD/216FD-V/216MFD/216MFD-V is accessible on your local network (LAN). To access the camera from the Internet, network routers must be configured to allow incoming traffic, which is usually done on a specific port. Please refer to the documentation for your router for further instructions. For more information on this and other topics, visit the Axis Support Web at www.axis.
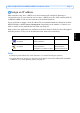
AXIS 216FD/216FD-V/216MFD/216MFD-V Installation Guide Page 13 Other methods of setting the IP address The table below shows the other methods available for setting or discovering the IP address. All methods are enabled by default, and all can be disabled. Notes UPnP™ Windows (ME or XP) When enabled on your computer, the camera is automatically detected and added to “My Network Places.” Bonjour MAC OSX (10.4 or later) Applicable to browsers with support for Bonjour.
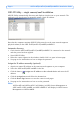
Page 14 AXIS 216FD/216FD-V/216MFD/216MFD-V Installation Guide Unit connectors Network connector - RJ-45 Ethernet connector. Supports Power over Ethernet. Using shielded cables is recommended. Power connector - Mini DC connector. 5.1V DC, max 3.8W. See product label for ± connection. Audio in - 3.5mm input for a mono microphone, or a line-in mono signal (left channel is used from a stereo signal).
AXIS 216FD/216FD-V/216MFD/216MFD-V Installation Guide Page 15 Connection diagram AXIS 216FD/216FD-V/216MFD/216MFD-V 1 3.3V max. 50mA o e.g. pushbutton 2o z 3o o LED indicators LED Color Indication Network Green Steady for connection to a 100 Mbit/s network. Flashes for network activity. Status Power Amber Steady for connection to 10 Mbit/s network. Flashes for network activity. Unlit No network connection. Green Steady green for normal operation.
Page 16 AXIS 216FD/216FD-V/216MFD/216MFD-V Installation Guide Resetting to the Factory Default Settings This will reset all parameters, including the IP address, to the Factory Default settings: 1. Disconnect power from the camera. 2. Press and hold the Control button and reconnect power. 3. Keep the Control button pressed until the Power indicator flashes amber (this may take up to 15 seconds). 4. Release the Control button.
AXIS 216FD/216FD-V/216MFD/216MFD-V Guide d’installation Page 17 AXIS 216FD/216FD-V AXIS 216MFD/216MFD-V Guide d'installation Ce guide d'installation vous explique comment installer la AXIS 216FD, AXIS 216FD-V, AXIS 216MFD, et AXIS 216MFD-V sur votre réseau. Pour d'autres informations sur l'utilisation de ce produit, consultez le Manuel de l'utilisateur, disponible sur le CD fourni, ou visitez le site www.axis.
Page 18 AXIS 216FD/216FD-V/216MFD/216MFD-V Guide d’installation Présentation du matériel Conduit de 16mm (non fourni) adaptable à AXIS 216FD-V/216MFD-V Capot plaques Bouton de commande Connecteur pour terminaux E/S (reportez-vous à la page 28) Sortie audio Connecteur d'alimentation (reportez-vous à la page 28) Connecteur de réseau Témoin DEL (reportez-vous à la d’alimentation Témoin DEL réseau page 28) Entrée audio ID du produit et numéro de série (S/N).
AXIS 216FD/216FD-V/216MFD/216MFD-V Guide d’installation Page 19 Installation du matériel ! IMPORTANT! - Le boitier de l'AXIS 216FD/216FD-V/216MFD/216MFD-V n'est pas approuvé pour une utilisation extérieure - Le produit doit être uniquement installé en intérieur. Montage de la caméra La caméra AXIS 216FD/216FD-V/216MFD/216MFD-V peut être montée avec les câbles d'alimentation et réseau acheminés dans le mur/plafond, ou depuis le haut ou le bas.
Page 20 AXIS 216FD/216FD-V/216MFD/216MFD-V Guide d’installation Branchement des câbles 1. Connectez la caméra à votre réseau à l'aide d'un câble de réseau blindé. 2. Si vous le souhaitez, connectez des dispositifs externes, par exemple des dispositifs d'alarme. Reportez-vous à la page 28 pour plus d'informations sur les broches du connecteur pour terminaux. 3. Si vous le souhaitez, connectez un haut-parleur actif pour la transmission audio bidirectionnelle. 4.
AXIS 216FD/216FD-V/216MFD/216MFD-V Guide d’installation Page 21 Attribution d'une adresse IP Aujourd'hui, la plupart des réseaux comportent un serveur DHCP qui attribue automatiquement des adresses IP aux dispositifs connectés. Si ce n'est pas le cas de votre réseau, l'AXIS 216FD/216FD-V/216MFD/216MFD-V utilisera l'adresse IP par défaut 192.168.0.90.
Page 22 AXIS 216FD/216FD-V/216MFD/216MFD-V Guide d’installation AXIS IP Utility - Une seule caméra/petite installation L'utilitaire AXIS IP Utility détecte et affiche automatiquement les périphériques Axis de votre réseau. Cette application sert également à attribuer manuellement une adresse IP statique. Notez que l'ordinateur exécutant l'application AXIS IP Utility doit se trouver sur le même segment de réseau (sous-réseau physique) que l'appareil AXIS 216FD/216FD-V/216MFD/ 216MFD-V.
AXIS 216FD/216FD-V/216MFD/216MFD-V Guide d’installation Page 23 AXIS Camera Management - Plusieurs caméras/grandes installations AXIS Camera Management peut détecter automatiquement plusieurs dispositifs Axis, afficher les états de connexion, gérer les mises à niveau du microcode et définir les adresses IP. Détection automatique Attribuer une adresse IP à un seul dispositif 1.
Page 24 AXIS 216FD/216FD-V/216MFD/216MFD-V Guide d’installation Définition du mot de passe Si vous accédez à la caméra AXIS 216FD/216FDV/216MFD/216MFD-V pour la première fois, la boîte de dialogue Configure Root Password (Configurer le mot de passe root) s'affiche. 1. Entrez un mot de passe et entrez-le une seconde fois pour en confirmer l'orthographe. Cliquez sur OK. 2. Saisissez le nom d'utilisateur root dans la boîte de dialogue Enter Network Password (Entrer le mot de passe réseau).
AXIS 216FD/216FD-V/216MFD/216MFD-V Guide d’installation Page 25 Réglage de la mise au point Ouvrez la page Live View (Vidéo en direct) dans l'interface Internet et effectuez les réglages suivants sur la caméra: Remarque: Dû à la réfraction du dôme, l’image peut apparaître lègèrement hors du foyer une fois que le dôme est placé, Pour compenser, il faut mettre le foyer légèrement proche de la zone préfèrée. 7.
Page 26 AXIS 216FD/216FD-V/216MFD/216MFD-V Guide d’installation Accès à la caméra depuis Internet Une fois installée, votre caméra AXIS 216FD/216FD-V/216MFD/216MFD-V est accessible depuis votre réseau local (LAN). Pour accéder à la caméra depuis Internet, vous devez configurer les routeurs réseau afin d'autoriser l'entrée de données, ce qui se fait généralement sur un port spécifique. Consultez la documentation de votre routeur pour obtenir davantage d'instructions.
AXIS 216FD/216FD-V/216MFD/216MFD-V Guide d’installation Page 27 Autres méthodes de définition de l'adresse IP Le tableau ci-dessous indique les autres méthodes permettant de définir ou de déterminer l'adresse IP. Toutes les méthodes sont activées par défaut et désactivables. Remarques UPnP™ Windows (ME ou XP) Lorsque la caméra est activée sur votre ordinateur, elle est détectée et ajoutée automatiquement au dossier Favoris réseau. Bonjour MAC OS X (10.
Page 28 AXIS 216FD/216FD-V/216MFD/216MFD-V Guide d’installation Connecteurs de l'unité Connecteur de réseau - Connecteur Ethernet RJ-45. Supporte l'Alimentation Eléctrique par Câble Ethernet (PoE). Il est recommandé d'utiliser des câbles blindés. Connecteur d’alimentation - Miniconnecteur CC. 5,1 V CC, jusqu'à 3.8W. Reportez-vous à l'étiquette du produit pour connaître la connexion ±. Entrée audio - 3.
AXIS 216FD/216FD-V/216MFD/216MFD-V Guide d’installation Page 29 Diagramme de connexion AXIS 216FD/216FD-V/216MFD/216MFD-V 1 3.3V max. 50mA o Par exemple, un bouton de commande 2o z 3o 4 o FRANCAIS Témoins DEL DEL Couleur Indication Réseau Vert Continu en cas de connexion à un réseau 100 Mbits/s. Clignote en cas d'activité réseau. Orange Continu en cas de connexion à un réseau 10 Mbits/s. Clignote en cas d'activité réseau. État Alimentation Éteint Pas de connexion à réseau.
Rétablissement des paramètres d'usine par défaut Procédez comme suit pour revenir aux paramètres par défaut définis en usine et réinitialiser l'adresse IP: 1. Débranchez l'alimentation de la caméra. 2. Maintenez le bouton de commande enfoncé et rebranchez l'alimentation. 3. Appuyez sur le bouton jusqu'à ce que le voyant d'alimentation passe à l'orange et clignote (cela peut prendre jusqu'à 15 secondes). 4. Relâchez le bouton.
AXIS 216FD/216FD-V/216MFD/216MFD-V Installationsanleitung Seite 31 AXIS 216FD/216FD-V AXIS 216MFD/216MFD-V Installationsanleitung In dieser Anleitung wird die Installation der AXIS 216FD, AXIS 216FD-V, AXIS 216MFD und AXIS 216MFD-V Fixed Dome Network Camera in einem Netzwerk beschrieben. Alle weiteren Hinweise zur Verwendung des Produkts finden Sie im Benutzerhandbuch, das auf der mitgelieferten CD oder auf unserer Website unter www.axis.com/techsup zur Verfügung steht.
Seite 32 AXIS 216FD/216FD-V/216MFD/216MFD-V Installationsanleitung Hardwareübersicht 16mm Kabelrohr (nicht mitgeliefert) passend zur AXIS 216FD-V/ 216MFD-V Stueretaste Abdeck -platten E/A-Anschluss klemmleiste (siehe seite 42) Audio Ausgang Stromversorgungs -anschluss (siehe seite 42) Audio-Eingang Netzwerk -anschluss (siehe seite 42) Betriebs -anzeige (LED) Netzwerk -anzeige (LED) Seriennummer (S/N). Die Seriennummer wird für die Installation benötigt.
AXIS 216FD/216FD-V/216MFD/216MFD-V Installationsanleitung Seite 33 Hardware installieren ! WICHTIG! - Das Gehäuse der AXIS 216FD/216FD-V/216MFD/216MFD-V ist nicht für den Gebrauch im Aussenbereich geeignet- die Kamera sollte nur in Innenbereichen installiert werden. Kamera befestigen Für die Montage der AXIS 216FD/216FD-V/216MFD/216MFD-V können das Netzwerk- und das Stromversorgungskabel durch die Wand oder von oben bzw. unten verlegt werden.
Seite 34 AXIS 216FD/216FD-V/216MFD/216MFD-V Installationsanleitung Die AXIS 216FD kan zusammen mit der AXIS 216FD Deckenhalterung angebracht werden, das erlaubt eine diskrete Montage der Kamera. Mehr Information zum Befestigungszubehör finden Sie unter www.axis.com Kabel anschließen 1. Verbinden Sie die Kamera über ein geschirmtes Netzwerkkabel mit dem Netzwerk. 2. Sie können zusätzlich externe Geräte, wie z. B. Alarmanlagen, anschließen. Informationen zur Anschlussbelegung finden Sie auf seite 42. 3.
AXIS 216FD/216FD-V/216MFD/216MFD-V Installationsanleitung Seite 35 IP-Adresse zuweisen In den meisten Netzwerken ist heutzutage ein DHCP-Server eingebunden, der angeschlossenen Geräten automatisch IP-Adressen zuweist. Wenn Ihr Netzwerk über keinen DHCP-Server verfügt, wird für die AXIS 216FD/216FD-V/216MFD/216MFD-V die StandardIP-Adresse 192.168.0.90 verwendet. Zum Zuweisen einer statischen IP-Adresse stehen unter Windows die Programme AXIS IP Utility und AXIS Camera Management zur Verfügung.
Seite 36 AXIS 216FD/216FD-V/216MFD/216MFD-V Installationsanleitung AXIS IP Utility - Einzelne Kamera/kleine Installation AXIS IP Utility erkennt automatisch im Netzwerk vorhandene Axis-Geräte und zeigt diese an. Die Anwendung kann außerdem zur manuellen Zuweisung einer statischen IP-Adresse verwendet werden. Beachten Sie, dass sich die AXIS 216FD/216FD-V/216MFD/216MFD-V und der Computer, auf dem AXIS IP Utility ausgeführt wird, im gleichen Netzwerksegment (d. h. physischen Subnetz) befinden müssen.
AXIS 216FD/216FD-V/216MFD/216MFD-V Installationsanleitung Seite 37 AXIS Camera Management - Mehrere Kameras/große Installation Mit AXIS Camera Management können automatisch mehrere Axis-Geräte erkannt, der Verbindungsstatus angezeigt, die Firmware-Aktualisierungen verwaltet und IP-Adressen festgelegt werden. Automatische Erkennung 1. Stellen Sie sicher, dass die Kamera an das Netzwerk und die Stromversorgung angeschlossen ist. 2. Starten Sie AXIS Camera Management.
Seite 38 AXIS 216FD/216FD-V/216MFD/216MFD-V Installationsanleitung Kennwort festlegen Beim erstmaligen Zugriff auf die AXIS 216FD/ 216FD-V/216MFD/216MFD-V wird das Dialogfeld „Configure Root Password (RootKennwort konfigurieren)“ angezeigt. 1. Geben Sie ein Kennwort ein, und wiederholen Sie die Eingabe, um die korrekte Schreibweise zu bestätigen. Klicken Sie auf OK. 2. Geben Sie in das Dialogfeld „Enter network password“ als Kennwort „ root“ ein.
AXIS 216FD/216FD-V/216MFD/216MFD-V Installationsanleitung Seite 39 Bildschärfe einstellen Öffnen Sie die Seite Direktübertragung, und nehmen Sie folgende Einstellungen an der Kamera vor: Durch die Lichtbrechung der Kuppel, Könnte das Bild etwas unscharf erscheinen, sobald die Kuppel verschraubt worden ist. Zum Ausgleich fokussieren Sie die Kamera auf einen Gegenstand der etwas näher als der beabsichtigte Bereich steht. 7. Arretieren Sie Zoomregler und Schärferegler in der gewählten Position.
Seite 40 AXIS 216FD/216FD-V/216MFD/216MFD-V Installationsanleitung Über das Internet auf die Kamera zugreifen Sobald die AXIS 216FD/216FD-V/216MFD/216MFD-V installiert ist, können Sie über Ihr lokales Netzwerk (LAN) auf die Kamera zugreifen. Um auch über das Internet auf die Kamera zugreifen zu können, müssen Sie die Netzwerk-Router so konfigurieren, dass diese den entsprechenden eingehenden Datenverkehr zulassen, was üblicherweise durch Zuweisung eines bestimmten Ports geschieht.
AXIS 216FD/216FD-V/216MFD/216MFD-V Installationsanleitung Seite 41 Andere Methoden zum Festlegen der IP-Adresse Diese Tabelle bietet einen Überblick über weitere Methoden, die IP-Adresse festzulegen bzw. zu ermitteln. Alle Methoden sind standardmäßig aktiviert und können deaktiviert werden. Verwendung im Betriebssystem Hinweise UPnP™ Windows (ME oder XP) Wenn die Funktion auf dem Computer aktiviert ist, wird die Kamera automatisch erkannt und zur „Netzwerkumgebung“ hinzugefügt.
Seite 42 AXIS 216FD/216FD-V/216MFD/216MFD-V Installationsanleitung Kameraanschlüsse Netzwerkanschluss - RJ-45-Ethernetanschluss. Unterstützt PoE-Anschluss. Die Verwendung von geschirmten Kabeln wird empfohlen. Stromanschluss - Mini-Gleichstromanschluss; 5.1 V Gleichstrom, max. 3.8W; Siehe Produktaufkleber bezüglich ±-Anschluss. Audioeingang - 3.5mm Anschluss für ein Monomikrofon oder ein Monosignal (linker Kanal wird von einem Stereosignal benutzt).
AXIS 216FD/216FD-V/216MFD/216MFD-V Installationsanleitung Seite 43 Anschlussschaltbild AXIS 216FD/216FD-V/216MFD/216MFD-V 1 3.3V max. 50mA o z. B. Schalter 2o z 3o 4 o LED-Anzeigen Farbe Bedeutung Netzwerk Grün Leuchtet konstant bei einer Netzwerkverbindung mit 100 Mbit/s. Blinkt bei Netzwerkaktivität. Gelb Leuchtet konstant bei einer Netzwerkverbindung mit 10 Mbit/s. Blinkt bei Netzwerkaktivität. Leuchtet nicht Keine Netzwerkverbindung vorhanden.
Werkseitige Standardeinstellungen wiederherstellen Gehen Sie wie folgt vor, um sämtliche Parameter einschließlich der IP-Adresse auf die werkseitigen Standardeinstellungen zurückzusetzen: 1. Trennen Sie die Kamera von der Stromversorgung. 2. Halten Sie die Steuertaste gedrückt, und schließen Sie den Netzstecker wieder an. 3. Halten Sie die Steuertaste so lange gedrückt, bis die Betriebsanzeige gelb blinkt (dies kann bis zu 15 Sekunden dauern). 4. Lassen Sie die Steuertaste los.
Guida all’installazione di AXIS 216FD/216FD-V/216MFD/216MFD-V Pagina 45 AXIS 216FD/216FD-V AXIS 216MFD/216MFD-V Guida all'installazione Nel presente documento vengono fornite le istruzioni per installare la AXIS 216FD, AXIS 216FD-V, AXIS 216MFD e AXIS 216MFD-V nella propria rete. Per tutti gli altri aspetti sull’utilizzo del prodotto, consultare il manuale dell’utente disponibile sul CD incluso nella confezione oppure visitare il sito Web all’indirizzo www.axis.com/techsup. Procedura di installazione 1.
Pagina 46 Guida all’installazione di AXIS 216FD/216FD-V/216MFD/216MFD-V Panoramica dell’hardware 16mm di cavo di conduttura (non incluso) che si adatta ad AXIS 216FD-V/216MFD-V Piastre di copertura Pulsante di controllo Connettore I/O (vedere pagina 56) Connettore di alimentazione (vedere pagina 56) Uscita audio Connettore di rete Indicatore di (vedere pagina 56) alimentazione Indicatore di (LED) rete (LED) Ingresso audio Numero di serie (S/N) Il numero di serie è richiesto durante l'installazione.
Guida all’installazione di AXIS 216FD/216FD-V/216MFD/216MFD-V Pagina 47 Installazione dell'hardware ! IMPORTANTE! - La custodia dell’AXIS 216FD/216FD-V/216MFD/216MFD-V non è adatta per uso esterno – la telecamera può essere installata solo in ambienti interni. Montaggio della videocamera La videocamera AXIS 216FD/216FD-V/216MFD/216MFD-V può essere montata con i cavi di rete e di alimentazione che passano attraverso la parete o il soffitto oppure inseriti dall'alto o dal basso.
Pagina 48 Guida all’installazione di AXIS 216FD/216FD-V/216MFD/216MFD-V Collegamento dei cavi 1. Collegare la videocamera alla rete mediante un cavo di rete schermato. 2. Connettere altre periferiche esterne (facoltativo) come, ad esempio, sistemi di allarme. Per informazioni sui pin della morsettiera di alimentazione, vedere pagina 56 3. Collegare un altoparlante attivo (facoltativo) per fornire audio a due vie. 4.
Guida all’installazione di AXIS 216FD/216FD-V/216MFD/216MFD-V Pagina 49 Impostazione di un indirizzo IP La maggior parte delle reti dispone di un server DHCP che automaticamente assegna gli indirizzi IP ai dispositivi connessi. Se la rete non dispone di un server DHCP, per il dispositivo AXIS 216FD/216FD-V/216MFD/216MFD-V viene utilizzato l'indirizzo IP predefinito 192.168.0.90. Per assegnare un indirizzo IP statico, si consiglia di utilizzare AXIS IP Utility o AXIS Camera Management in ambiente Windows.
Pagina 50 Guida all’installazione di AXIS 216FD/216FD-V/216MFD/216MFD-V AXIS IP Utility: videocamera singola/piccole installazioni AXIS IP Utility consente di individuare e visualizzare automaticamente la presenza di periferiche Axis sulla rete. L’applicazione inoltre può essere utilizzare per assegnare manualmente un indirizzo IP statico.
Guida all’installazione di AXIS 216FD/216FD-V/216MFD/216MFD-V Pagina 51 AXIS Camera Management: più videocamere/grandi installazioni È possibile utilizzare AXIS Camera Management per individuare automaticamente la presenza di più dispositivi Axis, mostrare lo stato di connessione, gestire gli aggiornamenti del firmware e impostare gli indirizzi IP. Rilevamento automatico 1. Verificare che la videocamera sia collegata alla rete e alimentata correttamente. 2. Avviare AXIS Camera Management.
Pagina 52 Guida all’installazione di AXIS 216FD/216FD-V/216MFD/216MFD-V Impostazione della password Quando si accede a AXIS 216FD/216FD-V/ 216MFD/216MFD-V per la prima volta, viene visualizzata la finestra di dialogo "Configura password di primo livello." 1. Immettere la password, quindi inserirla di nuovo per confermarne l'esattezza. Fare clic su OK. 2. Immettere il nome utente di primo livello nella finestra di dialogo Immetti password di rete.
Guida all’installazione di AXIS 216FD/216FD-V/216MFD/216MFD-V Pagina 53 Regolazione della messa a fuoco Note: A causa della rifrazione della cupola, l’immagine puó apparire leggermente sfocata una volta posizionata la cupola. Per compensare questo difetto, mettere a fuoco un oggetto piú vicino rispetto all’area che si desiderava. 7. Bloccare le levette di messa a fuoco e di zoom nella posizione desiderata ruotando le viti in senso orario.
Pagina 54 Guida all’installazione di AXIS 216FD/216FD-V/216MFD/216MFD-V Accesso a AXIS 216FD/216FD-V/216MFD/216MFD-V da Internet Una volta installata, la videocamera AXIS 216FD/216FD-V/216MFD/216MFD-V è accessibile dalla rete LAN. Per accedere alla videocamera da Internet, è necessario configurare i router di rete per consentire il traffico dei dati in entrata, operazione che solitamente viene effettuata su una porta specifica. Per ulteriori istruzioni sul router, fare riferimento alla documentazione.
Guida all’installazione di AXIS 216FD/216FD-V/216MFD/216MFD-V Pagina 55 Altri metodi di impostazione dell’indirizzo IP Nella tabella sotto riportata sono illustrati altri metodi disponibili per impostare o individuare l'indirizzo IP. Tutti i metodi sono disponibili per impostazione predefinita e possono essere tutti disabilitati. Sistema operativo Note UPnP™ Windows (ME o XP) Se abilitato sul computer, la videocamera viene rilevata automaticamente e aggiunta a “Risorse di rete”.
Pagina 56 Guida all’installazione di AXIS 216FD/216FD-V/216MFD/216MFD-V Connettori Connettore di rete - Ethernet RJ-45. Supporti Power over Ethernet (PoE). Si consiglia l’uso di cavi schermati. Connettore di alimentazione - A basso voltaggio da 5,1V CC, massimo 3.8W. Vedere l’etichetta sul prodotto per la connessione dei poli ±. Audio in - 3.5 mm per microfono in mono o segnale mono line-in (il canale sinistro é usato da un segnale in stereo).
Guida all’installazione di AXIS 216FD/216FD-V/216MFD/216MFD-V Pagina 57 Schema delle connessioni AXIS 216FD/216FD-V/216MFD/216MFD-V 1 3.3V max. 50mA o Esempio: pulsante 2o z 3o 4 o Indicatori LED Colore Indicazione Rete Verde Luce fissa: connessione di rete a 100 Mbit/s. Luce lampeggiante: attività di rete. Giallo Luce fissa: connessione di rete a 10 Mbit/s. Luce lampeggiante: attività di rete. Spento Assenza di connessione. Verde Luce verde fissa: condizioni di normale utilizzo.
Ripristino delle impostazioni di fabbrica Questa procedura consentirà di ripristinare le impostazioni di fabbrica per tutti i parametri, incluso l'indirizzo IP. 1. Scollegare l'alimentazione dalla videocamera. 2. Tenere premuto il pulsante Control e ricollegare il cavo di alimentazione. 3. Tenere premuto il pulsante Control fino a quando l'indicatore di alimentazione emette una luce gialla lampeggiante (l'operazione può richiedere fino a 15 secondi). 4. Rilasciare il pulsante Control.
AXIS 216FD/216FD-V/216MFD/216MFD-V Guia de instalación Página 59 AXIS 216FD/216FD-V AXIS 216MFD/216MFD-V Guía de instalación Esta guía de instalación incluye las instrucciones necesarias para instalar la AXIS 216FD, AXIS 216FD-V, AXIS 216MFD, y AXIS 216MFD-V en su red. Para obtener información sobre cualquier cuestión relacionada con el uso del producto, consulte el Manual del usuario, disponible en el CD que se incluye en este paquete, o la página www.axis.com/techsup. Pasos para la instalación 1.
Página 60 AXIS 216FD/216FD-V/216MFD/216MFD-V Guia de instalación Presentación del hardware Conducto portacables de 16mm (no incluido) adosado a AXIS 216FD-V/ 216MFD-V Placas de cubierta Botón de control Conector del terminal de E/S (ver la página 70) Conector de alimentation (ver la página 70) Indicador de alimentation (LED) Salida de audio Conector de red (ver la página 70) Indicador de red (LED) Entrada de audio Número de serie (N/S) y ID del producto.
AXIS 216FD/216FD-V/216MFD/216MFD-V Guia de instalación Página 61 Instalación del hardware ! IMPORTANTE: La cubierta de la AXIS 216FD/216FD-V/216MFD/216MFD-V no está aprobada para ser utilizada en exteriores, el producto debe instalarse sólo en interiores bajo techo. Montaje de la cámara La AXIS 216FD/216FD-V/216MFD/216MFD-V puede montarse haciendo pasar los cables de red y alimentación a través de la pared o el techo, desde arriba o desde abajo.
Página 62 AXIS 216FD/216FD-V/216MFD/216MFD-V Guia de instalación Conexión de los cables 1. Conecte la cámara a la red con un cable de red blindado. 2. También puede conectar dispositivos externos, como dispositivos de alarma. Para obtener más información sobre los pines de conectores de terminales, consulte la página 70. 3. También se puede conectar un altavoz activo para obtener audio bidireccional. 4.
AXIS 216FD/216FD-V/216MFD/216MFD-V Guia de instalación Página 63 Configuración de una dirección IP Actualmente, la mayoría de redes disponen de un servidor DHCP que asigna direcciones IP a dispositivos conectados de forma automática. Si su red no dispone de un servidor DHCP, AXIS 216FD/216FD-V/216MFD/216MFD-V utilizará 192.168.0.90 como dirección IP predeterminada. Si desea asignar una dirección IP estática, el método de Windows recomendado es AXIS IP Utility o AXIS Camera Management.
Página 64 AXIS 216FD/216FD-V/216MFD/216MFD-V Guia de instalación AXIS IP Utility: para cámaras individuales o instalaciones pequeñas AXIS IP Utility encuentra y muestra automáticamente los dispositivos Axis que existen en la red. Además, puede utilizarse para asignar manualmente una dirección IP estática. Recuerde que el equipo que ejecute AXIS IP Utility debe instalarse en el mismo segmento de red (subred física) que la AXIS 216FD/216FD-V/216MFD/216MFD-V. Detección automática 1.
AXIS 216FD/216FD-V/216MFD/216MFD-V Guia de instalación Página 65 AXIS Camera Management: para varias cámaras e instalaciones grandes AXIS Camera Management puede detectar automáticamente varios dispositivos Axis, mostrar el estado de la conexión, administrar las actualizaciones del firmware y configurar direcciones IP. Detección automática 1. Compruebe que la cámara está conectada a la red y que recibe alimentación. 2. Inicie AXIS Camera Management.
Página 66 AXIS 216FD/216FD-V/216MFD/216MFD-V Guia de instalación Configuración de la contraseña Al acceder a la AXIS 216FD/216FD-V/ 216MFD/216MFD-V por primera vez, aparecerá el cuadro de diálogo “Configurar contraseña de root”. 1. A continuación, escriba una contraseña y vuelva a escribirla para confirmarla. Haga clic en Aceptar. 2. Escriba el nombre de usuario root en el cuadro de diálogo “Enter Network Password”(Escribir contraseña de red).
AXIS 216FD/216FD-V/216MFD/216MFD-V Guia de instalación Página 67 Ajuste del enfoque Abra la página En vivo en la interfaz Web y realice los ajustes siguientes en la cámara: 1. Afloje el tornillo de bloAnillo de balance Botón de de la imagen enfoque Botón del zoom queo y los tornillos de ajuste de la inclinación. Tornillo de ajuste 2. Gire la lente hasta la de la inclinación posición deseada. 3.
Página 68 AXIS 216FD/216FD-V/216MFD/216MFD-V Guia de instalación Acceso a la AXIS 216FD/216FD-V/216MFD/216MFD-V desde Internet Una vez instalada, puede acceder a la AXIS 216FD/216FD-V/216MFD/216MFD-V desde su red local (LAN). Para acceder a la cámara desde Internet, los routers de red deben estar configurados para permitir el tráfico de datos de entrada, que normalmente se efectúa en un puerto específico. Para obtener más instrucciones, consulte la documentación de su enrutador.
AXIS 216FD/216FD-V/216MFD/216MFD-V Guia de instalación Página 69 Otros métodos para configurar la dirección IP Esta tabla presenta otros métodos disponibles para configurar o detectar la dirección IP. Todos los métodos están habilitados de forma predeterminada y es posible deshabilitarlos. Sistema operativo Notas UPnP™ Windows (ME o XP) La cámara se detecta y añade a “Mis sitios de red” automáticamente, siempre que esta opción esté habilitada en el equipo. Bonjour MAC OSX (10.
Página 70 AXIS 216FD/216FD-V/216MFD/216MFD-V Guia de instalación Conectores Conector de red - Conector Ethernet RJ-45. Ayudas Power over Ethernet (PoE). Se recomienda emplear cables blindados. Conector de alimentación - Conector mini de CC. 5,1V CC, máx. 3,8 W. Consulte la etiqueta del producto para información sobre la conexión de polaridad positiva o negativa ± Entrada de audio - Conector de 3.5mm para micrófono mono, o entrada de línea de señal mono (se usa el canal izquierdo de una señal estéreo).
AXIS 216FD/216FD-V/216MFD/216MFD-V Guia de instalación Página 71 Diagrama de conexiones AXIS 216FD/216FD-V/216MFD/216MFD-V 1 3.3V max. 50mA o p. ej. botón pulsador 2o z 3o 4 o Indicadores LED LED Color Indicación Red Verde Fijo para indicar conexión a una red de 100 Mbit/s, parpadeo para indicar actividad de red Ámbar Fijo para indicar conexión a una red de 10 Mbit/s, parpadeo para indicar actividad de red Estado Apagado Desconectada de la red.
Restablecimiento de los valores iniciales Esta operación restaurará todos los parámetros, incluida la dirección IP, a los valores iniciales: 1. Desconecte la alimentación de la cámara. 2. Mantenga presionado el botón de control y vuelva a conectar la alimentación. 3. Mantenga presionado el botón de control hasta que el indicador de alimentación emita una luz ámbar (puede tardar hasta 15 segundos en encenderse). 4. Suelte el botón de control.
AXIS 216FD/FD-V/MFD/MFD-V Installation Guide v4.0 Copyright © Axis Communications AB, 2007 May 2007 Part No.