AXIS 233D Network Dome Camera User’s Manual
About This Document This manual is intended for administrators and users of the AXIS 233D Network Dome Camera, and is applicable for software release 4.40. It includes instructions for using and managing the AXIS 233D on your network. Previous experience of networking will be of use when installing and using this product. Some knowledge of UNIX or Linux-based systems would also be beneficial, for developing shell scripts and applications.
Safety Notice - Battery Replacement The AXIS 233D uses a 3.0V CR2032 Lithium battery as the power supply for its internal real-time clock (RTC). This battery will, under normal conditions, last for a minimum of 5 years. Low battery power affects the operation of the RTC, causing it to reset at every power-up. A log message will appear when battery replacement is required.
AXIS 233D Table of contents Product Overview . . . . . . . . . . . . . . . . . . . . . . . . . . . . . . . . . . . . . . . . . . . . . . . . . . . . . . . . . . . . . . . . 6 Overview . . . . . . . . . . . . . . . . . . . . . . . . . . . . . . . . . . . . . . . . . . . . . . . . . . . . . . . . . . . . 7 Status LED Indicator. . . . . . . . . . . . . . . . . . . . . . . . . . . . . . . . . . . . . . . . . . . . . . . . . . . 8 Using the Network Dome Camera . . . . . . . . . . . . . . . . . . . . . . . .
AXIS 233D SOCKS . . . . . . . . . . . . . . . . . . . . . . . . . . . . . . . . . . . . . . . . . . . . . . . . . . . . . . . . . . . . . 47 QoS (Quality of service) . . . . . . . . . . . . . . . . . . . . . . . . . . . . . . . . . . . . . . . . . . . . . . . 47 SMTP (email) . . . . . . . . . . . . . . . . . . . . . . . . . . . . . . . . . . . . . . . . . . . . . . . . . . . . . . . . 47 SNMP. . . . . . . . . . . . . . . . . . . . . . . . . . . . . . . . . . . . . . . . . . . . . . . . . . . . . . . . . . .
AXIS 233D - Product Overview Product Overview The AXIS 233D Network Dome Camera is a high-performance, progressive-scan camera with security features such as HTTPS and IP address filtering for use in professional and demanding surveillance situations. The perfect choice for large area surveillance environments where superior image quality on moving objects is important from a long distance.
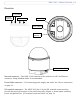
AXIS 233D - Product Overview Overview Power/Audio Network Connector I/O terminal Restart button Control button Status LED Indicator Serial number label Network connector - The AXIS 233D connects to the network via a RJ-45 Ethernet connector. Using shielded cables is recommended. Power/Audio connector - for connecting power supply and audio. See Power connections, on page 53.
AXIS 233D - Product Overview Serial number - This number is located on the product label at the base of the camera and is used during installation and restoring the camera to factory default settings. Included in the package is an extra product label, put this in a safe place for future reference. Restart button - This button power cycles the camera and is to be used during firmware upgrade or factory reset.
AXIS 233D - Using the Network Dome Camera Using the Network Dome Camera This document includes instructions for using and managing the AXIS 233D. For instructions on how to install the AXIS 233D on your network refer to the Installation Guide which is supplied with the product in printed format or in PDF format from the Axis Web site at http://www.axis.com The AXIS 233D can be used with most standard operating systems and supports Microsoft Internet Explorer 6.x or later, Netscape 7.
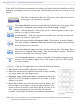
AXIS 233D - Using the Network Dome Camera If the AXIS 233D has been customized, the buttons and other items described below will be displayed accordingly on the Live View page. The following provides an overview of each button: The Video Format drop-down list allows the video format on the Live View page to be temporarily changed. The Output buttons control an output directly from the Live View page. These buttons are configured under Setup > Live View Config > Layout.
AXIS 233D - Using the Network Dome Camera The AMC viewer toolbar (AXIS Media Control), available from Microsoft Internet Explorer, displays the following buttons: The Play/Stop buttons start and stop the live video stream. The Snapshot button takes a snapshot of the currently displayed image. The Snapshot function and the target directory for saving snapshots can be configured from AMC (AXIS Media Control), which is available from the Windows Control Panel (Internet Explorer only).
AXIS 233D - Using the Network Dome Camera The Pan/Tilt/Zoom Control Queue is set up by the administrator under: Dome Configuration > Advanced > Control Queue. The Toolbar available from Mozilla Firefox, displays the following buttons: The Play/Stop buttons start and stop the live video stream. The Snapshot button takes a snapshot of the currently displayed image.
AXIS 233D - Video Streams Video Streams The AXIS 233D provides several different image and video stream formats. The type to use depends on your requirements and on the properties of your network. The Live View page in the AXIS 233D provides access to Motion JPEG and MPEG-4 video streams, as well as to single JPEG images. Other applications and clients can also access these video streams/images directly, without going via the Live View page.
AXIS 233D - Video Streams MPEG-4 protocols and communication methods To deliver live streaming video over IP networks, various combinations of transport protocols and broadcast methods are employed. • RTP (Realtime Transport Protocol) is a protocol that allows programs to manage the real-time transmission of multimedia data, via unicast or multicast. • RTSP (Real Time Streaming Protocol) serves as a control protocol, to negotiate which transport protocol to use for the stream.
AXIS 233D - Video Streams How to stream MPEG-4 Deciding on the combination of protocols and methods to use depends on your viewing requirements, and on the properties of your network. RTP+RTSP This method (actually RTP over UDP and RTSP over TCP) should be your first consideration for live video, especially when it is important to always have an up-to-date video stream, even if some images do get dropped. This can be configured as multicast or unicast.
AXIS 233D - Video Streams The AXIS Media Control The recommended method of accessing live video (MPEG-4 and/or Motion JPEG) from the AXIS 233D is to use the AXIS Media Control (AMC) in Microsoft Internet Explorer in Windows. This ActiveX component is automatically installed on first use, after which it can be configured by opening the AMC Control Panel applet from the Windows Control Panel. Alternatively, right-click the video image in Internet Explorer.
AXIS 233D - Configuring the Network Dome Camera Configuring the Network Dome Camera This section describes how to configure the AXIS 233D and is intended for the product Administrator who has unrestricted access to all Setup tools and Operator who has access to Video & Image, Live View Config and Event Configuration. See the section on Security, on page 39 for more information on user access control. The AXIS 233D is configured under Setup from a standard browser.
AXIS 233D - Video & Image Settings Video & Image Settings The following descriptions offer examples of the available features in the AXIS 233D. For details of each setting, please refer to the online help files which are available from each page. Click to access the help files. Image Settings To optimize the video images according to your requirements, modify the following settings under Image Appearance.
AXIS 233D - Video & Image Settings Overlay Settings Use these settings to include an image as an overlay, and/or the date and time, along with text of your own. Date & Time Overlay Text overlays are all included on one line at the top or bottom of the video image image. Use text overlays in combination with OSDI (On-Screen Directional Indicator) on page 31 to aid the viewer in navigating the camera. Example: To set up PTZ coordinates in text overlay.
AXIS 233D - Video & Image Settings Overlay image requirements Image Formats • • • Overlay image limitations Image Size • If the image overlay and text overlay are larger than the video image, no overlay will be displayed. When also using a text overlay, this will occupy 16 pixels in height and as many in width as the video image. • If the overlay is initially positioned so that part of it is outside the video image, it will be relocated so that it appears over the video image, i.e.
AXIS 233D - Video & Image Settings between light and dark in an image. Test the different levels to find the one that works best of your light conditions. • Backlight compensation - this setting is used to make the subject appear clearer, e.g. against a bright background. Low Light Behavior The settings for Low Light Behavior determine how the camera will behave at low light levels. These settings affect video image quality and frame rate.
AXIS 233D - Video & Image Settings MPEG-4 Settings Tools for adjusting the MPEG-4 settings and for controlling the video bit rate. The MPEG-4 standard provides many different coding tools for various applications in different situations. As most MPEG-4 clients do not support all of these tools, it is usual to instead define and use subsets for different clients or groups of clients. These settings allow you to define the type of viewing client to use.
AXIS 233D - Audio Audio The AXIS 233D can transmit audio to other clients by connecting an external microphone and can play audio received from other clients via a connected speaker. Audio Settings This section describes how to configure the basic audio settings for the AXIS 233D, e.g. set the communication mode and adjust the sound levels in the microphone and speaker connected to the camera. Enable Audio - Check this box to enable audio. Audio Channels The AXIS 233D has four types of audio transmission.
AXIS 233D - Audio Audio Input Audio from an external microphone or a line source can be connected to the Audio in Power/Audio connector of the AXIS 233D, see I/O terminal connector blocks, on page 54. The audio source must be set to Microphone or Line depending on the connected device. When Microphone is selected as a Source, set the Input sensitivity to High for an ordinary (unamplified) microphone, e.g. a computer mic or clip-on mic. Set to Low for a microphone with a built-in line amplifier.
AXIS 233D - Audio Advanced Audio Advanced audio settings can improve audio quality by speech filtering and echo and noise cancellation. When enabled the speech filter reduces noise by filtering out all the frequencies below 100HZ and above 3500 Hz. This improves the sound quality if a person is close to the microphone when talking and will reduce background noises. Enable echo cancellation to reduce acoustic echoing that can be caused by audio coming from a speaker being captured by a microphone.
AXIS 233D - Live View Config Live View Config Layout These are the tools for deciding the layout of the Live View page. The layout can be set in 3 ways: • Use Axis look - the layout is unchanged. • Use custom settings - modify the default page with your own colors, images etc. Click the Configure button and see the following page. • Own Home Page - Upload and use your own custom made page as the default web page. Click the Configure button and see the following page.
AXIS 233D - Live View Config Upload Own Web Files Your own web files, background picture, color etc. must first be uploaded to the AXIS 233D in order to be available for selection in the Custom Settings setup dialog. Once uploaded, the files are shown in the drop-down list. 1.Enter the path to the file, e.g. a file located on your workstation or click the Browse button. 2.Select the user level for the uploaded file.
AXIS 233D - Live View Config 4. Check Show Custom Link 2. 5. Enter a descriptive name, e.g. CAM STOP. 6. Select the Use as cgi link radio button and enter the cgi link in the field: http://192.168.0.125/axis-cgi/com/ptz.cgi?continuouspantiltmove=0,0 7. These links will appear in the web interface and can be used to control the AXIS 233D. For more information on the Axis HTTP API, see the Support / Developer pages on the Axis Web site at http://www.axis.com.
AXIS 233D - Live View Config Default Viewer From the drop-down lists, select the default method for viewing video images for your browser. The camera will attempt to show the video images in the selected video format and viewer. If this is not possible, the camera will override the settings and select the best available combination. Browser Windows Internet Explorer Other browsers Viewer Description AMC Recommended viewer in Windows Internet Explorer (MPEG-4 /Motion JPEG). QuickTime MPEG-4 only.
AXIS 233D - Live View Config The Motion JPEG selection has additional settings for Image Type, Image size and other optional settings to configure the video stream to suit your Web page. Click Update once satisfied. The camera generates the required source code for your configuration. Copy this code and paste it into your own Web page code. External Video An external video source is a source originating from some other Axis device on the network.
AXIS 233D - Dome Configuration Dome Configuration Preset Positions A preset position is a pre-defined camera view than can be used to quickly move the camera to a specific location. From Preset Position Setup, use the Pan, Tilt and Zoom (PTZ) controls to steer the camera to the required position. When satisfied with the camera's position, enter a descriptive name. The camera position, iris and focus settings are then saved as a preset position.
AXIS 233D - Dome Configuration The camera uses the coordinates of the center of the image to set the lower left and upper right zone areas. First navigate where you would like the most lower left point of the OSDI Zone to be located. By clicking on the Get button the coordinates are set. Proceed to where the upper right point of the zone should be located and click on its Get button.
AXIS 233D - Event Configuration Event Configuration This section describes how to configure the AXIS 233D for alarm handling. The AXIS 233D can be configured to perform certain actions when certain types of events occur. Event type A set of parameters describing how and when the Network Dome Camera is to perform certain actions Triggered Event page 34 the circumstances that start an event e.g.
AXIS 233D - Event Configuration Event Types An Event Type is a set of parameters describing how and when the Network Dome Camera is to perform certain actions. Example: If a door is opened, and an event has been configured to act on this, the Network Dome Camera can e.g. record and save video images to an FTP server or send a notification email to a pre-configured email address with a pre-configured message. Video images can be sent as an attachment with the email.
AXIS 233D - Event Configuration Pre-trigger and Post-trigger buffers This function is very useful when checking to see what happened immediately before and after a trigger, e.g. 2 minutes before and after a door has been opened. Go to Event Types > Add Triggered... > When Triggered... and check the Upload images checkbox to expand the web page with the available options. Buffer size - up to 36 MB buffer. The maximum length of time of the pre-/post-buffer depends on the image size and selected frame rate.
AXIS 233D - Event Configuration Scheduled Event A Scheduled event can be activated at pre-set times, in a repeating pattern on selected weekdays. How to set up a scheduled event This example describes how to set the Network Dome Camera to send an email notification with saved images from at a set time: 1. Click Add scheduled on the Event types page. 2. Enter a descriptive name for the event, e.g. Scheduled email. 3. Set the priority (High, Normal or Low). 4.
AXIS 233D - Event Configuration Motion Detection Motion detection is used to generate an alarm whenever movement occurs (or stops) in the video image. A total of 10 Include and/or Exclude windows can be configured.
AXIS 233D - Event Configuration Please see the online help for descriptions of each available option.
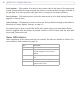
AXIS 233D - System Options System Options Security User access control is enabled by default, the administrator sets the root password on first access. Other users are authorized with user names and passwords, or the administrator can choose to allow anonymous viewer login to the Live View page, as described below: Users - the user list displays the authorized users and access levels: User Description Viewer Provides the lowest level of access, which only allows the user access to the Live View page.
AXIS 233D - System Options Notes: If the referrals feature is enabled and you wish to also allow normal access to the Live View page, the product's own IP address or host name must be added to the list of allowed referrers. Restricting referrers has no effect on an MPEG-4 video stream. To restrict an MPEG-4 stream, IP address filtering must be enabled. Restricting referrers is of greatest value when not using IP address filtering.
AXIS 233D - System Options Clients and servers in an 802.1X network may need to authenticate each other by some means. In the Axis implementation this is done with the help of digital certificates provided by a Certification Authority. These are then validated by a third-party entity, such as a RADIUS server, examples of which are Free Radius and Microsoft Internet Authentication Service. To perform the authentication, the RADIUS server uses various EAP methods/protocols, of which there are many.
AXIS 233D - System Options From the Time Mode section, select the preferred method to use for setting the time: • Synchronize with computer time - sets the time from the clock on your computer. • Synchronize with NTP Server - the network camera will obtain the time from an NTP server every 60 minutes. Specify the NTP server's IP address or host name. Note: Note that if using a host name for the NTP server, a DNS server must be configured under TCP/IP settings.
AXIS 233D - System Options Network - Basic TCP/IP Settings IP Address Configuration The AXIS 233D supports both IP version 4 and IP version 6. Both versions may be enabled simultaneously, and at least one version must always be enabled. When using IPv4, the IP address for the AXIS 233D can be set automatically via DHCP, or a static IP address can be set manually. If IPv6 is enabled, the AXIS 233D will receive an IP address according to the configuration in the network router.
AXIS 233D - System Options Network - Advanced TCP/IP Settings DNS Configuration DNS (Domain Name Service) provides the translation of host names to IP addresses on your network. Obtain DNS server address via DHCP - automatically use the DNS server settings provided by the DHCP server. Click the View button to see the current settings.
AXIS 233D - System Options Link-Local IPv4 Address This is enabled by default and assigns the AXIS 233D an additional IP address for use with UPnP™. The AXIS 233D can have both a Link-Local IP and a static/DHCP-supplied IP address at the same time - these will not affect each other. HTTP The default HTTP port number (80) can be changed to any port within the range 1 - 65535. This is useful for e.g. simple port mapping. HTTPS If applicable, enter the HTTPS port the AXIS 233D will use.
AXIS 233D - System Options Enable/Disable - When enabled, the AXIS 233D will attempt to configure port mapping in a NAT router on your network, using UPnP™. Note that UPnP™ must be enabled in the camera (see System Options > Network > UPnP). AXIS Internet Dynamic DNS Service - Use this free service to assign a host name (user-friendly name) for easy access to your camera.
AXIS 233D - System Options SOCKS SOCKS is a networking proxy protocol. The AXIS 233D can be configured to use a SOCKS server to reach networks on the other side of a firewall/proxy server. This functionality is useful if the AXIS 233D is located on a local network behind a firewall, but notifications, uploads, alarms, etc., need to be sent to a destination outside the local network (e.g. to the Internet).
AXIS 233D - System Options SNMP The Simple Network Management Protocol (SNMP) allows remote management of network devices. Depending on the level of security required, select the version of SNMP to use. The three levels of security are: • SNMP V1 - includes no security. • SNMP V2c - uses very simple security. The community name can be specified as a password for read or read/write access to all supported SNMP objects. The community is the group of network devices using SNMP.
AXIS 233D - System Options • the default router • the subnet mask • the system time • Default - The default button should be used with caution. Pressing this will return all of the network camera's settings to the factory default values (including the IP address). Dome Status - Click the Test button to check the camera and dome mechanics for errors. Contact Axis Customer Services if you receive an error message as the result of this test. Upgrade Server - See Support, on page 50.
AXIS 233D - System Options Support The support overview page provides valuable information on troubleshooting and contact information, should you require technical assistance. System Overview - is a quick look over the camera’s status and settings. Information that can be found here includes the camera’s Firmware version, IP address, Security, Optional Network Services, Event Settings, Image settings and Recent log items.
AXIS 233D - System Options About Third Party Software Licenses - click View licenses for a list of the licensed software used in the AXIS 233D Network Dome Camera.
AXIS 233D - I/O terminal Connectors I/O terminal Connectors The AXIS 233D Network Dome Camera has 3 (8 pin) connectors. The inputs/outputs are used in applications for, e.g. event triggering, time lapse recording, alarm notification via email, picture storage to FTP locations. Power/Audio Network connector Outputs Inputs • Power, auxiliary power, GND and audio.
AXIS 233D - I/O terminal Connectors Power connections Power can be supplied to the camera by the following methods: • Connect the supplied indoor power adapter to the power connector block and attach it to the camera casing. Note that this indoor power adapter provides power for the camera only. • Connect an outdoor power supply to the power connector block and attach it to the camera casing. For information on available outdoor power supplies, please visit the Support pages at http://www.axis.
AXIS 233D - I/O terminal Connectors I/O terminal connector blocks Pin Function Power/Audio 1 Power AC 2 Power AC/DC+ 3 4 GND Vout 5 6 GND Line OUT 7 GND 8 Mic/Line IN Output 1 Out1_1_relay 2 Out1_2_relay 3 Out2_1_relay 4 Out2_2_relay 5 Out3_1_relay 6 Out3_2_relay 7 Out4_1_relay 8 Out4_2_relay Input 1 In1_anode(+) 2 In1_cathode(-) 3 In2_anode(+) 4 In2_cathode(-) 5 In3_anode(+) 6 In3_cathode(-) 7 In4_anode(+) 8 In4_cathode(-) Description 18 - 30 VAC max 25VA power consumption.
AXIS 233D - I/O terminal Connectors Schematic Diagram - AXIS 233D I/O connectors and power 55
AXIS 233D - Troubleshooting Troubleshooting Checking the Firmware One of your first actions when troubleshooting a problem should be to check the currently installed firmware version. The latest version may contain a correction that fixes your particular problem. See the support section at http://www.axis.com/techsup for information on the latest available firmware version. The current software version in your AXIS 233D is available from the product Web pages under Setup > Basic Configuration.
AXIS 233D - Troubleshooting Emergency Recovery Procedure If power or the network connection to the AXIS 233D is lost during the upgrade, the process will fail and the unit will become unresponsive. When the status indicator flashes red it indicates a failed upgrade. To recover the unit, follow the steps below. The serial number is found on the label on the product casing and was included on an extra label included in the package. 1.
AXIS 233D - Troubleshooting LED Indicator flash routine Case Color Description Normal boot sequence Unlit Power on RFL check Kernel booting System initiating Shows steady green for 10 sec. for normal operation after restart. Steady connection/normal operation Power on RFL check Steady - Kernel booting Flashes - Firmware restore Steady - System initiating Shows steady green for 10 sec. for normal operation after restart.
AXIS 233D - Troubleshooting Support If you contact Axis Customer Services, please help us help you resolve your problems expediently by providing a server report, log file and a brief description of the problem. Server Report - go to Setup > System Options > Support Overview. The server report contains important information about the server and its software, as well as a list of the current parameters. Log file - go to Setup > System Options > Logs & Reports.
AXIS 233D - Troubleshooting Symptoms, Possible Causes and Remedial Actions Problems setting the IP address Using ARP Ping The IP address must be set within two minutes after the power has been applied to the AXIS 233D, restart the server and try again. Also, make sure the ping length is set to 408. See the ARP ping description in the installation section. The AXIS 233D is located on a different subnet.
AXIS 233D - Troubleshooting Image too dark or too light. See the help files on Video & Image Settings Problems uploading own files There is only limited space available for the upload of your own files. Try deleting one or more existing files, to free up space. Missing images in uploads This can occur when trying to use a larger image buffer than is actually available. Try lowering the frame rate or the upload period. Slow image update Configuring, e.g.
AXIS 233D - Technical Specifications Technical Specifications Item Specification Models • AXIS 233D Network Dome Camera 60 Hz • AXIS 233D Network Dome Camera 50 Hz Image sensor • 1/4” ExView HAD Progressive Scan CCD Lens • F1.4 - 4.2 • F=3.4 - 119mm • Automatic day/night IR filter • Autofocus with 35x optical zoom • Focus range: 100mm (wide) or 1000 mm (tele) to infinity Angle of view • Horizontal: 1.73 - 55.8o Zoom • 35x optical and 12x digital, Total 420x Minimum illumination • Color: 0.
AXIS 233D - Technical Specifications Item Specification Shutter time • 1.5s PAL(1/2s NTSC) - 1/30000s Audio • Two-way (full or half duplex) or one-way • Audio compression: G.711 PCM 64kbit/s, G726 ADPCM 32 or 24 kbits • Requires external microphone or line in. • Mono audio output (line level) connects to PA system or active speaker with built-in amplifier.
AXIS 233D - Technical Specifications Item Specification Minimum web browsing requirements • Pentium III CPU 500 MHz or higher or equivalent AMD • 128 MB RAM • AGP graphics card 32MB RAM, DirectDraw • Windows: 2003 Server, XP, 2000 • DirectX 9.0 or later • Internet Explorer 6.x or later • For other operating systems and browsers, see www.axis.
AXIS 233D - Technical Specifications General performance considerations When setting up your system, it is important to consider how various settings and situations will affect performance. Some factors affect the amount of bandwidth (the bit rate) required, others can affect the frame rate, and some will affect both. If the load on the CPU reaches its maximum, this will also affect the frame rate.
AXIS 233D - Technical Specifications Frame rates Motion JPEG Test results show the frame rates in frames/second (fps) for Motion JPEG streams from the AXIS 233D, using a compression level of 50% is 25 fps for PAL and 30 fps for NTSC. Note that these values are guidelines only - actual values may vary. MPEG-4 Test results show the frame rates in frames/second (fps) for MPEG-4 streams from the AXIS 233D is 25 fps for PAL and 30 fps for NTSC.
AXIS 233D 67 Index DSCP 47 802.
AXIS 233D Live View 17 Logs & Reports 50 Low light behavior 21 Q M R Motion JPEG 13 Mozilla Firefox 12 MPEG-4 13 MPEG-4 clients 16 MPEG-4 Decoder 64 MPEG-4 protocols 14 Multicasting 14 N NAT traversal 45 Network 43 New Server Time 41 Noise canceller attenuation 25 Notification of IP address change 43 O Output 52, 54 Output Buttons 10, 28 Overlay Image 19 Overlay Settings 19 Own home page 27 Own web files 27 P Pan/Tilt/Zoom Control Queue 11 Pan/Tilt/Zoom Controls 11 Pinout 48 Plain Config 50 Por
AXIS 233D 69 V Variable bit rate 13 Video format 10 Video Stream 19 W Wide dynamic range 20