
User's Manual

AXIS Q6035 PTZ Dome Network Camera
Video and Audio
2. To include an overlay image, select Include overlay image at the coordinates. The overlay image must first be uploaded to
the Axis product, see
Overlay Image
.
3. To include date a nd time, s elect Include date and Include time.
4. To include a text string, select Include text and enter the text in the fi eld. Modifiers can be used, s ee
File Naming &
Date/Time Formats
in the online help .
5. Select the text color, the text background color and the position of the overlay.
6. Click Save.
Tomodifythedateandtimeformat,gotoSystem Options > Date & Time.See
Date & Time, on page 41
.
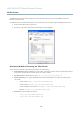
Overlay I mage
An overlay image is a static image superimposed over the video stream. The image, for example company logo, is used to provide
extra information or to mask a part of the image.
Since it is static, the pos ition and size of an overlay image will remain the same regardless of resolution and P an/Ti lt/Zoom
movements. To set up a dynamic mask, which will always mask the specified part of monitored area, see
Privacy Mask
.
To use an o verlay i m age , the image must first be uploaded to the Axis prod uct:
1. Go to Video & Audio > Overlay Image.
2. Click Browse andbrowsetothefile.
3. Click Upload.
4. Select the image to use from the Use overlay image list.
5. Click Save.
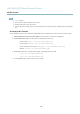
To display the overlay image:
1. Go to Video & Audio > Video Stream and select the Image tab.
2. Under Overlay Settings,selectInclude overlay image at the coordinates and enter the X and Y coordinates.
3. Click Save.
For info rmation about
supported image formats, see the online help
.
Privacy Mask
Apriv
acy mask is an area of s olid color that prohibits users from viewing parts of the monitored area. Privacy masks cannot be
bypassed via the VAPIX® Application Programming Interface (API).
The Privacy Mask List, Video & Audio > Privacy Mask, sho ws all the masks that are currently configured in the Axis product and
indicates i f they are enabled.
Since the Pan/Tilt/Zoom coordinates define its size and position, a privacy mask is dynamic in relat ion to the monitored area. This
means that regardless of the angle and zoom of the lens, the same place or object w ill be hidden. To define at what magnification the
mask should be displayed, zoom to the desired level and click Set level.
You can add a new mask, re-size the mask with the mouse,chooseacolorforthemask,andgivethemaskaname.
For more information, see the online help
.
Important
Adding many privacy masks may affect the product’s performance.
20