USER MANUAL AXIS M3114-R Network Camera
About this document This manual is intended for administrators and users of the AXIS M3114-R Network Camera, and is applicable to firmware 5.40 and later. It includes instructions for using and managing the product on your network. Previous experience of networking will be of use when using this product. Some knowledge of UNIX or Linux-based systems may also be beneficial, for developing shell scripts and applications. Later versions of this document will be posted to the Axis website, as required.
AXIS M3114-R Network Camera Table of Contents Hardware Overview . . . . . . . . . . . . . . . . . . . . . . . . . . . . . . . . . . . . . . . . . . Connectors . . . . . . . . . . . . . . . . . . . . . . . . . . . . . . . . . . . . . . . . . . . . . . . . . . . . LED Indicators . . . . . . . . . . . . . . . . . . . . . . . . . . . . . . . . . . . . . . . . . . . . . . . . . . Accessing the Product . . . . . . . . . . . . . . . . . . . . . . . . . . . . . . . . . . . . . . . Access from a Browser . . . . . .
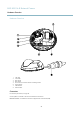
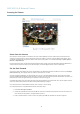
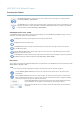
AXIS M3114-R Network Camera Hardware Overview Hardware Overview 7 1 2 3 4 6 5 8 1 2 3 4 5 6 7 8 180° mark Lens holder Optic mount Optic holder Use screws here to mount camera to mounting surface Control button LED indicators Network cable Connectors For technical specifications, see page 46. The Axis product is available in two variants with different connectors: Network connector - RJ-45 Ethernet connector. Supports Power over Ethernet (PoE).
AXIS M3114-R Network Camera Hardware Overview Network connector - D-coded M12 connector. Supports Power over Ethernet (PoE). NOTICE The product shall be connected using a shielded network cable (STP). All cables connecting the product to the network switch shall be shielded (STP) and intended for their specific use. Make sure that the network switch is properly grounded. See for regulatory requirements. Control button - The control button is used for: • Connecting to an AXIS Video Hosting System service.
AXIS M3114-R Network Camera Accessing the Product Accessing the Product To install the Axis product, refer to the Installation Guide supplied with the product. The product can be used with most operating systems and browsers. The recommended browsers are Internet Explorer with Windows, Safari with Macintosh and Firefox with other operating systems. See Technical Specifications, on page 46. To view streaming video in Internet Explorer, allow installation of AXIS Media Control (AMC) when prompted.
AXIS M3114-R Network Camera Accessing the Product Access from the Internet Once connected, the Axis product is accessible on your local network (LAN). To access the product from the Internet you must configure your network router to allow incoming data traffic to the product. To do this, enable the NAT-traversal feature, which will attempt to automatically configure the router to allow access to the product. This is enabled from Setup > System Options > Network > TCP/IP Advanced.
AXIS M3114-R Network Camera Accessing the Product Set Power Line Frequency Power line frequency is set the first time the Axis product is accessed and can only be changed from Plain Config (see page 41) or by resetting the product to factory default. Select the power line frequency (50 Hz or 60 Hz) used at the location of the Axis product. Selecting the wrong frequency may cause image flicker if the product is used in fluorescent light environments.
AXIS M3114-R Network Camera Accessing the Product The Manual Trigger button is used to trigger an action rule from the Live View page; see . Enable this button from Live View Config > Action Buttons. Click Snapshot to save a snapshot of the video image. Right-click the video image to save it in JPEG format on your computer. This button is primarily intended for use when the AXIS Media Control viewer toolbar is not available. Enable this button from Live View Config > Action Buttons.
AXIS M3114-R Network Camera Accessing the Product Pan and Tilt bars – Use the arrows to pan and tilt the camera view, or click on a position on the bar to steer the camera view to that position. Zoom bar – Use the arrows to zoom in and out, or click on a position on the bar to zoom to that position. The PTZ controls can be disabled under PTZ > Advanced > Controls, see Controls, on page 23.
AXIS M3114-R Network Camera Media Streams Media Streams The Axis product provides several video stream formats. Your requirements and the properties of your network will determine the type you use. The Live View page in the product provides access to H.264 and Motion JPEG video streams, and to the list of available stream profiles. Other applications and clients can access video streams directly, without going via the Live View page. How to Stream H.264 The video compression standard H.
AXIS M3114-R Network Camera Media Streams The AMC Control Panel can be used to configure various video settings. Please see the AXIS Media Control User’s Manual for more information. The AMC Control Panel is automatically installed on first use, after which it can be configured. Open the AMC Control Panel from: • Windows Control Panel (from the Start menu) • Alternatively, right-click the video image in Internet Explorer and click Settings.
AXIS M3114-R Network Camera Media Streams Note • = IP addess • The Axis product supports QuickTime 6.5.1 and later. • QuickTime adds latency to the video stream. • It may be possible to use other players to view the H.264 stream using the paths above, although Axis does not guarantee this.
AXIS M3114-R Network Camera Setting Up the Product Setting Up the Product The Axis product can be configured by users with administrator or operator rights. To open the product’s Setup pages, click Setup in the top right-hand corner of the Live View page. • Administrators have unrestricted access to all settings. • Operators have access to all settings except System Options See also the online help .
AXIS M3114-R Network Camera Video Video It is possible to configure the following video features in your Axis product: • Video stream. See page 15. • Stream profiles. See page 16. • Camera settings. See page 17. • View area. See page 18. • Overlay image. See page 18. • Privacy mask. See page 19. Video Stream You can define the following video stream settings from Video > Video Stream: • Image. See page 16. • H.264. See page 16. • MJPEG. See page 16.
AXIS M3114-R Network Camera Video • The Live View page in Internet Explorer in Windows. Right-click in the image and select Pixel counter. Use the mouse to move and resize the rectangle. Image The default image settings can be configured under Video> Video Stream. Select the Image tab. The following settings are available: • Resolution. Select the default resolution. • Compression.
AXIS M3114-R Network Camera Video • In the Live View page – select the stream profile from the Stream profile drop-down list. For quick setup, use one of the predefined stream profiles. Each predefined profile has a descriptive name, indicating its purpose. If required, the predefined stream profiles can be modified and new customized stream profiles can be created. To create a new profile or modify an existing profile, go to Setup > Video > Stream Profiles.
AXIS M3114-R Network Camera Video View Area A view area is a cropped part of the full view. The view area is treated as a video source in Live View and has its own video stream and PTZ settings. When setting up a view area it is recommended that the video stream resolution is the same size as or smaller than the view area size. Setting the video stream resolution larger than the view area size implies digitally scaled up video after sensor capture, requiring more bandwidth without adding image information.
AXIS M3114-R Network Camera Video To use an overlay image, the image must first be uploaded to the Axis product: 1. Go to Video > Overlay Image. 2. Click Browse and browse to the file. 3. Click Upload. 4. Select the image to use from the Use overlay image list. 5. Click Save. To display the overlay image: 1. Go to Video > Video Stream and select the Image tab. 2. Under Overlay Settings, select Include overlay image at the coordinates and enter the X and Y coordinates. 3. Click Save.
AXIS M3114-R Network Camera Live View Config Live View Config You can customize the Live View page and alter it to suit your requirements. It is possible to define the following features of the Live View page. • Stream Profile. See page 16. • Default Viewer for Browser. See page 20. • Viewer Settings. See page 21. • Action Buttons. These are the buttons described in Controls on the Live View Page, on page 8 . • User Defined Links. See page 21.
AXIS M3114-R Network Camera Live View Config Browser Viewer Description Windows Internet Explorer AMC Recommended viewer in Internet Explorer (H.264/Motion JPEG). QuickTime H.264. Java applet A slower imaging alternative to AMC (Motion JPEG). Requires one of the following installed on the client: • JVM (J2SE) 1.4.2 or higher. • JRE (J2SE) 5.0 or higher. Still image Displays still images only. Click the Refresh button in your browser to view a new image.
AXIS M3114-R Network Camera PTZ (Pan Tilt Zoom) PTZ (Pan Tilt Zoom) The PTZ menu is available if digital PTZ (pan, tilt and zoom) is enabled in the selected view area. For more information on view areas, see View Area, on page 18. Preset Positions A preset position is a predefined view that can be used to quickly steer the camera to a specific location. Preset positions can be accessed in several ways: • By selecting the preset from the Source drop-down list in the Live View Page.
AXIS M3114-R Network Camera PTZ (Pan Tilt Zoom) 3. Specify the pause length between runs. 4. Select an available preset position and click Apply. 5. Specify the View Time in seconds or minutes. 6. Specify the View Order or select the Random view order option. 7. Click Save. To modify or remove guard tours, go to PTZ > Guard Tour, select the guard tour in the Guard Tour List and click Modify/Remove. For more information see the online help . Note This Axis product supports limited guard tours.
AXIS M3114-R Network Camera Detectors Detectors Camera Tampering Camera Tampering can generate an alarm whenever the camera is repositioned, or when the lens is covered, sprayed or severely defocused. To send an alarm, for example an email, an action rule must be set up. To configure tampering: 1. Go to Detectors > Camera Tampering. 2. Set the Minimum duration, that is, the time that must elapse before an alarm is generated. This can help prevent false alarms for known conditions that affect the image. 3.
AXIS M3114-R Network Camera Detectors Note Using the motion detection feature may decrease the product’s overall performance. Set Up Motion Detection Windows To set up a motion detection Include Window, follow these instructions: 1. Go to Detectors > Motion Detection. 2. Select the Configure Included Windows option and click New. Select the new window in the list of windows and enter a descriptive name. 3.
AXIS M3114-R Network Camera Detectors Low level (0%) Even very small objects trigger motion detection. An object that appears in the window triggers motion detection only for a very short time before it is considered as non-moving. Only very bright objects on a dark background trigger motion detection.
AXIS M3114-R Network Camera Applications Applications Third party applications can be uploaded to and installed on the Axis product. For information about available applications, downloads, trials and licenses, go to www.axis.com/applications To upload an application, go to Applications > Overview, click Browse to locate the file and then click Upload Package. Click on the uploaded application’s name to open the menu options Settings, License and About.
AXIS M3114-R Network Camera Events Events The Axis product can be configured to perform actions when different events occur, for example, start a recording when motion is detected. The set of conditions that defines how and when the action is triggered is called an Action Rule. Available Action Rule triggers and conditions include: • Applications — use installed applications to trigger the rule, see Applications, on page 27.
AXIS M3114-R Network Camera Events • Status LED — flash the LED indicator. This can for example be used to validate triggers such as motion detection during product installation and configuration. Convert Event Types to Action Rules If the Axis product is upgraded to firmware version 5.40 or later, it is recommended to convert Event Types to Action Rules. The legacy user Event Types in the camera will continue to work but will not be visible in the user interface of the camera.
AXIS M3114-R Network Camera Events Recipient Use with action Email Send Images Send Notification FTP Send Images HTTP Send Images Send Notification Network Share Send Images TCP Send Notification Note A network share can also be used as a storage device for recorded video. Go to System Options > Storage to configure a network share before setting up a continuous recording or an action rule to record video. See Storage, on page 39 for more information about storage devices.
AXIS M3114-R Network Camera Events To use the recurrence in an Action Rule, first select Time from the Trigger drop-down list in the Action Rule Setup page and then select the recurrence from the second drop-down list. To modify or remove recurrences, select the recurrence in the Recurrences List and click Modify or Remove.
AXIS M3114-R Network Camera Recordings Recordings The Axis product can be configured to record video continuously or according to an action rule: • To start a continuous recording, see page 32. • To set up action rules, see page 29. • To access recordings, see Recording List, on page 32. • To configure camera controlled storage, see Storage, on page 39. Recording List Recorded videos are listed on the Recordings > List page.
AXIS M3114-R Network Camera System Options System Options Security Users User access control is enabled by default and can be configured under System Options > Security > Users. An administrator can set up other users by giving them user names and passwords. It is also possible to allow anonymous viewer login, which means that anybody may access the Live View page.
AXIS M3114-R Network Camera System Options IEEE 802.1X IEEE 802.1X is a standard for port-based Network Admission Control providing secure authentication of wired and wireless network devices. IEEE 802.1X is based on EAP (Extensible Authentication Protocol). To access a network protected by IEEE 802.1X, devices must authenticate themselves.
AXIS M3114-R Network Camera System Options If using a host name for the NTP server, a DNS server must be configured. See DNS Configuration, on page 36. • Set manually allows you to manually set date and time. If using an NTP server, select your Time zone from the drop-down list. If required, check Automatically adjust for daylight saving time changes. The Date & Time Format Used in Images is the date and time format displayed as a text overlay in the video stream.
AXIS M3114-R Network Camera System Options Always - The Axis product will constantly attempt to connect to the AVHS service over the Internet. Once registered the product will stay connected to the service. This option can be used when the product is already installed and it is not convenient to use the one-click installation. AXIS Internet Dynamic DNS Service AXIS Internet Dynamic DNS Service assigns a host name for easy access to the product. For more information, see www.axiscam.
AXIS M3114-R Network Camera System Options HTTP The HTTP port used by the Axis product can be changed under System Options > Network > TCP/IP > Advanced. In addition to the default setting, which is 80, any port in the range 1024–65535 can be used. HTTPS The HTTPS port used by the Axis product can be changed under System Options > Network > TCP/IP > Advanced. In addition to the default setting, which is 443, any port in the range 1024–65535 can be used.
AXIS M3114-R Network Camera System Options Note H.264 video streams will not be available if the RTSP server is disabled. SOCKS SOCKS is a networking proxy protocol. The Axis product can be configured to use a SOCKS server to reach networks on the other side of a firewall or proxy server.
AXIS M3114-R Network Camera System Options To use SNMP v3, HTTPS must be enabled, see HTTPS, on page 33. To enable SNMP v3, check the box and provide the initial user password. Note The initial password can only be set once. If the password is lost, the Axis product must be reset to factory default, see Reset to Factory Default Settings, on page 41. UPnPTM The Axis product includes support for UPnPTM.
AXIS M3114-R Network Camera System Options Maintenance The Axis product provides several maintenance functions. These are available under System Options > Maintenance. Click Restart to perform a correct restart if the Axis product is not behaving as expected. This will not affect any of the current settings. Click Restore to reset most settings to the factory default values.
AXIS M3114-R Network Camera System Options Parameter List - Shows the product's parameters and their current settings. This may prove useful when troubleshooting or when contacting Axis Support. Connection List - Lists all clients that are currently accessing media streams. Crash Report - Generates an archive with debugging information. The report takes several minutes to generate. The log levels for the System Log and the Access Log are set under System Options > Support > Logs & Reports > Configuration.
AXIS M3114-R Network Camera Troubleshooting Troubleshooting Checking the Firmware Firmware is software that determines the functionality of network devices. One of your first actions when troubleshooting a problem should be to check the current firmware version. The latest version may contain a correction that fixes your particular problem. The current firmware version in the Axis product is displayed in the page Setup > Basic Setup and in Setup > About.
AXIS M3114-R Network Camera Troubleshooting arp -s temp ping -s 408 In Windows, type the following from a command/DOS prompt (this may require that you run the command prompt as an administrator): arp -s ping -l 408 -t 2. If the product does not reply in 30 seconds, restart it and wait for a reply. Press CTRL+C to stop Ping. 3. Open a browser and type in the product’s IP address.
AXIS M3114-R Network Camera Troubleshooting The IP address has been changed by DHCP IP addresses obtained from a DHCP server are dynamic and may change. If the IP address has been changed, use AXIS IP Utility or AXIS Camera Management to located the product on the network. Identify the product using its model or serial number, or by the DNS name (if the name has been configured). If required, a static IP address can be assigned manually.
AXIS M3114-R Network Camera Troubleshooting Lower frame rate than expected See Performance Considerations, on page 48. Reduce the number of applications running on the client computer. Limit the number of simultaneous viewers. Check with the network administrator that there is enough bandwidth available. Check in the AMC Control Panel (H.264 tag) that video processing is NOT set to Decode only key frames. Lower the image resolution.
AXIS M3114-R Network Camera Technical Specifications Technical Specifications Function/group Item Specifications Camera Model AXIS M3114-R: 1 MP, rugged RJ-45 connector, 2.9 mm lens AXIS M3114-R M12: 1 MP, rugged M12 connector, 2.9 mm lens AXIS M3114-R M12 2 mm: rugged 1 MP, M12 connector, 1.97 mm lens Image sensor Progressive scan RGB CMOS 1/4” Lens M12 mount, fixed iris, megapixel resolution AXIS M3114-R/M12: 2.9 mm, F2.
AXIS M3114-R Network Camera Technical Specifications Function/group Item Specifications System Integration Application Programming Interface Open API for software integration, including VAPIX® and AXIS Camera Application Platform from Axis Communications; specifications available at www.axis.com Includes the ONVIF specification available at www.onvif.
AXIS M3114-R Network Camera Technical Specifications Function/group Item Specifications Included accessories Lens tool, top cover tool, drill hole template, mounting adapter, Installation Guide, CD with installation tools, recording software and User Manual, Windows decoder 1-user license Video management software (not included) AXIS Camera Station — Video management software for viewing and recording up to 50 cameras See www.axis.
User Manual AXIS M3114-R Network Camera © Axis Communications AB, 2009 - 2012 Ver. M2.2 Date: November 2012 Part No.