USER'S MANUAL AXIS Q1602 Network Camera
About this document This manual is intended for administrators and users of the AXIS Q1602 Network Camera, and is applicable to firmware 5.40 and later. It includes instructions for using and managing the product on your network. Previous experience of networking will be of use when using this product. Some knowledge of UNIX or Linux-based systems may also be beneficial, for developing shell scripts and applications. Later version of this document will be posted to the Axis website, as required.
AXIS Q1602 Network Camera Table of Contents Hardware Overview . . . . . . . . . . . . . . . . . . . . . . . . . . . . . . . . . . . . . . . . . . Connectors . . . . . . . . . . . . . . . . . . . . . . . . . . . . . . . . . . . . . . . . . . . . . . . . . . . . LED Indicators . . . . . . . . . . . . . . . . . . . . . . . . . . . . . . . . . . . . . . . . . . . . . . . . . . Status LED when using Focus Assistant . . . . . . . . . . . . . . . . . . . . . . . . . . . . . . Replacing the lens . . . . . . . . . .
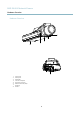
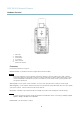
AXIS Q1602 Network Camera Hardware Overview Hardware Overview 1 2 3 4 5 8 6 7 1. 2. 3. 4. 5. 6. 7. 8.
AXIS Q1602 Network Camera Hardware Overview 1. 2. 3. 4. 5. 6. Power LED Network LED Control button Iris connector Power connector I/O terminal connector Connectors For technical specifications, see page 51. Network connector - RJ-45 Ethernet connector. Supports Power over Ethernet (PoE). NOTICE Due to local regulations or the environmental and electrical conditions in which the product is to be used, a shielded network cable (STP) may be appropriate or required.
AXIS Q1602 Network Camera Hardware Overview • Enabling the Focus Assistant. Press and very quickly release the Control button. • Connecting to an AXIS Video Hosting System service. See page 38. To connect, press and hold the button for about 1 second until the Status LED flashes green. • Connecting to AXIS Internet Dynamic DNS Service. See page 38. To connect, press and hold the button for about 3 seconds. • Resetting the product to factory default settings. See page 45.
AXIS Q1602 Network Camera Hardware Overview Replacing the lens It is possible to use optional lenses for the Axis product. To replace the lens: 1. Disconnect the iris cable. 2. Unscrew the standard lens. 3. Attach and screw on the new lens. Note There is no need to restart the Axis product after changing the lens. However, the product must be restarted if you are interchanging between a P-iris, DC-Iris or fixed/manual iris lens.
AXIS Q1602 Network Camera Accessing the Product Accessing the Product To install the Axis product, refer to the Installation Guide supplied with the product. The product can be used with most operating systems and browsers. The recommended browsers are Internet Explorer with Windows, Safari with Macintosh and Firefox with other operating systems. See Technical Specifications, on page 51. To view streaming video in Internet Explorer, allow installation of AXIS Media Control (AMC) when prompted.
AXIS Q1602 Network Camera Accessing the Product Access from the Internet Once connected, the Axis product is accessible on your local network (LAN). To access the product from the Internet you must configure your network router to allow incoming data traffic to the product. To do this, enable the NAT-traversal feature, which will attempt to automatically configure the router to allow access to the product. This is enabled from Setup > System Options > Network > TCP/IP Advanced.
AXIS Q1602 Network Camera Accessing the Product The Live View Page The controls and layout of the Live View page may have been customized to meet specific installation requirements and user preferences. Consequently, some of the examples and functions featured here may differ from those displayed in your own Live View page. The following provides an overview of each available control.
AXIS Q1602 Network Camera Accessing the Product Speaker button — Click to turn the speakers on or off. Microphone button – Click to mute or unmute the microphone. In Simplex - speaker only mode, the Microphone and Talk buttons must both be active to send audio to the Axis product. Click either button to stop audio transmission. Use the slider to control the volume of the speakers and the microphone. Half-duplex mode The Talk/Listen button is used to switch between sending and receiving audio.
AXIS Q1602 Network Camera Media Streams Media Streams The Axis product provides several audio and video stream formats. Your requirements and the properties of your network will determine the type you use. The Live View page in the product provides access to H.264 and Motion JPEG video streams, audio streams and to the list of available stream profiles. Other applications and clients can access video and audio streams directly, without going via the Live View page. How to Stream H.
AXIS Q1602 Network Camera Media Streams The AMC Control Panel can be used to configure various video and audio settings. Please see the AXIS Media Control User’s Manual for more information. The AMC Control Panel is automatically installed on first use, after which it can be configured. Open the AMC Control Panel from: • Windows Control Panel (from the Start menu) • Alternatively, right-click the video image in Internet Explorer and click Settings.
AXIS Q1602 Network Camera Media Streams Note • = IP addess • The Axis product supports QuickTime 6.5.1 and later. • QuickTime adds latency to the video stream. • It may be possible to use other players to view the H.264 stream using the paths above, although Axis does not guarantee this.
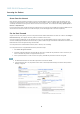
AXIS Q1602 Network Camera Setting Up the Product Setting Up the Product The Axis product can be configured by users with administrator or operator rights. To open the product’s Setup pages, click Setup in the top right-hand corner of the Live View page. • Administrators have unrestricted access to all settings. • Operators have access to all settings except System Options See also the online help .
AXIS Q1602 Network Camera Video and Audio Video and Audio The video and audio settings can be used to optimize video and audio quality. You can configure the following: • Video stream settings. See page 16. • Stream profiles. See page 17. • Camera settings. See page 18. • Overlay image. See page 18. • Privacy mask. See page 19. • Focus. See page 20. • Audio settings. See page 20. • Audio clips. See page 21.
AXIS Q1602 Network Camera Video and Audio • Compression. The compression level affects the image quality, bandwidth and file size of saved images; the lower the compression, the higher the image quality with higher bandwidth requirements and larger file sizes. • Rotate image. If required, the image can be rotated. • Maximum frame rate. To avoid bandwidth problems, the frame rate allowed to each viewer can be limited. • Overlay settings. See Overlay, on page 18. Click Save to apply the new settings.
AXIS Q1602 Network Camera Video and Audio Camera Settings The Video & Audio > Camera Settings page provides access to advanced image settings for the Axis product. Image Appearance Increasing the Color level increases the color saturation. The value 100 gives maximum color saturation. The value 0 gives a black and white image. The image Brightness can be adjusted in the range 0–100, where a higher value produces a brighter image. Increasing the Sharpness can increase bandwidth usage.
AXIS Q1602 Network Camera Video and Audio An overlay text can display the current date and time, or a text string. When using a text string, modifiers can be used to display information such as the current bit rate or the current frame rate. For information about available modifiers, see File Naming & Date/Time Formats in the online help . To enable overlays: 1. Go to Video & Audio > Video Stream and select the Image tab. 2. To include an overlay image, select Include overlay image at the coordinates.
AXIS Q1602 Network Camera Video and Audio Important Adding many privacy masks may affect the product’s performance. Focus You can focus the Axis product under Video & Audio > Focus. For most applications, the adjustments on the Basic tab are sufficient. If required, additional adjustments can be made on the Advanced tab. Before focusing, always click Open iris to open the iris to its maximum. This gives the smallest depth of field and thus best conditions for correct focusing.
AXIS Q1602 Network Camera Video and Audio Note The internal microphone is used by default; the external microphone is used when connected. It is possible to disable the internal microphone by connecting a plug to the mic input. Source - Select Microphone for an external microphone or Line for a Line in device, e.g. an audio mixer for multiple microphones or a microphone with a built-in amplifier. Microphone power - The Enable microphone power option provides DC power for an external microphone.
AXIS Q1602 Network Camera Video and Audio To configure the Axis product to play audio clips when an event occurs, an action rule must be set up. For more information, see Events, on page 30. Note Audio clips cannot be used if the product’s audio functionality is enabled. The audio functionality is enabled on the Audio tab under Video & Audio > Video Stream.
AXIS Q1602 Network Camera Live View Config Live View Config You can customize the Live View page and alter it to suit your requirements. It is possible to define the following features of the Live View page. • Stream Profile. See page 17. • Default Viewer for Browser. See page 23. • Viewer Settings. See page 24. • Action Buttons. These are the buttons described in Controls on the Live View Page, on page 10. • User Defined Links. See page 24. • Output Buttons. See page 24.
AXIS Q1602 Network Camera Live View Config Browser Viewer Description Windows Internet Explorer AMC Recommended viewer in Internet Explorer (H.264/Motion JPEG) QuickTime H.264 Java applet A slower imaging alternative to AMC (Motion JPEG). Requires one of the following installed on the client: • JVM (J2SE) 1.4.2 or higher • JRE (J2SE) 5.0 or higher Still image Displays still images only.
AXIS Q1602 Network Camera Live View Config For more information about I/O ports, see I/O Ports, on page 42.
AXIS Q1602 Network Camera Detectors Detectors Camera Tampering Camera Tampering can generate an alarm whenever the camera is repositioned, or when the lens is covered, sprayed or severely defocused. To send an alarm, for example an email, an action rule must be set up. To configure tampering: 1. Go to Detectors > Camera Tampering. 2. Set the Minimum duration, that is, the time that must elapse before an alarm is generated. This can help prevent false alarms for known conditions that affect the image. 3.
AXIS Q1602 Network Camera Detectors Note Using the motion detection feature may decrease the product’s overall performance. Set Up Motion Detection Windows To set up a motion detection Include Window, follow these instructions: 1. Go to Detectors > Motion Detection. 2. Select the Configure Included Windows option and click New. Select the new window in the list of windows and enter a descriptive name. 3.
AXIS Q1602 Network Camera Detectors Low level (0%) Even very small objects trigger motion detection. An object that appears in the window triggers motion detection only for a very short time before it is considered as non-moving. Only very bright objects on a dark background trigger motion detection.
AXIS Q1602 Network Camera Applications Applications Third party applications can be uploaded to and installed on the Axis product. For information about available applications, downloads, trials and licenses, go to www.axis.com/applications To upload an application, go to Applications > Overview, click Browse to locate the file and then click Upload Package. Click on the uploaded application’s name to open the menu options Settings, License and About.
AXIS Q1602 Network Camera Events Events The Axis product can be configured to perform actions when different events occur, for example, start a recording when motion is detected. The set of conditions that defines how and when the action is triggered is called an Action Rule. Available Action Rule triggers and conditions include: • Applications — use installed applications to trigger the rule, see Applications, on page 29.
AXIS Q1602 Network Camera Events • Send Notifications — send a notification message to a recipient. Setting Up an Action Rule An action rule defines the conditions that must be met for the product to perform an action, for example record video or send email notifications. If multiple conditions are defined, all must be met to trigger the action. The following example describes how to set up an action rule to record video to a network share if there is movement in the camera’s field of view.
AXIS Q1602 Network Camera Events To add a recipient: 1. Go to Events > Recipients and click Add. 2. Enter a descriptive name 3. Select a recipient Type. 4. Enter the information needed for the recipient type. 5. Click Test to test the connection to the recipient. 6. Click OK. Schedules Schedules can be used as action rule triggers or as additional conditions, for example to record video if motion is detected outside office hours.
AXIS Q1602 Network Camera Recordings Recordings The Axis product can be configured to record video continuously or according to an action rule: • To start a continuous recording, see page 33. • To set up action rules, see page 31. • To access recordings, see Recording List, on page 33. • To configure camera controlled storage, see Storage, on page 41. Recording List Recorded videos are listed on the Recordings > List page.
AXIS Q1602 Network Camera Recordings Note If a new stream profile is selected while a recording is ongoing, the recording will be stopped and saved in the recording list and a new recording with the new stream profile will start. All previous continuous recordings will remain in the recording list until they are removed manually or through automatic removal of old recordings.
AXIS Q1602 Network Camera System Options System Options Security Users User access control is enabled by default and can be configured under System Options > Security > Users. An administrator can set up other users by giving them user names and passwords. It is also possible to allow anonymous viewer login, which means that anybody may access the Live View page.
AXIS Q1602 Network Camera System Options IEEE 802.1X IEEE 802.1X is a standard for port-based Network Admission Control providing secure authentication of wired and wireless network devices. IEEE 802.1X is based on EAP (Extensible Authentication Protocol). To access a network protected by IEEE 802.1X, devices must authenticate themselves.
AXIS Q1602 Network Camera System Options To change the date and time settings, select the preferred Time mode under New Server Time: • Synchronize with computer time sets date and time according to the computer’s clock. With this option, date and time are set once and will not be updated automatically. • Synchronize with NTP Server obtains date and time from an NTP server. With this option, date and time settings are updated continuously.
AXIS Q1602 Network Camera System Options AXIS Video Hosting System (AVHS) AVHS used in conjunction with an AVHS service, provides easy and secure Internet access to live and recorded video accessible from any location. For more information and help to find a local AVHS Service Provider go to www.axis.com/hosting AVHS is enabled by default. The settings are configured under System Options > Network > TCP IP > Basic.
AXIS Q1602 Network Camera System Options Link-Local IPv4 Address Link-Local Address is enabled by default and assigns the Axis product an additional IP address which can be used to access the product from other hosts on the same segment on the local network. The product can have a Link-Local IP and a static or DHCP-supplied IP address at the same time. This function can be disabled under System Options > Network > TCP/IP > Advanced.
AXIS Q1602 Network Camera System Options Note This FTP server has nothing to do with the product’s ability to transfer images via FTP to other locations and servers. RTSP The RTSP server running in the Axis product allows a connecting client to start an H.264 stream. The RTSP port number can be changed under System Options > Network > TCP/IP > Advanced. The default port is 554. Note H.264 video streams will not be available if the RTSP server is disabled. SOCKS SOCKS is a networking proxy protocol.
AXIS Q1602 Network Camera System Options The following traps are available: • Cold start • Warm start • Link up • Authentication failed SNMP v3 provides encryption and secure passwords. To use traps with SNMP v3, an SNMP v3 management application is required. To use SNMP v3, HTTPS must be enabled, see HTTPS, on page 35. To enable SNMP v3, check the box and provide the initial user password. Note The initial password can only be set once.
AXIS Q1602 Network Camera System Options 3. Click Format and select the desired file system. Note During formatting any previous data stored on the disk will be lost. Mounting is done automatically when the card is inserted or when the product is started. A manual mount is only required if the card has been unmounted and not ejected and re-inserted. To unmount the SD card: 1. Go to System Options > Storage and click SD Card. 2. Click Unmount. 3. The card can now be removed.
AXIS Q1602 Network Camera System Options Port Status The list on the System Options > Ports & Devices > Port Status page shows the status of the product’s input and output ports. Maintenance The Axis product provides several maintenance functions. These are available under System Options > Maintenance. Click Restart to perform a correct restart if the Axis product is not behaving as expected. This will not affect any of the current settings.
AXIS Q1602 Network Camera System Options System Overview To get an overview of the Axis product’s status and settings, go to System Options > Support > System Overview. Information that can be found here includes firmware version, IP address, network and security settings, event settings, image settings and recent log items. Many of the captions are links to the proper Setup page.
AXIS Q1602 Network Camera System Options Plain Config Plain Config is for advanced users with experience of Axis product configuration. Most parameters can be set and modified from this page. Help is available from the standard help pages. To open Plain Config, go to System Options > Advanced > Plain Config. Reset to Factory Default Settings This will reset all parameters, including the IP address, to the factory default settings: 1. Disconnect power from the product. 2.
AXIS Q1602 Network Camera Troubleshooting Troubleshooting Checking the Firmware Firmware is software that determines the functionality of network devices. One of your first actions when troubleshooting a problem should be to check the current firmware version. The latest version may contain a correction that fixes your particular problem. The current firmware version in the Axis product is displayed in the page Setup > Basic Setup and in Setup > About.
AXIS Q1602 Network Camera Troubleshooting Symptoms, Possible Causes and Remedial Actions Problems setting the IP address When using ARP/Ping Try the installation again. The IP address must be set within two minutes after power has been applied to the product. Ensure the Ping length is set to 408. See the Installation Guide for detailed instructions.
AXIS Q1602 Network Camera Troubleshooting No multicast H.264 displayed in the client Check with your network administrator that the multicast addresses used by the Axis product are valid for your network. Check with your network administrator to see if there is a firewall preventing viewing. Multicast H.264 only accessible by local clients Check if your router supports multicasting, or if the router settings between the client and the product need to be configured.
AXIS Q1602 Network Camera Troubleshooting Missing images in uploads This can occur when trying to use a larger image buffer than is actually available. Try lowering the frame rate or the upload period. Slow image update Configuring pre-buffers, motion detection, high-resolution images or high frame rates will affect the performance of the Axis product.
AXIS Q1602 Network Camera Troubleshooting Distorted audio Check that the correct Audio Input source is selected under Setup > Video & Audio > Audio Settings. Feedback loops Feedback loops might appear in full-duplex mode. Try moving the microphone or the speaker, or use half-duplex mode instead. Storage and disk management problems Video cannot be recorded Check that the SD card is not write protected (that is, read only). SD card cannot be mounted Reformat the SD card and then click Mount.
AXIS Q1602 Network Camera Technical Specifications Technical Specifications Function/group Camera Item Specifications Model AXIS Q1602: Extended D1 resolution (768x576), indoor Image sensor Progressive scan RGB CMOS 1/3” Lens Varifocal 2.8 - 8 mm, F1.2, DC-iris, IR corrected, CS-mount Horizontal angle of view 100°-34° Vertical angle of view 75°-26° Diagonal angle of view 135°-43° Day and Night Automatically removable infrared-cut filter Minimum illumination Color: 0.05 lux, F1.2 B/W: 0.
AXIS Q1602 Network Camera Technical Specifications Function/group Audio Network System Integration Audio streaming Two-way, full duplex Audio compression AAC LC 8 kHz 32kbit/s, 16 kHz 64 kbit/s G.711 PCM 8 kHz 64 kbit/s G.726 ADPCM 8 kHz 32 kbit/s or 24 kbit/s Configurable bit rate Audio input/output External microphone input or line input, line output Built-in microphone Audio input 3.5mm jack for mic/line in. Max 80mVpp for microphone/ Max 6.
AXIS Q1602 Network Camera Technical Specifications Function/group General Installation aids in software Focus assistant, remote back focus, pixel counter, Installation, management and maintenance Axis Camera Management tool on CD and web-based configuration Configuration of backup and restore Firmware upgrades over HTTP or FTP, firmware available at www.axis.
AXIS Q1602 Network Camera Technical Specifications • Heavy usage of event settings affect the product’s CPU load. Frame rate affected. • Heavy network utilization due to poor infrastructure. Bandwidth affected. • Viewing on poorly performing client computers lowers perceived performance. Frame rate affected.
User's Manual AXIS Q1602 Network Camera © Axis Communications AB, 2011 - 2012 Ver. M4.2 Date: April 2012 Part No.