USER MANUAL AXIS Q1931–E Thermal Network Camera
About this Document This manual is intended for administrators and users of AXIS Q1931–E Thermal Network Camera, and is applicable to firmware 5.55 and later. It includes instructions for using and managing the product on your network. Previous experience of networking will be of use when using this product. Some knowledge of UNIX or Linux-based systems may also be beneficial, for developing shell scripts and applications. Later versions of this document will be posted to the Axis website, as required.
Europe This symbol means that the product shall not be disposed of together with household or commercial waste. Directive 2012/19/EU on waste electrical and electronic equipment (WEEE) is applicable in the European Union member states. To prevent potential harm to human health and the environment, the product must be disposed of in an approved and environmentally safe recycling process.
AXIS Q1931–E Thermal Network Camera Table of Contents Hardware Overview . . . . . . . . . . . . . . . . . . . . . . . . . . . . . . . . . . . . . . . . . . Connectors and Buttons . . . . . . . . . . . . . . . . . . . . . . . . . . . . . . . . . . . . . . . . . . LED Indicators . . . . . . . . . . . . . . . . . . . . . . . . . . . . . . . . . . . . . . . . . . . . . . . . . . Accessing the Product . . . . . . . . . . . . . . . . . . . . . . . . . . . . . . . . . . . . . . . Access from a Browser . . . . . .
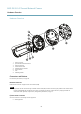
AXIS Q1931–E Thermal Network Camera Hardware Overview Hardware Overview 1 2 3 8 7 4 1 2 3 4 5 6 7 8 5 6 Power connector I/O and audio terminal connector Network connector Status indicator LED MicroSD memory card slot Control button Foot Mounting bracket Connectors and Buttons For technical specifications, see page 53. Network Connector RJ45 Ethernet connector. Supports Power over Ethernet (PoE). NOTICE The product shall be connected using a shielded network cable (STP).
AXIS Q1931–E Thermal Network Camera Hardware Overview • Input/Output (I/O) devices When connecting external equipment, a multi-connector cable (available from Axis) is required in order to maintain the product’s IP rating. For more information, see Multi-Connector Cable (sold separately), on page 47. Power Connector Terminal connector for connecting AC/DC power supply. SD Card Slot A microSD card (not included) can be used for local recording with removable storage.
AXIS Q1931–E Thermal Network Camera Accessing the Product Accessing the Product To install the Axis product, refer to the Installation Guide supplied with the product. The product can be used with most operating systems and browsers. The recommended browsers are Internet Explorer with Windows, Safari with Macintosh and Firefox with other operating systems. See Technical Specifications, on page 53. To view streaming video in Internet Explorer, allow installation of AXIS Media Control (AMC) when prompted.
AXIS Q1931–E Thermal Network Camera Accessing the Product Access from the Internet Once connected, the Axis product is accessible on your local network (LAN). To access the product from the Internet you must configure your network router to allow incoming data traffic to the product. To do this, enable the NAT-traversal feature, which will attempt to automatically configure the router to allow access to the product. This is enabled from Setup > System Options > Network > TCP/IP Advanced.
AXIS Q1931–E Thermal Network Camera Accessing the Product Click the Active/Inactive buttons to manually activate and inactive the product’s output port. For information about how to enable and configure output buttons, see page 23. The Manual Trigger button is used to trigger an action rule from the Live View page. For information about how to configure and enable the button, see Manual Trigger, on page 9 . Click Snapshot to save a snapshot of the video image.
AXIS Q1931–E Thermal Network Camera Accessing the Product Click the View Full Screen button and the video image will fill the entire screen. Press ESC (Escape) on the computer keyboard to cancel full screen view. The Record button is used to record the current video stream. The location where the recording is saved can be specified in the AMC Control Panel. Enable this button from Live View Config > Viewer Settings.
AXIS Q1931–E Thermal Network Camera Media Streams Media Streams The Axis product provides several audio and video stream formats. Your requirements and the properties of your network will determine the type you use. The Live View page in the product provides access to H.264 and Motion JPEG video streams, audio streams and to the list of available stream profiles. Other applications and clients can access video and audio streams directly, without going via the Live View page. How to Stream H.
AXIS Q1931–E Thermal Network Camera Media Streams The AMC Control Panel can be used to configure various video and audio settings. Please see the AXIS Media Control User’s Manual for more information. The AMC Control Panel is automatically installed on first use, after which it can be configured. Open the AMC Control Panel from: • Windows Control Panel (from the Start menu) • Alternatively, right-click the video image in Internet Explorer and click Settings.
AXIS Q1931–E Thermal Network Camera Media Streams Note • = IP addess • The Axis product supports QuickTime 6.5.1 and later. • QuickTime adds latency to the video stream. • It may be possible to use other players to view the H.264 stream using the paths above, although Axis does not guarantee this.
AXIS Q1931–E Thermal Network Camera Setting Up the Product Setting Up the Product The Axis product can be configured by users with administrator or operator rights. To open the product’s Setup pages, click Setup in the top right-hand corner of the Live View page. • Administrators have unrestricted access to all settings. • Operators have access to all settings except System Options See also the online help .
AXIS Q1931–E Thermal Network Camera Video and Audio Video and Audio The video and audio settings can be used to optimize video and audio quality. You can configure the following: • Video stream settings. See page 15. • Stream profiles. See page 17. • Camera settings. See page 17. • Overlay image. See page 17. • Privacy mask. See page 19. • Audio settings. See page 19. • Audio clips. See page 20.
AXIS Q1931–E Thermal Network Camera Video and Audio • Video & Audio > Video Stream. Under Preview, click Open and select the Show pixel counter option to enable the rectangle in the image. Use the mouse to move and resize the rectangle, or enter the number of pixels in the Width and Height fields and click Apply. • The Live View page in Internet Explorer in Windows. Right-click in the image and select Pixel counter. Use the mouse to move and resize the rectangle.
AXIS Q1931–E Thermal Network Camera Video and Audio Stream Profiles A stream profile is a set of predefined stream settings including resolution, compression, frame rate and overlay settings. Stream profiles can be used: • When setting up recording using action rules. See Events, on page 29. • When setting up continuous recording. See Continuous Recording, on page 33. • In the Live View page – select the stream profile from the Stream profile drop-down list.
AXIS Q1931–E Thermal Network Camera Video and Audio 3. To include date and time, select Include date and Include time. 4. To include a text string, select Include text and enter the text in the field. Modifiers can be used, see File Naming & Date/Time Formats in the online help . 5. Define text overlay characteristics in the relevant fields. 6. Click Save. To modify the date and time format, go to System Options > Date & Time. See Date & Time, on page 37.
AXIS Q1931–E Thermal Network Camera Video and Audio 4. From the Actions list, select Overlay Text 5. Enter the text to display in the Text field. This is the text that #D will be replaced by. 6. Specify the Duration. The text can be displayed while the rule is active or for a fixed number of seconds. Example To display the text “Motion detected” when motion is detected, enter #D in the Include text field and enter “Motion detected” in the Text field when setting up the action rule.
AXIS Q1931–E Thermal Network Camera Video and Audio Select Microphone to use an external microphone or Line to use a Line in device, e.g. an audio mixer for multiple microphones or a microphone with a built-in amplifier, as audio source. The Microphone power option provides DC power for an external microphone. Microphone power should only be used with microphones that have no battery. This setting should not be enabled when using a dynamic or battery powered microphone.
AXIS Q1931–E Thermal Network Camera Video and Audio Note Audio clips cannot be used if the product’s audio functionality is enabled. The audio functionality is enabled on the Audio tab under Video & Audio > Video Stream.
AXIS Q1931–E Thermal Network Camera Live View Config Live View Config You can customize the Live View page and alter it to suit your requirements. It is possible to define the following features of the Live View page. • Stream Profile. See page 17. • Default Viewer for Browser. See page 22. • Viewer Settings. See page 23. • Action Buttons. These are the buttons described in Controls on the Live View Page, on page 8 . • User Defined Links. See page 23. • Output Buttons. See page 23.
AXIS Q1931–E Thermal Network Camera Live View Config Browser Viewer Description Windows Internet Explorer AMC Recommended viewer in Internet Explorer (H.264/Motion JPEG). QuickTime H.264. Java applet A slower imaging alternative to AMC (Motion JPEG). Requires one of the following installed on the client: • JVM (J2SE) 1.4.2 or higher. • JRE (J2SE) 5.0 or higher. Still image Displays still images only. Click the Refresh button in your browser to view a new image.
AXIS Q1931–E Thermal Network Camera Live View Config - Active/Inactive displays two buttons, one or each action. To configure the active and inactive states, go to System Options > Ports & Devices > I/O Ports and set the port’s Normal state. For more information about I/O ports, see I/O Ports, on page 44. Note A multi-connector cable (available from Axis) is required when connecting external I/O devices to the Axis product.
AXIS Q1931–E Thermal Network Camera Detectors Detectors Motion Detection Motion detection is used to generate an alarm whenever movement starts or stops in the camera view. Motion detection is configured by defining up to 10 Include and Exclude windows: • Include windows — define areas where motion should be detected • Exclude windows — define areas within an Include window that should be ignored (areas outside Include windows are automatically ignored).
AXIS Q1931–E Thermal Network Camera Detectors To delete an include or exclude window, select the window in the list of windows and click Del. Motion Detection Parameters The parameters controlling motion detection are described in the table below: Parameter Object Size History Sensitivity High level (100%) Only very large objects trigger motion detection. An object that appears in the window triggers motion detection for a long time before it is considered as non-moving.
AXIS Q1931–E Thermal Network Camera Applications Applications Third party applications can be uploaded to and installed on the Axis product. Applications add functionality to the product, for example video analytics and intelligent video capabilities such as recognition, tracking, detection and counting. For information about available applications, downloads, trials and licenses, go to www.axis.com/applications Note • It is recommended to run one application at a time.
AXIS Q1931–E Thermal Network Camera Applications If the Axis product is reset to factory default, installed applications and their settings are removed. For information about factory default, see Reset to Factory Default Settings.
AXIS Q1931–E Thermal Network Camera Events Events The Axis product can be configured to perform actions when different events occur, for example, start a recording when motion is detected. The set of conditions that defines how and when the action is triggered is called an Action Rule. Available action rule triggers and conditions include: • Applications – Use installed applications to trigger the rule. See Applications, on page 27.
AXIS Q1931–E Thermal Network Camera Events Available actions include: • Output Port – Activate an I/O port to control an external device. • Overlay Text – Display an overlay text. SeeUsing Overlay Text in an Action Rule, on page 18. • Play Audio Clip – See Audio Clips, on page 20. • Record Video – Record video to a selected storage. • Send Images – Send images to a recipient. • Send Notifications – Send a notification message to a recipient.
AXIS Q1931–E Thermal Network Camera Events Recipients Recipients receive media files and notification messages. The following recipients are available: Recipient Use with action Email1 Send Images Send Notification Send Video Clip FTP Send Images Send Video Clip HTTP Send Images Send Notification Send Video Clip HTTPS Send Images Send Notification Send Video Clip Network Share2 Send Images Send Video Clip TCP 1. 2.
AXIS Q1931–E Thermal Network Camera Events 2. Enter a Name and select Email from the Type list. 3. Enter the email addresses to send emails to in the To field. Use commas to separate multiple addresses. 4. Select the email provider from the Provider list. 5. Enter the user ID and password for the email account. 6. Click Test to send a test email. To set up an email recipient using for example a corporate email server, follow the instructions above but select User defined as Provider.
AXIS Q1931–E Thermal Network Camera Recordings Recordings The Axis product can be configured to record video continuously or according to an action rule: • To start a continuous recording, see page 33. • To set up action rules, see page 30. • To access recordings, see Recording List, on page 33. • To configure camera controlled storage, see Storage, on page 43. Recording List Recorded videos are listed on the Recordings > List page.
AXIS Q1931–E Thermal Network Camera Languages Languages Multiple languages can be installed in the Axis product. All web pages including the online help will be displayed in the selected language. To switch languages, go to Setup > Languages and first upload the new language file. Browse and locate the file and click the Upload Language button. Select the new language from the list and click Save.
AXIS Q1931–E Thermal Network Camera System Options System Options Security Users User access control is enabled by default and can be configured under System Options > Security > Users. An administrator can set up other users by giving them user names and passwords. It is also possible to allow anonymous viewer login, which means that anybody may access the Live View page.
AXIS Q1931–E Thermal Network Camera System Options 3. Optionally, click Ciphers and select the encryption algorithms to use for SSL. 4. Set the HTTPS Connection Policy for the different user groups. 5. Click Save to enable the settings. To access the Axis product via the desired protocol, enter https:// or http:// in the address field in a browser. The HTTPS port can be changed on the System Options > Network > TCP/IP > Advanced page. IEEE 802.1X IEEE 802.
AXIS Q1931–E Thermal Network Camera System Options 1. Go to Setup > System Options > Security > Certificates. 2. Click Create self-signed certificate and provide the requested information. To create and install a CA-signed certificate: 1. Create a self-signed certificate as described above. 2. Go to Setup > System Options > Security > Certificates. 3. Click Create certificate signing request and provide the requested information. 4. Copy the PEM-formatted request and send to the CA of your choice. 5.
AXIS Q1931–E Thermal Network Camera System Options Network Basic TCP/IP Settings The Axis product supports IP version 4 and IP version 6. Both versions can be enabled simultaneously, and at least one version must always be enabled. IPv4 Address Configuration By default, the Axis product is set to use IPv4 (IP version 4) and to obtain the IP address automatically via DHCP. The IPv4 settings are configured under System Options > Network > TCP/IP > Basic.
AXIS Q1931–E Thermal Network Camera System Options ping -l 408 -t Windows example (this may require that you run the command prompt as an administrator) arp -s 192.168.0.125 00-40-8c-18-10-00 ping -l 408 -t 192.168.0.125 4. Check that the network cable is connected and then restart the product by disconnecting and reconnecting power. 5. Close the command prompt when the product responds with Reply from 192.168.0.125:... or similar. 6.
AXIS Q1931–E Thermal Network Camera System Options Primary/Secondary DNS server - Enter the IP addresses of the primary and secondary DNS servers. The secondary DNS server is optional and will be used if the primary is unavailable. NTP Configuration NTP (Network Time Protocol) is used to synchronize the clock times of devices in a network. The NTP settings are configured under System Options > Network > TCP/IP > Advanced.
AXIS Q1931–E Thermal Network Camera System Options Enable/Disable - When enabled, the Axis product attempts to configure port mapping in a NAT router on your network, using UPnPTM. Note that UPnPTM must be enabled in the product (see System Options > Network > UPnP). Use manually selected NAT router - Select this option to manually select a NAT router and enter the IP address for the router in the field. If no router is specified, the product automatically searches for NAT routers on your network.
AXIS Q1931–E Thermal Network Camera System Options Depending on the level of security required, select the version on SNMP to use. SNMP v1/v2 provides the lowest level of security. The community name can be specified as a password for read or read/write access to all supported SNMP devices. The default password for the Read community is public and the default password for the Write community is write. Note If HTTPS is enabled, SNMP v1 and SNMP v2c should be disabled.
AXIS Q1931–E Thermal Network Camera System Options Storage SD Card The Axis product supports SD cards with up to 64 GB of storage. For best recording performance, use an SDHC or SDXC card with speed class 10. NOTICE To prevent corruption of recordings, the SD card should always be unmounted before it is ejected. The Axis product supports SD cards with the following file systems: • ext4 — recommended due to its resilience against data loss if the card is ejected or if there is abrupt power loss.
AXIS Q1931–E Thermal Network Camera System Options 5. If required, select The share requires login and enter the user name and password. 6. Click Connect. To clear all recordings and data from the Axis product’s folder on the designated share, click Clear under Storage Tools. To avoid filling the share, it is recommended to remove recordings continuously. Under Recording Settings, select Remove recordings older than and select the number of days or weeks.
AXIS Q1931–E Thermal Network Camera System Options Support Support Overview The System Options > Support > Support Overview page provides information on troubleshooting and contact information, should you require technical assistance. See also Troubleshooting, on page 49. System Overview To get an overview of the Axis product’s status and settings, go to System Options > Support > System Overview.
AXIS Q1931–E Thermal Network Camera System Options File Upload Files, for example web pages and images, can be uploaded to the Axis product and used as custom settings. To upload a file, go to System Options > Advanced > File Upload. Uploaded files are accessed through http:///local// where is the selected user group (viewer, operator or administrator) for the uploaded file. Plain Config Plain Config is for advanced users with experience of Axis product configuration.
AXIS Q1931–E Thermal Network Camera Multi-Connector Cable (sold separately) Multi-Connector Cable (sold separately) When connecting external equipment to the Axis product, a multi-connector cable (available from Axis) is required in order to maintain the product’s IP rating. The multi-connector cable can be purchased from your Axis reseller. Connect the multi-connector cable to the product’s multi-connector. To locate the multi-connector, see Hardware Overview, on page 5 .
AXIS Q1931–E Thermal Network Camera Multi-Connector Cable (sold separately) 1 12 V max 50 mA 2 A B Connection diagram A B I/O configured as input I/O configured as output I/O connector 1 2 3 4 48
AXIS Q1931–E Thermal Network Camera Troubleshooting Troubleshooting Checking the Firmware Firmware is software that determines the functionality of network devices. One of your first actions when troubleshooting a problem should be to check the current firmware version. The latest version may contain a correction that fixes your particular problem. The current firmware version in the Axis product is displayed in the page Setup > Basic Setup and in Setup > About.
AXIS Q1931–E Thermal Network Camera Troubleshooting 1. In UNIX/Linux, type the following from the command line: arp -s temp ping -l 408 In Windows, type the following from a command/DOS prompt (this may require that you run the command prompt as an administrator): arp -s ping -l 408 -t 2. If the product does not reply in 30 seconds, restart it and wait for a reply. Press CTRL+C to stop Ping. 3.
AXIS Q1931–E Thermal Network Camera Troubleshooting The IP address has been changed by DHCP IP addresses obtained from a DHCP server are dynamic and may change. If the IP address has been changed, use AXIS IP Utility or AXIS Camera Management to locate the product on the network. Identify the product using its model or serial number, or by the DNS name (if the name has been configured). If required, a static IP address can be assigned manually.
AXIS Q1931–E Thermal Network Camera Troubleshooting The maximum frames per second is dependent on the utility frequency (60/50 Hz) of the Axis product. See Technical Specifications, on page 53. Video and image problems, general Image unsatisfactory Check the video stream and camera settings under Setup > Video & Audio > Video Stream and Setup > Video & Audio > Camera Settings. Motion Detection triggers unexpectedly Changes in luminance Motion detection is based on changes in luminance in the image.
AXIS Q1931–E Thermal Network Camera Technical Specifications Technical Specifications Function/group Item Specifications Camera Models AXIS Q1931–E Image sensor Uncooled Micro bolometer 384x288 pixels, pixel size 17 µm Lens 7 mm: f 1.2 FoV horizontal 55°, Vertical 40° 13 mm: f 1.0 FoV horizontal 28°, Vertical 21° 35 mm: f 1.2 FoV horizontal 10.7°, Vertical 8° 60 mm: f 1.25 FoV horizontal 6.2°, Vertical 4.7° Detection range (1.
AXIS Q1931–E Thermal Network Camera Technical Specifications Function/group Item Specifications Audio Audio streaming Two-way, Full duplex Audio compression AAC LC 8/16 kHz, G.711 PCM 8 kHz, G.726 ADPCM 8 kHz Configurable bit rate Audio input/output External microphone or line input, line output Security Password protection, IP address filtering, HTTPS encryption*, IEEE 802.
AXIS Q1931–E Thermal Network Camera Technical Specifications Function/group Item Specifications Approvals EN 55022 Class B EN 50121-4 EN 55024 EN 61000-6-1 EN 61000-6-2 FCC Part 15 Subpart B Class B ICES-003 Class B VCCI Class B C-tick AS/NZS CISPR22 Class B KCC KN22 Class B, KN24 IEC/EN/UL 60950-1 IEC/EN/UL 60950-22 EN 50581 (RoHS) IEC 60529 IP66 NEMA 250 Type 4X IEC 60068-2-1, IEC 60068-2-2, IEC 60068-2-6, IEC 60068-2-27, IEC 60068-2-78 IEC 60721-3-4 Class 4K3, 4C3, 4S3, 4M4 Weight Q1931-E 7 mm: 2.
AXIS Q1931–E Thermal Network Camera Technical Specifications • Simultaneous viewing of different streams (resolution, compression) by different clients. Effect on frame rate and bandwidth. • Accessing Motion JPEG and H.264 video streams simultaneously. Frame rate and bandwidth affected. • Heavy usage of event settings affect the product’s CPU load. Frame rate affected. • Heavy network utilization due to poor infrastructure. Bandwidth affected.
User Manual AXIS Q1931–E Thermal Network Camera © Axis Communications AB, 2013 Ver. M3.4 Date: November 2013 Part No.