
Installation Guide


AXIS 207/207W/207MW Installation Guide Page 3
ENGLISH
AXIS 207/207W/207MW Network Camera
Installation Guide
This installation guide provides instructions for installing the AXIS 207/207W/207MW on
your network. For all other aspects of using the product, please see the product User’s Manual,
available on the CD included in this package, or from www.axis.com
Installation steps
Follow these steps to install the AXIS 207/207W/207MW on your local network (LAN):
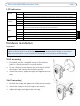
1. Check the package contents against the list below.
2. Make all the necessary connections. See page 6.
3. Set an IP address. See page 6 for information on the available methods.
4. Set the password. See page 10.
5. For wireless models, configure the wireless connection. See page 11.
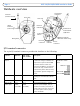
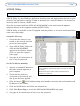
Package contents
Item Description
Axis Network Camera models AXIS 207
AXIS 207W
AXIS 207MW
Power adapter AXIS 207: Type PS-L, country-specific
AXIS 207W/AXIS 207MW: type PS-H, country-specific
Camera stand Supplied with 3 mounting screws. The extension section is ready fitted.
Flexible clamp For shelf mounting
Connector block 4-pin connector block for connecting external devices to the I/O terminal connector
Cable clip Self-adhesive - fixes to back panel for holding power cable
CD Axis Network Video Product CD, including installation tools and other software,
product documentation
Printed Materials AXIS 207/207W/207MW Installation Guide (this document)
Axis Warranty Document