INSTALLATION GUIDE AXIS M1011 STS Network Camera AXIS M1011-W STS Network Camera AXIS M1031-W STS Network Camera
About this Document This document includes instructions for installing the AXIS M1011/M1031 STS on your network. Previous experience of networking will be beneficial when installing the product. Legal Considerations Video and audio surveillance can be prohibited by laws that vary from country to country. Check the laws in your local region before using this product for surveillance purposes. This product includes one (1) H.264 and one (1) MPEG-4 decoder license.
Axis STS Network Camera Installation Guide Page 3 Axis STS Network Camera Installation Guide This installation guide provides instructions for installing your Axis STS Network Camera. The models covered by this guide are: • AXIS M1011 STS • AXIS M1011-W STS • AXIS M1031-W STS For more information on using your camera, please visit your operator’s web portal. Installation steps 1. 2. 3. 4. 5. Check the package contents against the list below. Study the overview for your camera.
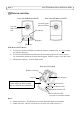
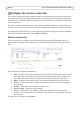
Page 4 Axis STS Network Camera Installation Guide Camera overview Front view AXIS M1031-W STS Front view AXIS M1011/-W STS Lens with Status Indicator LED Lens with Status Indicator LED Microphone Speaker Light PIR Sensor AXIS M1031-W STS Notes: • • • The light (an illuminator LED) has a maximum lifespan of 30000 hours. It is not intended for constant operation. The Passive Infrared (PIR) sensor detects heat from moving objects and can be used to e.g.
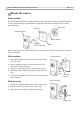
Axis STS Network Camera Installation Guide Page 5 Mount the camera Camera stand The Axis STS Network Camera is shipped with the stand and extension section mounted. Depending on the required installation, disassemble the stand and follow the instructions for wall or shelf mounting below. Base plate Cable tie Network camera Rubber washer Extension section (optional) Stand Make a note of the serial number (S/N) located on the product label. This number may be required during installation.
Page 6 Axis STS Network Camera Installation Guide Connect the cables 1. Connect the camera to your home broadband router, using a shielded network cable - do not connect it directly to your computer. For the wireless models, this connection is temporary and allows the camera’s wireless settings to be configured before connecting to the wireless network. 2. Connect the supplied indoor power supply to the power connector on the camera. 3.
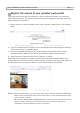
Axis STS Network Camera Installation Guide Page 7 Register the camera at your operator’s web portal If your operator gave you specific instructions on how to register your camera, you should now follow those instructions. The steps and illustrations below are examples only and may differ from those provided by your operator. 1. Open a browser (e.g. Internet Explorer) and visit your operator’s web portal, as in the example below. 2.
Page 8 Axis STS Network Camera Installation Guide Configure the wireless connection For a wireless camera, the wireless settings should be configured while the camera is connected via the network cable. After the settings have been made, the cable can be disconnected. Configuring the camera via an unsecured wireless connection is not recommended, as passphrases and keys will be sent in plain text.
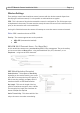
Axis STS Network Camera Installation Guide Page 9 Wireless Settings These settings control how the wireless camera interacts with the wireless network. Apart from identifying the wireless network, it is also possible to enable wireless encryption. SSID - This is the name of the wireless network the camera is configured for. The field accepts up to 32 alphanumeric characters. The name must be exactly the same as that used in the wireless access point, or the connection will not be established.
Page 10 Axis STS Network Camera Installation Guide Key Type - The key types available depend on the access point being used. The following options may be available: • • • Manual - Allows you to manually enter the hex key (10 or 26 characters). ASCII - In this method the string must be exactly 5 characters for 64-bit WEP, or 13 characters for 128-bit WEP. Passphrase - The passphrase can contain up to 31 characters. In 64-bit WEP, the Passphrase generates 4 different keys.
Axis STS Network Camera Installation Guide Page 11 Network LED The Network LED on the camera can indicate the following: • • • Green flash - Connected to the network at 100 Mbps. Orange flash - Connected to the network at 10 Mbps. Red - Cable malfunction. Replace the cable. Wireless LED (wireless models only) The wireless LED can indicate the following: • • • Green flash - Connected to wireless network. Red - No network connection. Unlit - Connected via network cable.
Page 12 Axis STS Network Camera Installation Guide Radio Transmission Regulatory Information & EMC This equipment generates and radiates radio frequency energy, and must be installed and operated while maintaining a minimum body-to-camera distance of 3 feet (1 meter).
Axis STS Network Camera Installation Guide Page 13 Canada - This device complies with RSS-210 of Industry Canada. Operation is subject to the following conditions: (1) This device may not cause interference, and (2) this device must accept any interference, including interference that may cause undesired operation of the device. Europe - EU Declaration of Conformity.
Axis STS Network Camera Installation Guide, v1.0 November 2008 Copyright © Axis Communications AB, 2008 Part No.