
User's Manual


Axis STS Network Camera Installation Guide Page 5
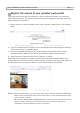
Mount the camera
Camera stand
The Axis STS Network Camera is shipped with the stand and extension section mounted. Depending
on the required installation, disassemble the stand and follow the instructions for wall or shelf
mounting below.
Make a note of the serial number (S/N) located on the product label. This number may be required
during installation.
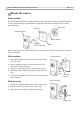
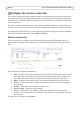
Wall mounting
1. Unscrew the extension section to release the base plate
from the stand.
2. Use the supplied screws to fix the base plate to a flat
(horizontal or vertical) surface.
3. Attach the stand and optionally the extension section.
4. Attach the camera, adjust the angle and tighten the lock
ring.
5. The stand is equipped with a cable tie to secure the cables
once connected.
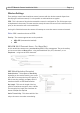
Shelf mounting
1. Position the clamp and tighten the fixing screw securely.
2. Attach the lock ring on the camera to the clamp.
3. Adjust the camera angle and tighten the lock ring.
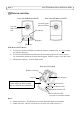
Cable tie
Base plate
Rubber washer
Stand
Extension
section (optional)
Network camera
Lock
ring
Extension
section
Stand
Wall mounting
Shelf mounting
Clamp
Lock
ring
Fixing screw