User’s Guide ENGLISH AXIS Q8108-R Network Video Recorder
About this Document This document includes instructions for installing the AXIS Q8108-R Network Video Recorder. and fitness for a particular purpose. Axis Communications AB shall not be liable nor responsible for incidental or consequential damages in connection with the furnishing, performance or use of this material. Legal Considerations Video and audio surveillance can be prohibited by laws that vary from country to country.
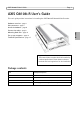
AXIS Q8108-R User’s Guide Page 3 AXIS Q8108-R User’s Guide This user’s guide provides instructions for installing the AXIS Q8108-R Network Video Recorder. ENGLISH Hardware overview - page 4 Unit connectors - page 5 Install the hardware - page 8 Connect the cables - page 9 Mounting Hard Disk - page 10 Set up your computer - page 12 Technical Specifications - page 15 Important! The network video recorder should be installed by a trained professional.
Page 4 AXIS Q8108-R User’s Guide Hardware overview Back cover Front panel Cable shelf Screws to clamp cables 80 mm (3.1”) 294 mm (11.6”) 86 mm (3.4”) 178 mm (7”) 193.6 mm (7.6”) 211mm (8.3”) 17,5 mm (0.7”) 80 mm (3.1”) 80 mm (3.1”) 275 mm (10.
AXIS Q8108-R User’s Guide Page 5 Back SATA power cable adapter Hard disk bracket Internal power button Power LED indicators 1 Gbit network port Network LED indicators I/O connector Power connector 8 x PoE network connectors 2 USB 2.
Page 6 AXIS Q8108-R User’s Guide Unit connectors 8 PoE network connectors - RJ-45 Ethernet connectors. Provides power to up to 8 network cameras that are PoE enabled Class 1. The PoE ports are divided into a left and right group of four. A maximum load of 16W is allowed per group. For example, a PoE class 0 can be connected in the left group and up to 4 PoE class 1 can be connected in the right group. If a PoE class 0 is connected, the other ports in the group must not be used.
AXIS Q8108-R User’s Guide Page 7 Pin assignment - I/O connector Function Notes Specifications Open collector NPN transistor with the emitter connected to ground when activated. Outputs are reserved for developer use.
Page 8 AXIS Q8108-R User’s Guide Install the hardware Before you begin There are a few considerations before installing the AXIS Q8108-R. • The AXIS Q8108-R casing is designed to mount directly on any surface using a minimum of 4 screws appropriate for the surface type • The operating temperature range is dependent on the Hard Disk • Install in an open area allowing for 10mm of space on all sides for cooling and ventilation • Ensure there is proper fuse protection: 12V DC (10A) or 24V DC (5 A) 1.
AXIS Q8108-R User’s Guide Page 9 Connect the cables 8 x PoE network connectors 1 Gbit network port I/O connector Power connector 1. Install up to 8 Axis network cameras according to their Installation Guides. 2. Connect cameras to AXIS 8108-R via RJ-45 PoE connectors, which will provide both power and network connection to each camera. 3. Optionally connect external input/output devices. 4. Connect the supplied power cable to the power block. ENGLISH 2 USB 2.
Page 10 AXIS Q8108-R User’s Guide Mounting Hard Disk AXIS Q8108-R supports the use of up to 2 separate hard disk. Follow these instructions and consult manufacturer’s recommendations to mount or change hard disk. 1. Remove the back cover. 2. Power off the AXIS Q8108-R, see Start up and shut down, on page 11 and LED indicators, on page 7. 3. Insert hard disks into adapter kit. It’s possible to use one 3.5” or up to two 2.5” hard disks. 4. Insert adapter kit with hard disks into the bracket in the lid. 5.
AXIS Q8108-R User’s Guide Page 11 Start up and shut down The AXIS Q8108-R starts up automatically when power is supplied. See AXIS NVR Manager, on page 13 for more options. The AXIS Q8108-R automatically does a controlled shut down after one minute when the power is shut off. Internal power button Internal power button The internal power button is also used for resetting the NVR to factory default settings, see Resetting to the factor default settings.
Page 12 AXIS Q8108-R User’s Guide Set up your computer This section will help you install AXIS NVR Manager and AXIS Camera Station Client and configure it for your Axis NVRs and Axis Network Cameras. A brief introduction to the functionality of the software is covered here. For more information see the context sensitive help files or, for AXIS Camera Station see the User’s Manual available at www.axis.com AXIS NVR Manager is for discovery, configuration and firmware upgrade of AXIS Q8108-R. Go to www.
AXIS Q8108-R User’s Guide Page 13 AXIS NVR Manager 1. Connect to the NVR directly via a network cable or through the network and make sure that power has been applied. 2. Start AXIS NVR Manager. 3. AXIS NVR Manager will automatically discover all NVRs that are in the same network. Note that the NVR startup takes more than a minute and must be completed before it can be discovered. ENGLISH Set the password The default user name is “Administrator” and password is “password”.
Page 14 AXIS Q8108-R User’s Guide AXIS Camera Station AXIS Camera Station Client is for monitoring, recording, playback and event management. Connect AXIS Camera Station Client From AXIS NVR Manager select an NVR device and click the Launch AXIS Camera Station Client icon or start AXIS Camera Station Client from your computer and use the NVR’s network address in the logon dialog.
AXIS Q8108-R User’s Guide Page 15 Technical Specifications Function/ group System Software General Specification Model AXIS Q8108-R Processor 1.1GHz Intel Atom Z5 series CPU RAM 1GB SODIMM DDR2 System disk Compact Flash PATA drive 4GB Operating system Windows Embedded Standard 2009 Battery backup Controlled shutdown 1 minute after power loss Security Password protection, user access log NTP NTP server included Video Management Software AXIS Camera Station, 8-channel license included.
Page 16 Function/ group AXIS Q8108-R User’s Guide Item Specification Approvals EU directive 2002/96/EC, MIL STD-810F Method 516.5 Procedure I, MIL STD-810F method 514.5, EN 55022, EN 55024, EN 61000-4-2, ISO 11452-2, EN 61000-4-3, ISO 11452-2, EN 61000-4-4, EN 610004-5, EN 61000-4-11, ISO 7637-2, EN50121-3-2, FCC part 15 subpart B class B Project customization WLAN 802.
User’s Guide AXIS Q8108-R © Axis Communications AB, 2010 Ver.1.0 Printed: August 2010 Part No.