
Installation guide


Page 4 AXIS 231D+/232D+ Installation Guide
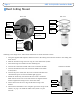
Hard Ceiling Mount
Referring to the image above, follow these instructions to mount the dome camera:
1. Using the supplied drill template, drill three holes in the ceiling and secure the bracket to the ceiling with
three screws.
2. Slide the decoration ring and cover ring on to the AXIS 231D+/232D+.
3. Insert the fixing screw holder into the mounting slot.
4. Connect the connection module cable to the connection module.
5. Connect the Ethernet cable and connection module to the AXIS
231D+/232D+.
6. Connect the power cable (24V AC) to the connection module and
check that the power and network LEDs light up green.
7. Mount the dome body onto the bracket and rotate it clockwise.
Make sure the screw hole on the side of dome is aligned with the
bracket. Tighten the fixing screw to secure the dome.
8. Attach and secure the cover ring and decoration ring to the
bracket.
9. The hardware installation is now complete, proceed to Assign an IP
address, on page 7 to install the AXIS 231D+/232D+ on your
network.
module
Network
Connection
connector
Network
Indicator
Power
Indicator
fixing screw
Mounting slot for
Control
button
connector
Serial number
S/N
Side view
Decoration
ring
Ceiling
bracket
Cover ring
Rear view
24V AC
PS GND
Connection module cable connector
Connection module