
Instruction manual


AXIS 2400+/2401+ Admin Manual Configuring the Video Server
21
Preset Positions
To enable quick and accurate camera PTZ positioning to known camera hotspots, the
Administrator can control and record any camera orientation as a named entity - creating
up to twenty Preset Positions that can be used at any time.
Defining Preset Positions
The camera orientation for the selected video source is controlled by Pan Tilt and Zoom
control bars. Follow the instructions below to define a preset position:
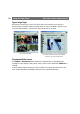
1. Click the Preset Position button. An image from the selected source (at its current
position) is displayed in a new window.
2. By clicking in the image or by using the Pan Tilt and Zoom control bars, move the
camera to the desired position.
3. Enter a descriptive name in the Current Position field.
4. Click Save to register the new preset position with the AXIS 2400+/2401+ and then
check that the new name is included in the Preset Positions drop-down list. You can
alternatively choose to save the position as a new Home position. Setting Home
positions for several video sources (AXIS 2400+ only) will cause these to be named as
Home1, Home2, etc.
5. Click Remove to remove this or any other preset position in the list.
Established preset positions are selected from the Preset Positions drop-down list in the
application viewing environment, or when viewing a specific video source.
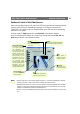
Serial Port Settings
The AXIS 2400+/2401+ is supplied with two internal serial ports that are managed directly
from the user interface:
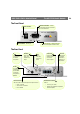
• Serial Port 1- Typically used for controlling PTZ devices, this port can be logically connected to
the RS-232 COM 1 port or the RS-485/422 port on the Terminal Block Connector, and is
configurable as either an RS-232 or RS-485/422 port.
Click the COM1 icon in the graphic interface to determine the Purpose, Interface Mode and
Communication Settings for the port.
• Serial Port 2 - logically connected to COM2, this port is used for connecting a PTZ device, a
modem, or the AXIS 2191 Audio Module. Click the COM2 icon in the graphic interface to set
the Purpose and Communication Settings for the port.