
Instruction manual

AXIS 2400+/2401+ Admin Manual The AXIS 2191 Audio Module
31
Configuring the Audio Module
The video server’s administration pages provide all the tools required for successfully configuring
the AXIS 2191. From the server’s home page, click on the link to Administration Tools and then
follow this procedure:
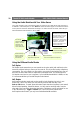
1. In the Admin tools, click on the icon for COM2. Select the AXIS 2191 Audio Module as
the Purpose for this port. Click Save.
Note: If the AXIS 2191 is not available for selection, the video server does not have the correct firm-
ware for running this device and must be upgraded. See Updating the Firmware, on page 41.
2. You should now see the icon for the
AXIS 2191 Audio Module under the icon for COM2.
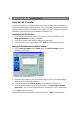
Click this icon to open the Audio Settings page.
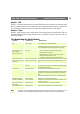
3. Select the Audio Mode. This can be:
• Full-Duplex (Talk and Listen Simultaneously)
• Half-Duplex (Talk and Listen)
• Simplex - Talk
• Simplex - Listen
This selection will depend on your
application. See page 32 for more
information.
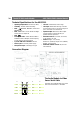
4. Enter the maximum number of clients that
will be able to access the application at any
one time. Use this setting to limit access if
you only have limited bandwidth available.
5. If you are using Half-Duplex mode, the Send
option can be used to send audio from the
client currently transmitting to all the other
clients, and not just to the server end. Set to
Yes to enable the function.
6. When using Half-Duplex, the Push-To-Talk
button will be visible. Select the mode to use
for this button. Selecting Toggle means that
when the button is pushed it will remain so
until pushed again. Instant means that the
button will remain active (pushed) until
released.
7. Adjust the Volume Out control until a
satisfactory speaker level is heard. The Level Out LED can be used to check that there is audio
being received. Note that both the control and the LED are on the audio module itself.
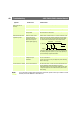
The configuration page for the AXIS 2191.